Vein Systems
This topic describes creating a vein system for a geological model. The topic is divided into:
- Creating a Vein System
- Adding Veins to the Vein System
- Refining the Veins
- Setting Vein Interactions
- Changing Output Volume Settings
A model of a sedimentary system cross-cut by vertical intersecting dykes could model the veins as individual veins, and represent each vein in the model as a separate lithology, as shown here:
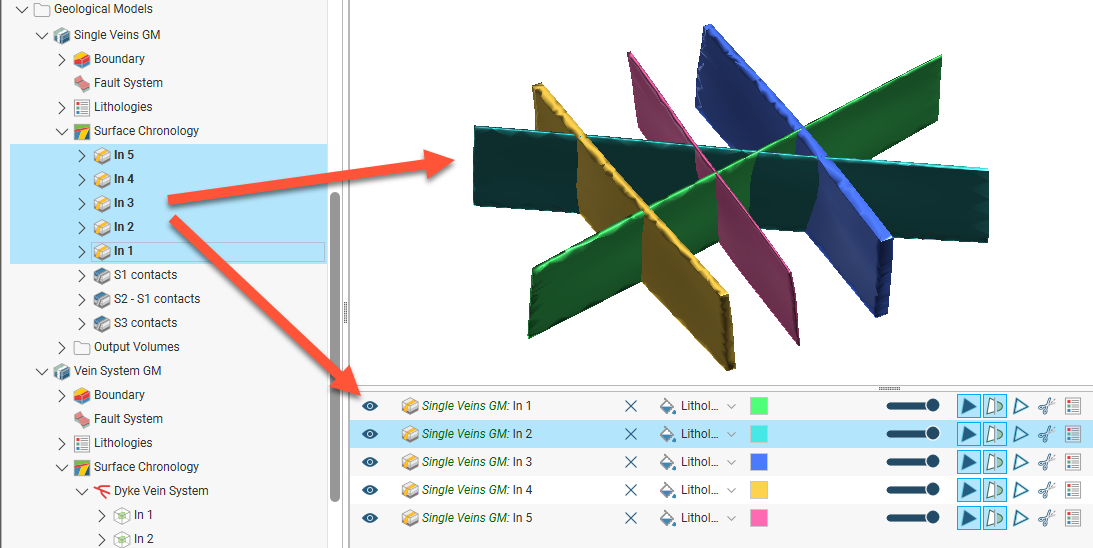
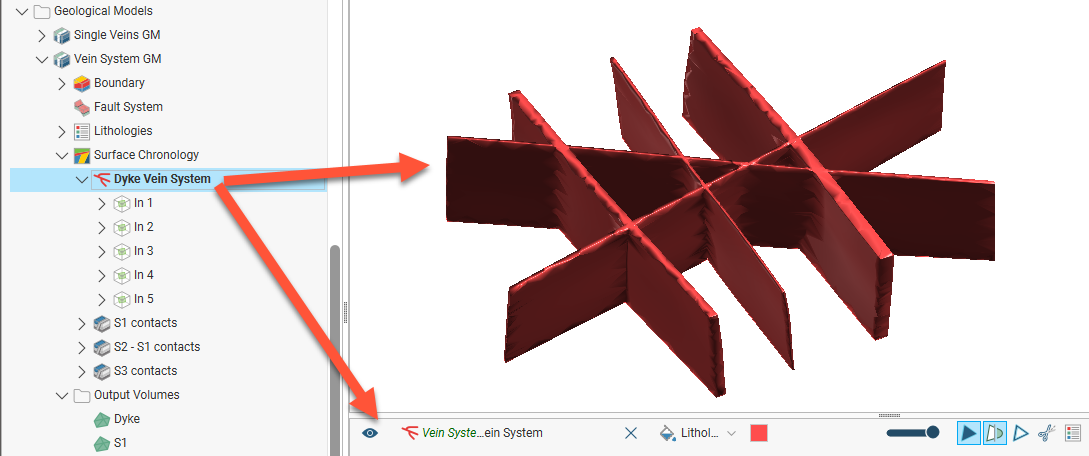
An alternative is to create a vein system. Using a vein system provides additional benefits in being able to treat the veins individually as well as a whole collection with associated relationships. In a vein system, veins are grouped into a vein system object (![]() ) that defines the vein structures as a unified object:
) that defines the vein structures as a unified object:
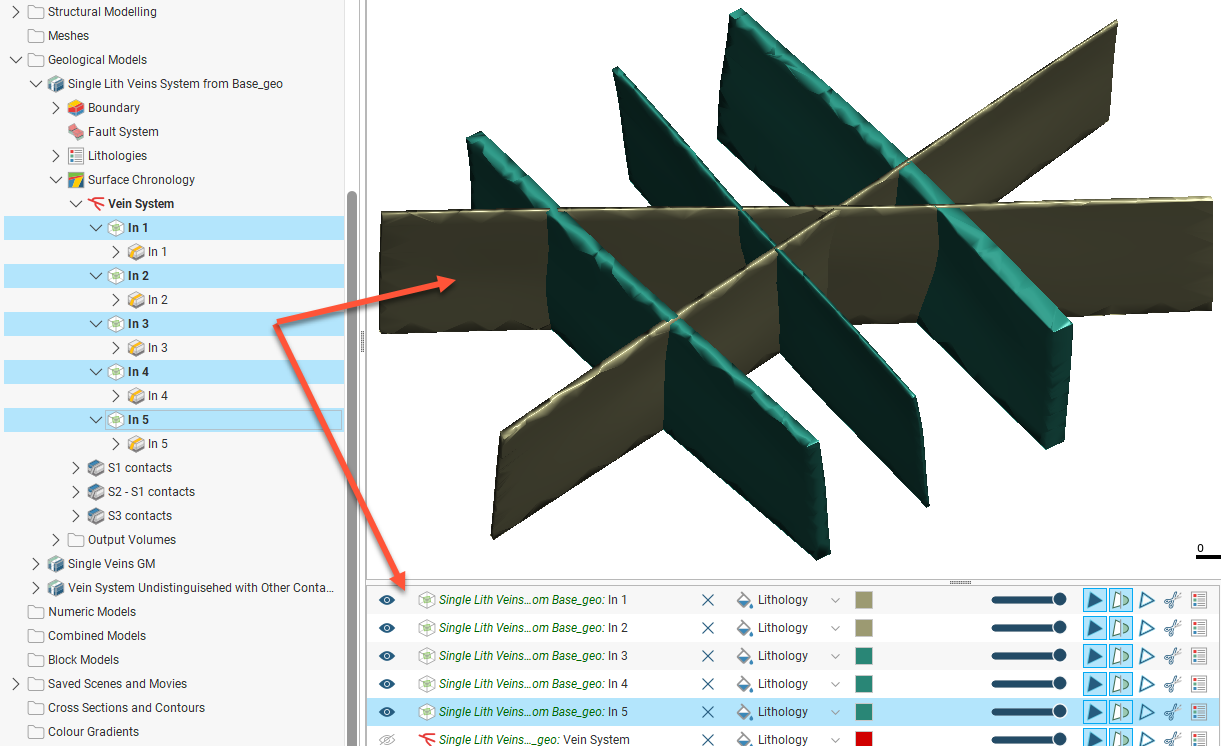
This does not restrict or limit the model to a single lithology representation. Each of the veins can be coded for different lithologies. As a result, the model could be used to depict two different geological processes responsible for the vein formation:
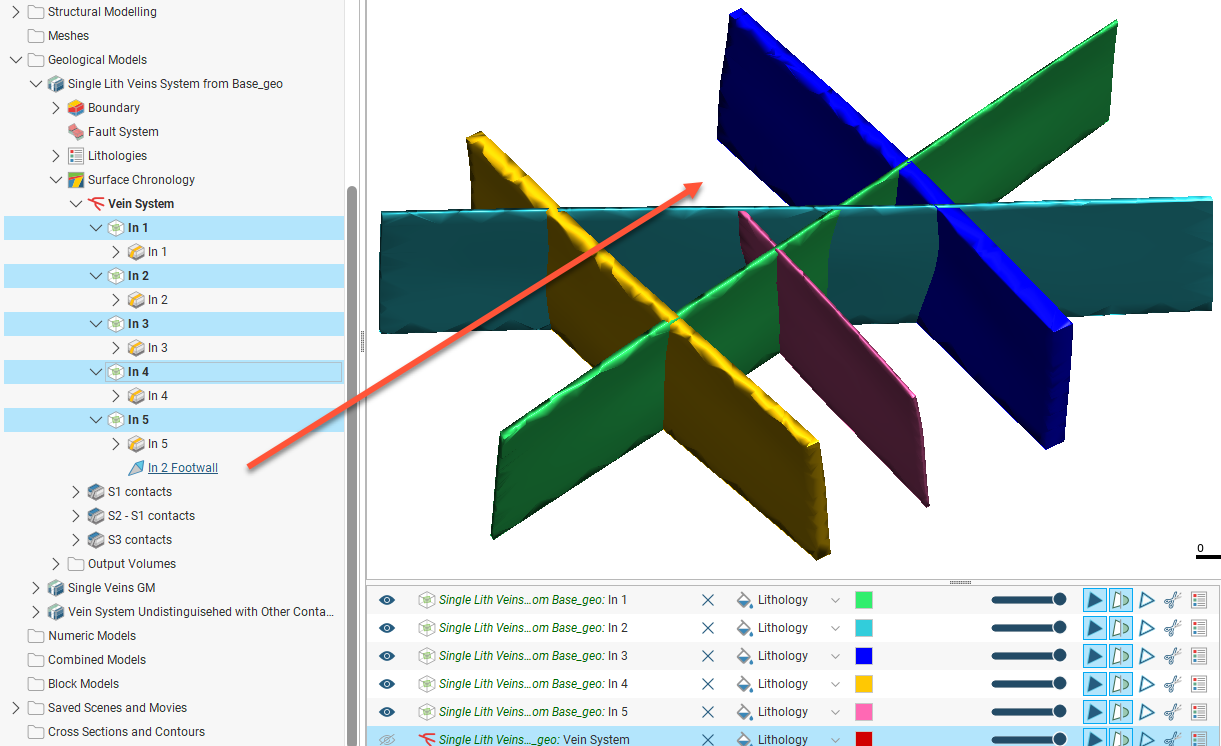
Or, just as in the case with each vein being modelled as a separate vein, each vein could be coded uniquely. An advantage of using the vein system is that relationships between the veins documenting their interaction can be modelled, as in the case of the pink vein terminating against the footwall of another vein:
Individual veins are defined inside the vein system (![]() ) and are linked to the vein system via a “terminated vein” (
) and are linked to the vein system via a “terminated vein” (![]() ) that takes into account the vein’s relationship to other veins in the vein system. Expanding a terminated vein shows the “vein surface” (
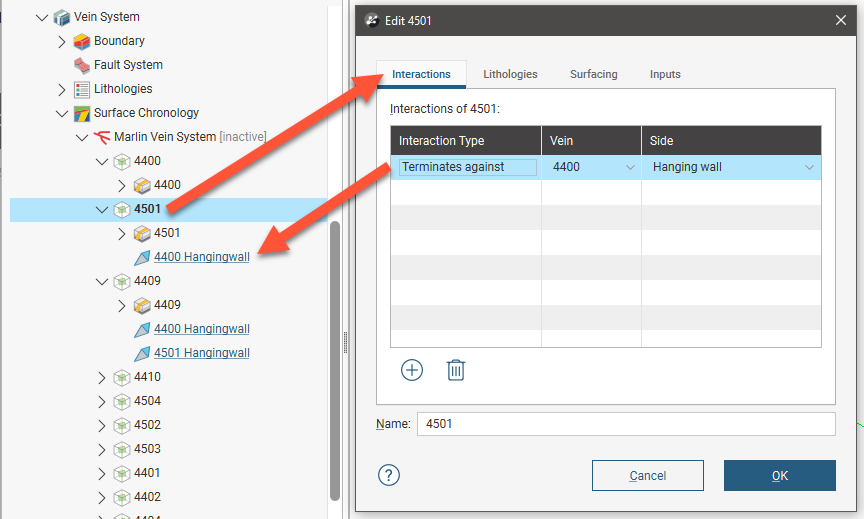
) that takes into account the vein’s relationship to other veins in the vein system. Expanding a terminated vein shows the “vein surface” (![]() ) and any interactions with other veins in the vein system. Here vein 4501 interacts with vein 4400 on its hangingwall side, and so vein 4400’s hangingwall side is hyperlinked to vein 4501.
) and any interactions with other veins in the vein system. Here vein 4501 interacts with vein 4400 on its hangingwall side, and so vein 4400’s hangingwall side is hyperlinked to vein 4501.
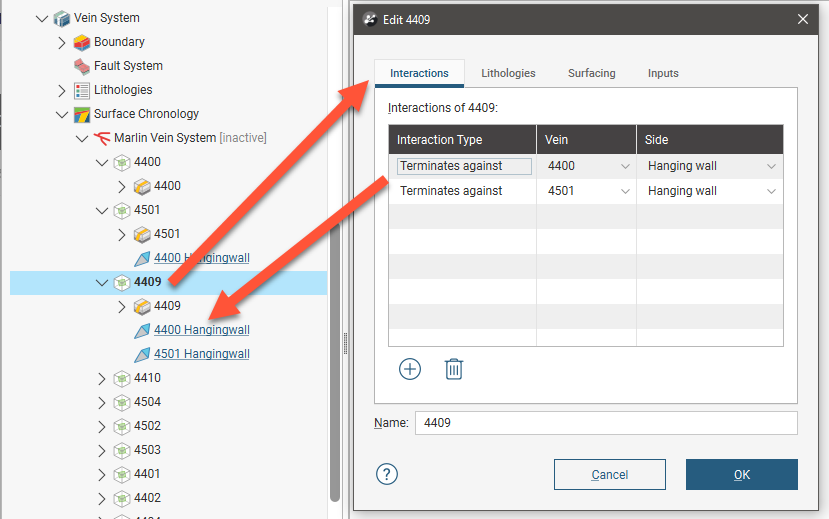
Vein 4409 interacts with two other veins, 4400 and 4501, and so contains hyperlinks to those veins:
You can use a vein system to generate a single output vein lithology or separate output volumes for each vein in the vein system, as described in Changing Output Volume Settings.
Creating a Vein System
To create a vein system, right-click on the Surface Chronology and select New Vein System. In the window that appears, select the Vein lithology:

The lithology code selected for the Vein lithology will be from those available in the geological model's Lithologies. It will be used to represent the collective lithology of the entire vein system. Individual veins added to the system will later have their own lithology specified, so select a lithology code that appropriately represents the whole system. If no suitable code exists, one can be added to Lithologies manually, as described in Model Lithologies.
If the vein system contacts only one lithology, set the Outside lithology. Otherwise, leave Outside lithology set to Unknown.
Click OK. An empty vein system (![]() ) will be added to the project tree under the Surface Chronology.
) will be added to the project tree under the Surface Chronology.
Next, add veins to the new vein system as described in Adding Veins to the Vein System.
Double-click the vein system in the project tree to open the Edit Vein System window. In this window, you can:
- Change the lithologies assigned to the vein system
- Change how output volumes are generated. See Changing Output Volume Settings.
- Define vein system interactions. See Setting Vein Interactions.
Adding Veins to the Vein System
To add veins to a vein system, right-click on the vein system and select one of the New Vein options. These are the same options used to add a new vein directly to a Surface Chronology, and are more fully described in New Vein From Base Lithology, New Vein From Other Contacts and Veins From Other Data.
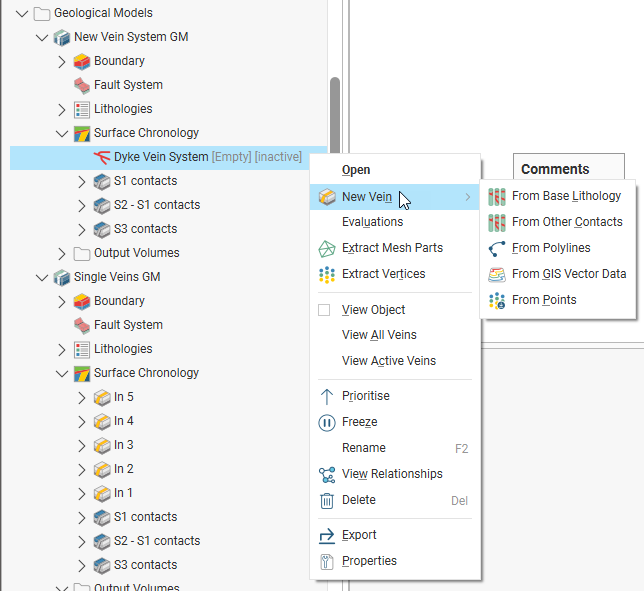
Veins will appear in the project tree as part of the vein system object and can be expanded to show how they were created.
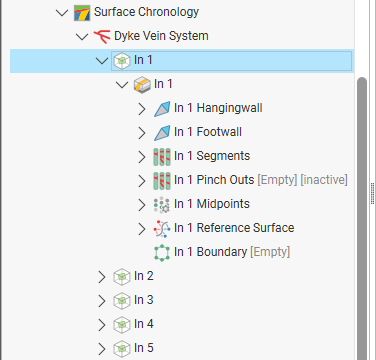
Refining the Veins
The techniques for refining veins that are part of vein systems are the same as those for individual veins added to the Surface Chronology. Expand each terminated vein inside the vein system in the project tree to work with each part of the vein:
For more detail on refining veins, see the following subtopics in the Veins topic:
- Vein Surface Settings
- Pinch Outs
- Vein Segment Settings
- Editing Vein Segment Orientations
- Editing Vein Midpoints
- Editing the Reference Surface
- Editing the Vein Boundary
- Exporting and Importing Pinchout, Segment and Midpoint Edits
Setting Vein Interactions
Once all the veins required have been created, you can start defining the interactions between them by double-clicking on the vein system (![]() ), then clicking on the Vein System tab:
), then clicking on the Vein System tab:
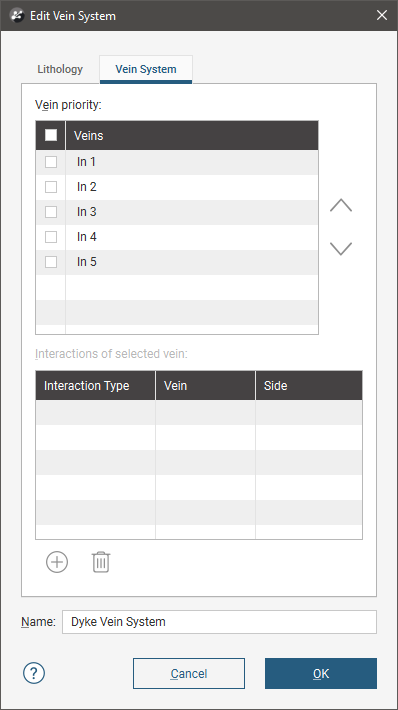
The veins appear in the list from highest priority to lowest. Organise the veins in chronological order before defining interactions.
The Vein priority determines which veins other veins can interact with. You cannot define an interaction for the highest priority vein in the list, and other veins in the list can interact only with those of higher priority.
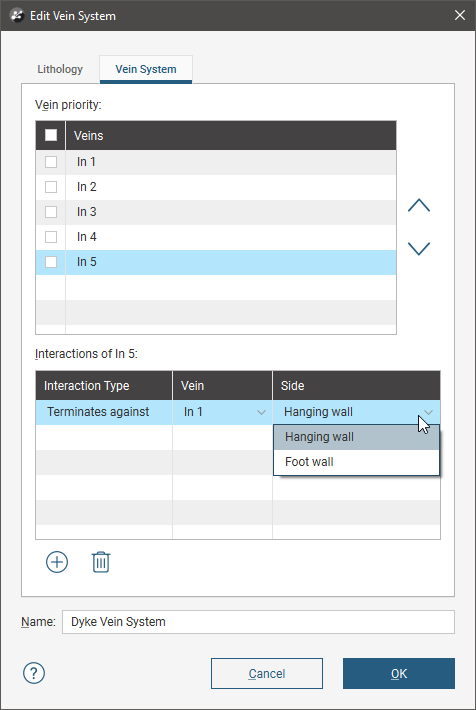
Here, In 2 can only interact with In 1, the higher priority vein:

The lowest priority vein, In 5, can interact with all the other veins in the system:

To define an interaction, click on a vein, then click the Add button. Add an interaction for each vein and then set the Side on which they interact.
Once you have defined the required vein interactions, tick the box for each vein, then click OK. Once the Vein System object has been processed, add it to the scene to check that the veins interact correctly.
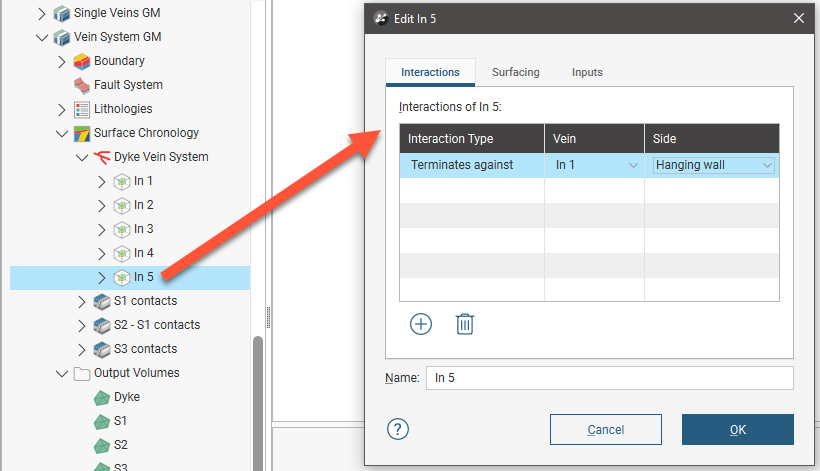
You can also edit vein interactions by double-clicking on the individual veins, which opens the vein’s Edit window:
Veins and the vein system are not active in the geological model until the box is ticked for each vein in the Edit Vein System window and the vein system is enabled in the Surface Chronology. This means you can check the vein system without regenerating the geological model.
Changing Output Volume Settings
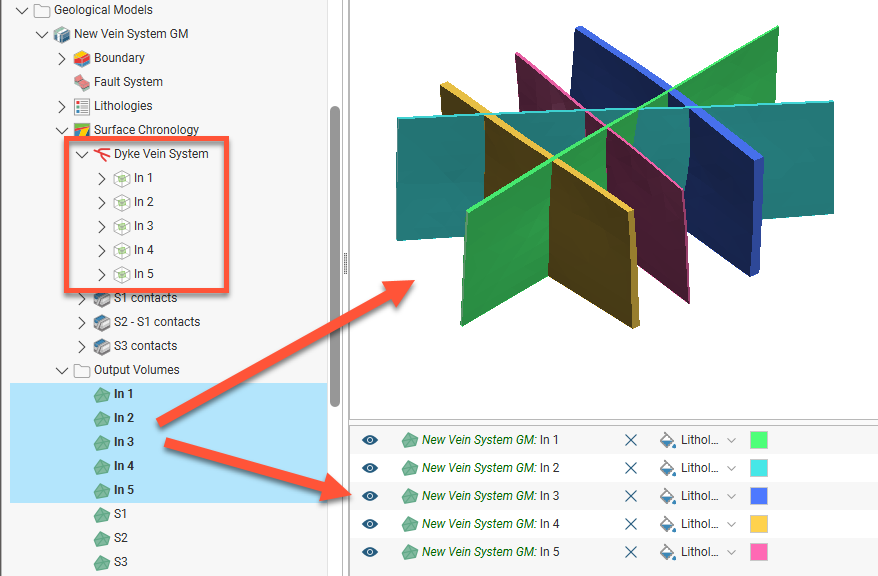
When a vein system is enabled in the geological model, the default setting is that it will produce a single output volume in the geological model that is assigned the Vein lithology set for the system. For example, here enabling the vein system results in a single “Dyke” output volume:

You can also choose to have separate output volumes for each vein in the vein system. In this example, each vein defined for the vein system results in an output volume:
To switch between a single vein system output volume and separate vein output volumes, double-click on the vein system in the project tree. In the Lithology tab, change the Generate single vein system volume setting:
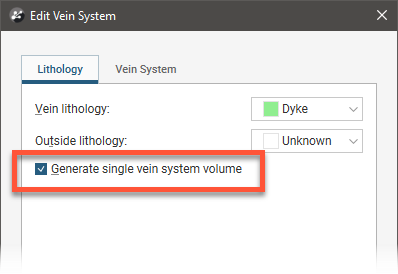
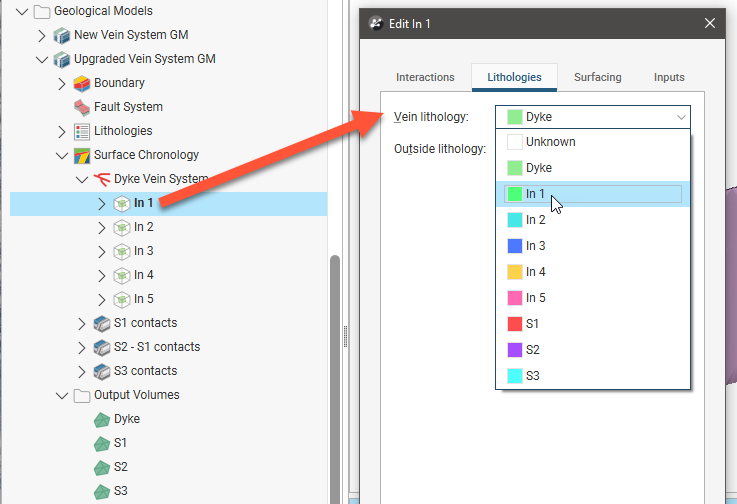
If disabling this setting does not result in vein output volumes with different lithologies, double-click on each vein that has been defined for the vein system and ensure its Vein lithology in the Lithologies tab is coded appropriately for the modelling intent.
The Generate single vein system volume setting was introduced in Leapfrog Geo 2021.2. When geological models created in earlier versions are upgraded in 2021.2, this setting will automatically be enabled so that upgrading the model does not result in changes to the model. If you wish to generate separate output volumes:
1. Double-click on the vein system and disable the Generate single vein system volume option.
2. Double-click on each vein in the vein system and change its Vein lithology from the vein system’s lithology to the desired lithology.
Got a question? Visit the Seequent forums or Seequent support
© 2022 Bentley Systems, Incorporated