
Importing Block Models
You can import the following types of block models into Leapfrog Geo:
- Regular block models
- Octree sub-blocked models
- Fully sub-blocked models
The formats supported depend on the type of block model you are importing.
- Surpac *.mdl format:
- Regular block models
- Octree sub-blocked models
- CSV + Text Header (*.csv, *.csv.txt) and CSV with Embedded Header (*.csv) formats:
- Regular block models
- Octree sub-blocked models
- Fully sub-blocked models
Variable Z sub-blocked models cannot be imported into Leapfrog Geo projects.
Regardless of the file and model type, start importing by right-clicking on the Block Models folder and selecting Import Block Model.

In the window that appears, select the file you wish to import, then click Open. Leapfrog Geo will open the file and step you through the import wizard, which is different for Surpac and CSV files. See:
Importing Surpac *.mdl Block Model Files
If you are importing a regular block model or an octree sub-blocked model from a Surpac *.mdl file, the following Import Block Model window will appear:
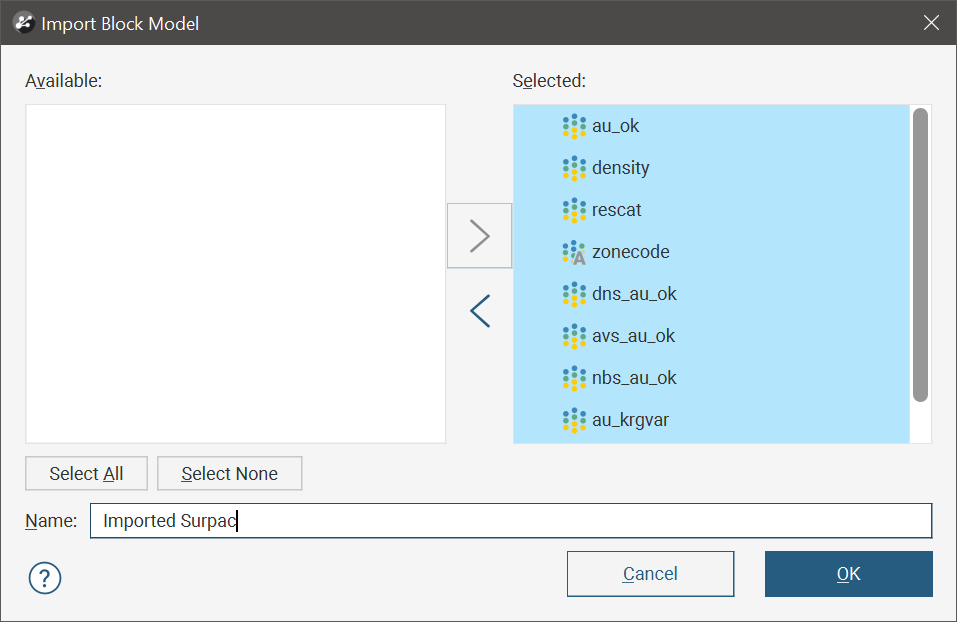
By default all data columns will be in the Selected list, but you can choose to move some out to the Available list if you do not wish to import them. Click OK and the *.mdl file will be imported.
Importing CSV Block Model Files
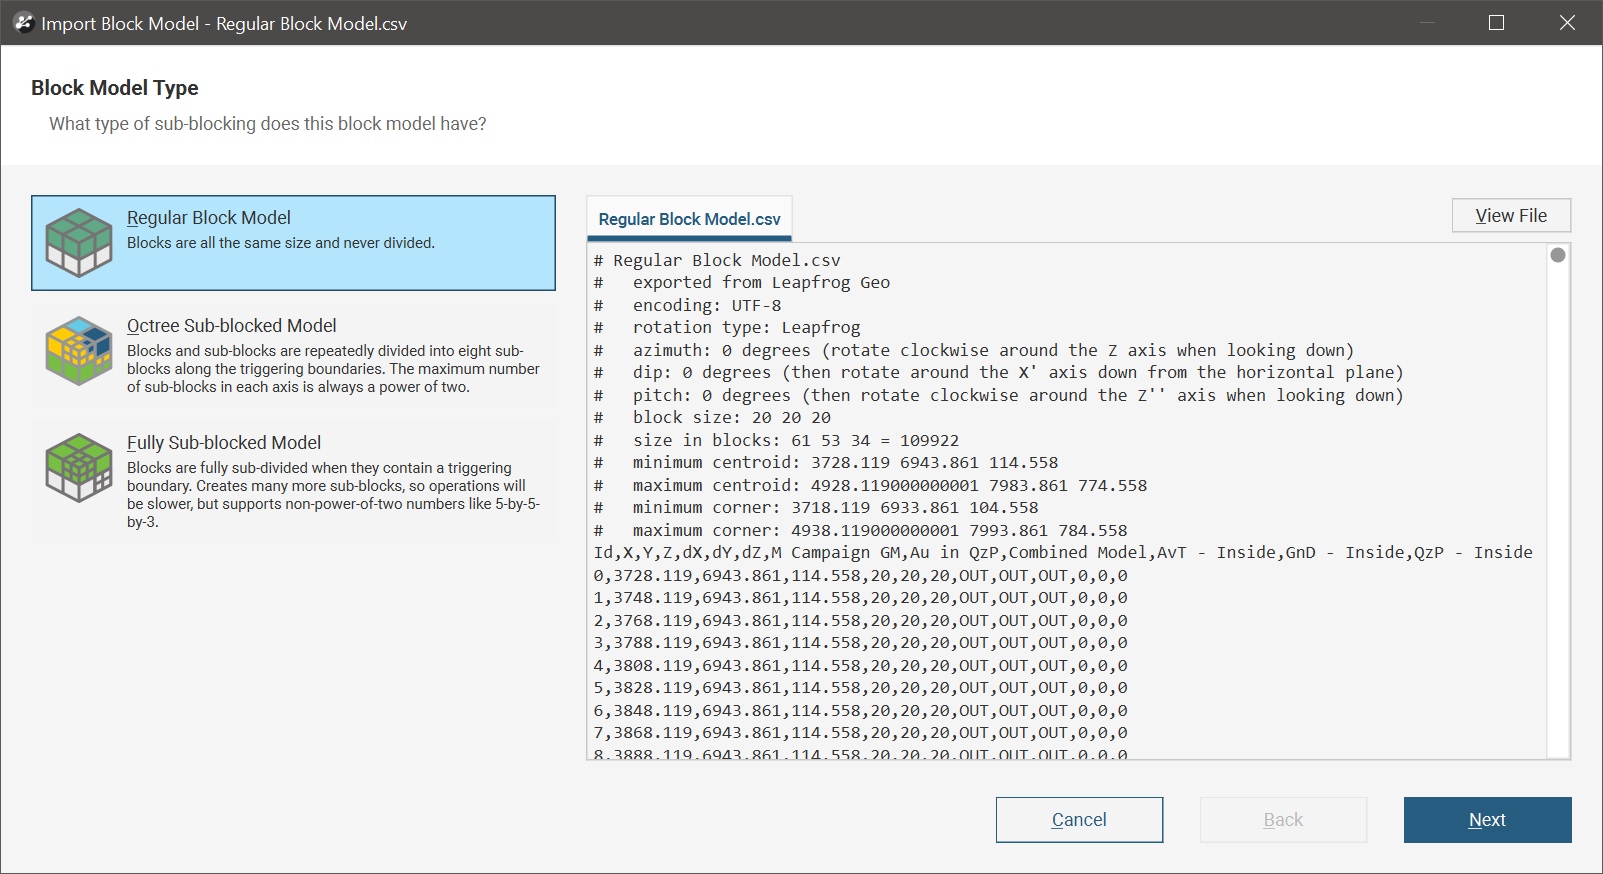
Leapfrog Geo can import CSV block models with regularly sized blocks or with sub-blocks that conform to multiples of a defined minimum cell size. This includes block models produced by Leapfrog, as well as by other mining GMPs (e.g. Surpac, Datamine, Vulcan, Minesight). If you are importing a block model in CSV format, the Import Block Model window will prompt you to select the type of block model you are importing:
Sub-blocked models that have merged cells can be imported into Leapfrog Geo. The merged cells will be expanded into the component sub-block cells. When subsequently exported, the model will be exported with the expanded component sub-block cells, without merging them back together.
If Leapfrog Geo is able to detect what sort of block model was stored in the file, that option will automatically be selected.
This window also includes a preview of the file to aid in selecting the type of block model.
Once you have selected the model type, there are two steps to finishing the import:
Selecting Attributes
After selecting the block model type and clicking Next, you will be presented with a window to Select Attributes to import. Here you can make sure all the columns you want to import are selected and have appropriate Column type and Import Name settings.

Click Next when you have completed selecting the attributes to import from the file.
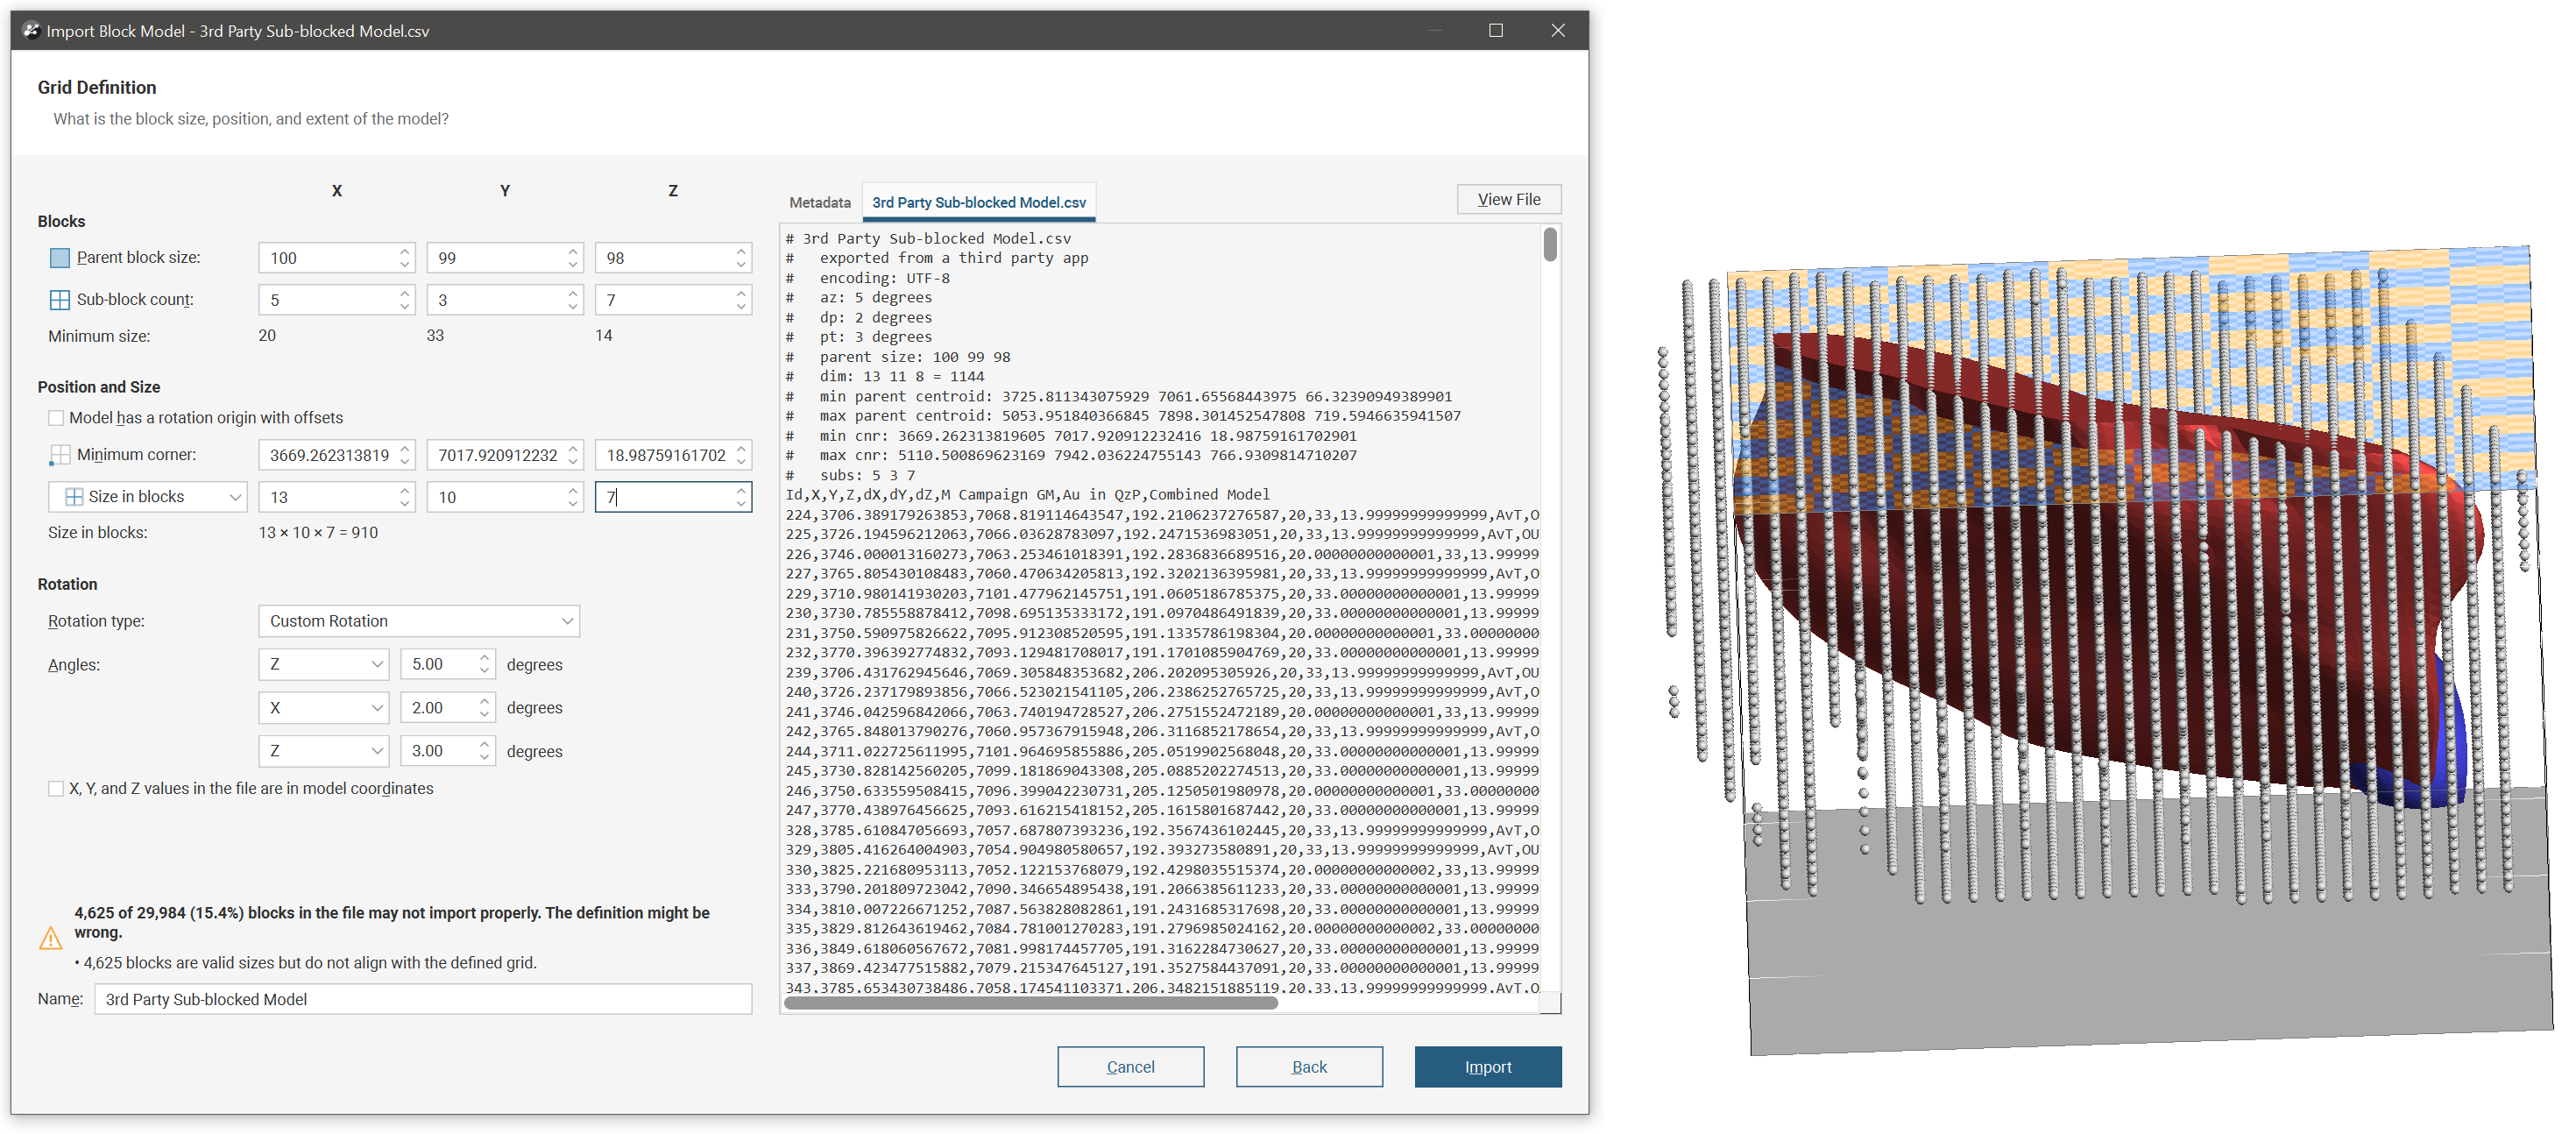
Defining the Grid
The Grid Definition fields for an imported block model cannot be modified once the block model has been imported.
In the Grid Definition window, data from the CSV will be used to define the model’s block size, position and extents.
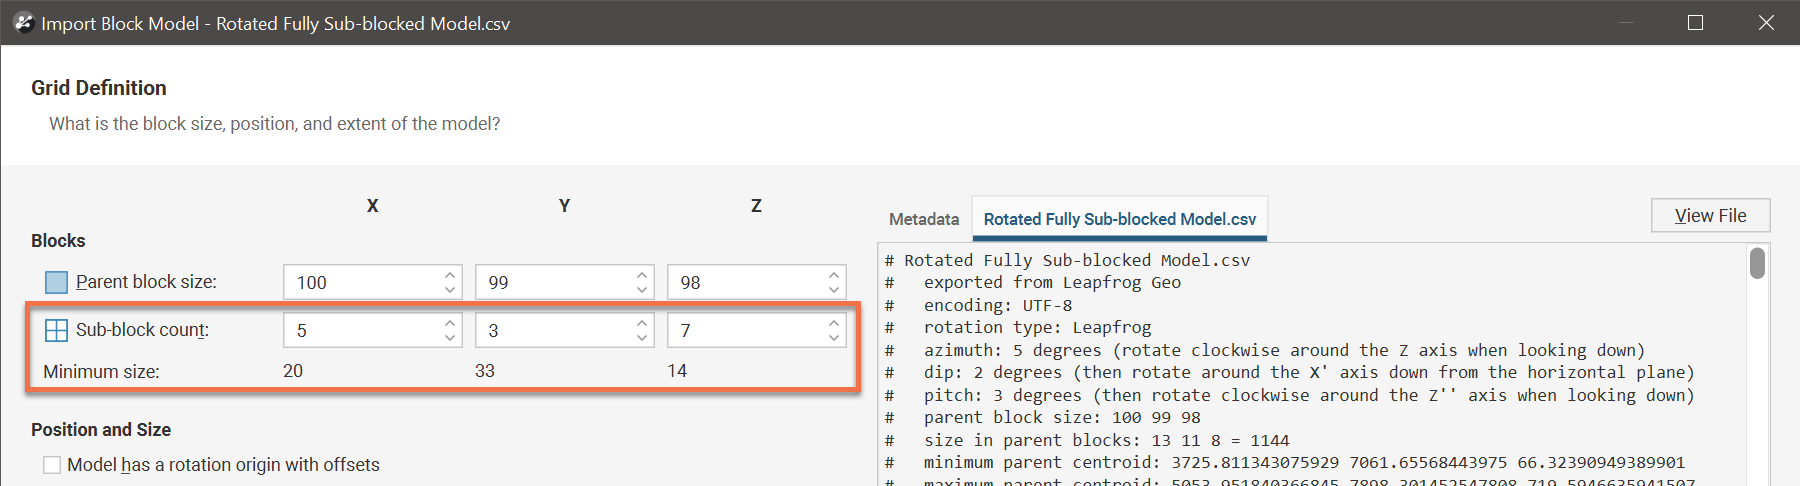
For sub-blocked models, the Blocks section has some additional details relating to sub-blocking:
The source data is displayed on the right to help you in setting these properties.
The Metadata tab on the right side of the screen will contain additional information extracted or processed from the file content, including the minimum and maximum grid corners were the grid not rotated.

The grid definition is divided into:
The Blocks section of the grid definition window defines the Parent block size in X, Y and Z directions.

For sub-blocked models, the Sub-clock count specifies the number of sub-blocks per parent block in the X, Y and Z directions. The sub-blocks’ Minimum size is calculated from the sub-block definition data entered.

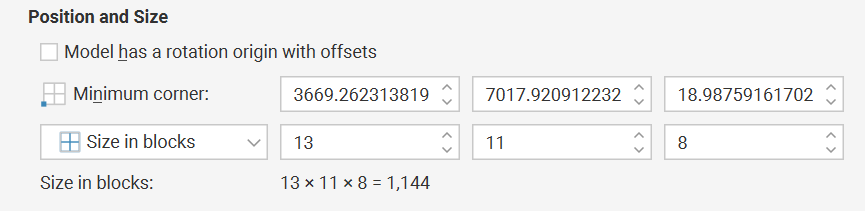
The location of the block model is specified by defining a Minimum corner position in X, Y and Z spatial coordinates.
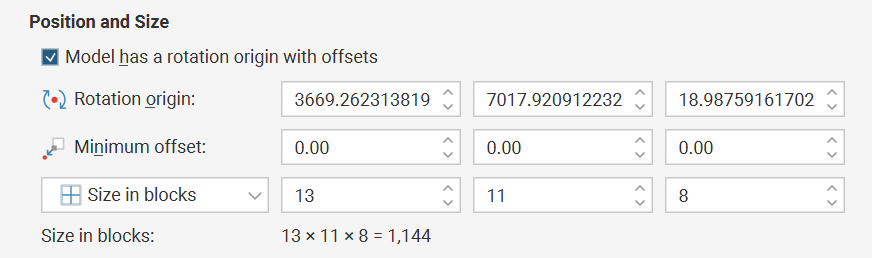
Alternatively, if the block model data has been specified in terms of a rotation origin with the model’s minimum corner at a specified offset from the rotation origin, tick the box Model has a rotation origin with offsets. Then specify the Rotation origin in X, Y and Z spatial coordinates and enter the distance the model’s minimum corner is offset from the rotation origin in the Minimum offsetX, Y and Z distances.
Whichever way the block model position is specified, the size of the block model extents can be described either by specifying the model’s Size in blocks, the model’s Maximum corner coordinates or the Boundary size of the model.

If the block model being imported is not rotated, select No Rotation as the Rotation type.

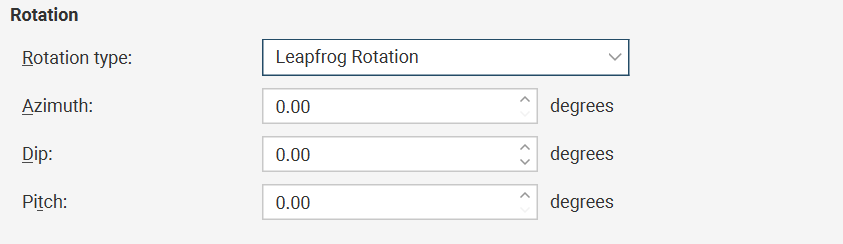
If the block model being imported is rotated using Leapfrog Geo rotation conventions, select Leapfrog Rotation as the Rotation type, then enter the appropriate values for the Azimuth, Dip and Plunge rotation angles.
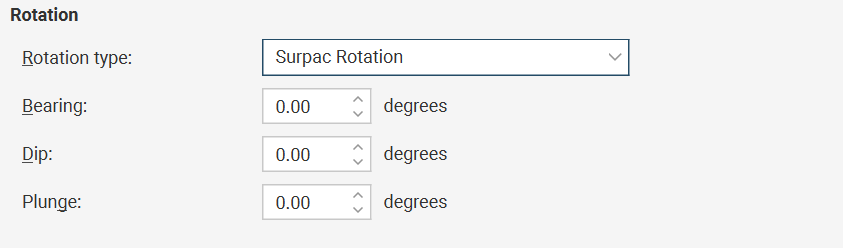
If the block model being imported is rotated using Surpac rotation conventions, select Surpac Rotation as the Rotation type, then enter the appropriate values for the Bearing, Dip and Plunge rotation angles.
To provide for supporting the importation of block models from other block model tools that use other rotation conventions, Leapfrog Geo provides support for alternative rotation conventions. Select Custom Rotation as the Rotation type, then specify up to three rotation Angles, first specifying an axis of rotation and then the angular rotation amount in degrees.

Each subsequent rotation axis specified is relative to the previous model rotation, as demonstrated in the following ZXZ rotation using a left hand as a mnemonic device:
The use of the mesh "Left Hand Rule" (https://skfb.ly/6XBOH) by mHafiz0809 is licensed under Creative Commons Attribution (http://creativecommons.org/licenses/by/4.0/).
While the grid definition does not align with the block centroid points, a message will warn that none of the blocks in the file match the grid you’ve defined.

When the grid definition provides a match with some but not all the blocks, the message changes to a warning that without further changes, the file may not import properly. This usually indicates that the grid definition is close to correctly matching the data in the file, but there may be a small change required to improve the definition.

When the grid definition aligns with the data in the file, the message changes to inform you that all the blocks in the file match the grid you’ve defined.

If no grid definition header is apparent for the file you have selected, check the source folder to see if there is another file that contains the grid definition information.
If a block model was exported from Leapfrog Geo, the file will be named the same but also have “.txt” at the end.
If Leapfrog Geo can identify the sidecar file, it will be displayed in a tab on the right side of the window.
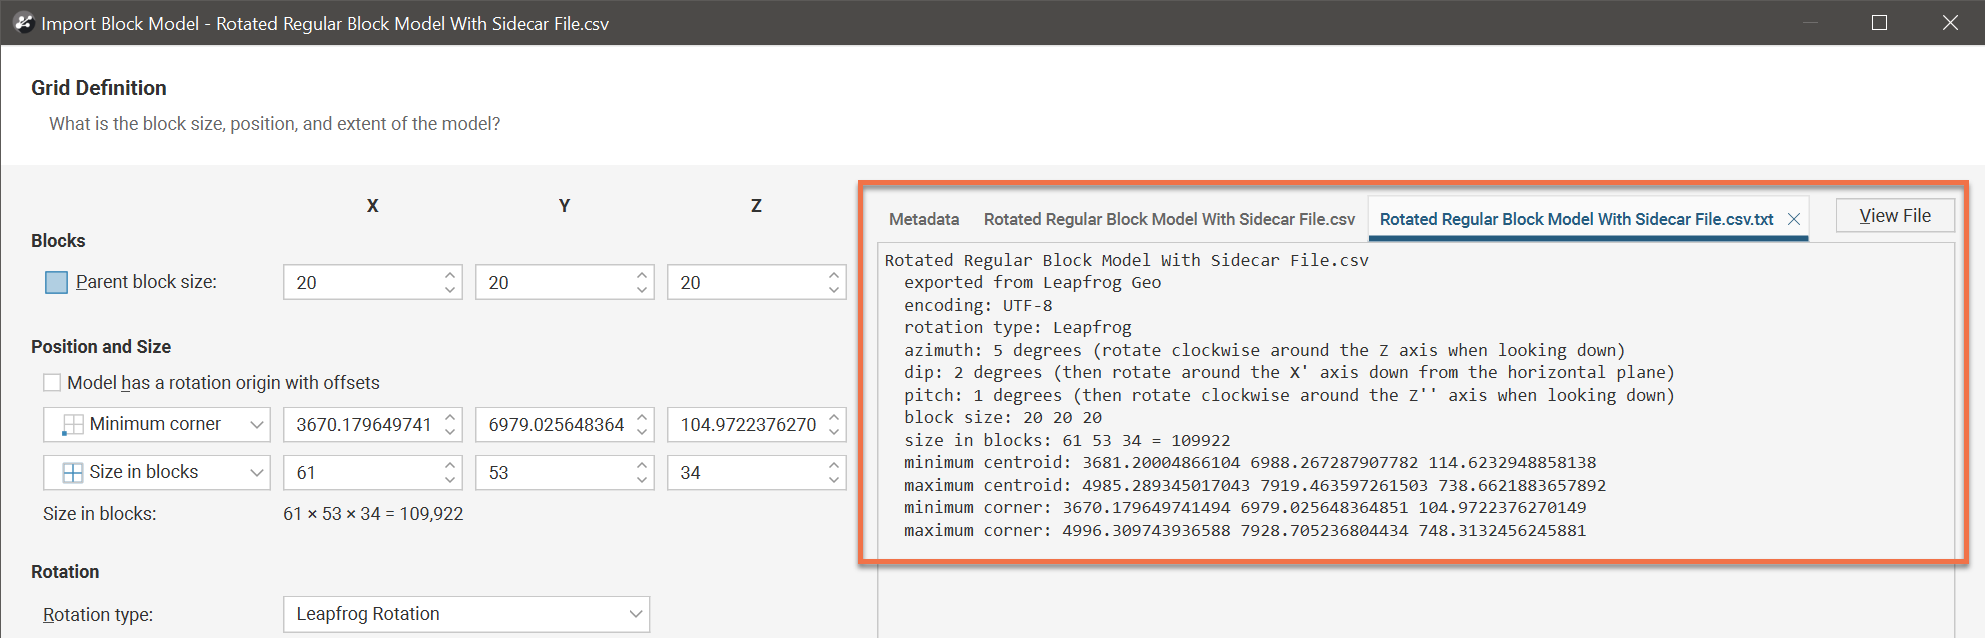
Note that importing a block model in CSV format does not require a header in either the CSV file itself or any text sidecar file. Once you start the import process, Leapfrog Geo will use the data in the file to locate the minimum and maximum centroids. You can view this information and change how the data is mapped before the file is imported into the project.
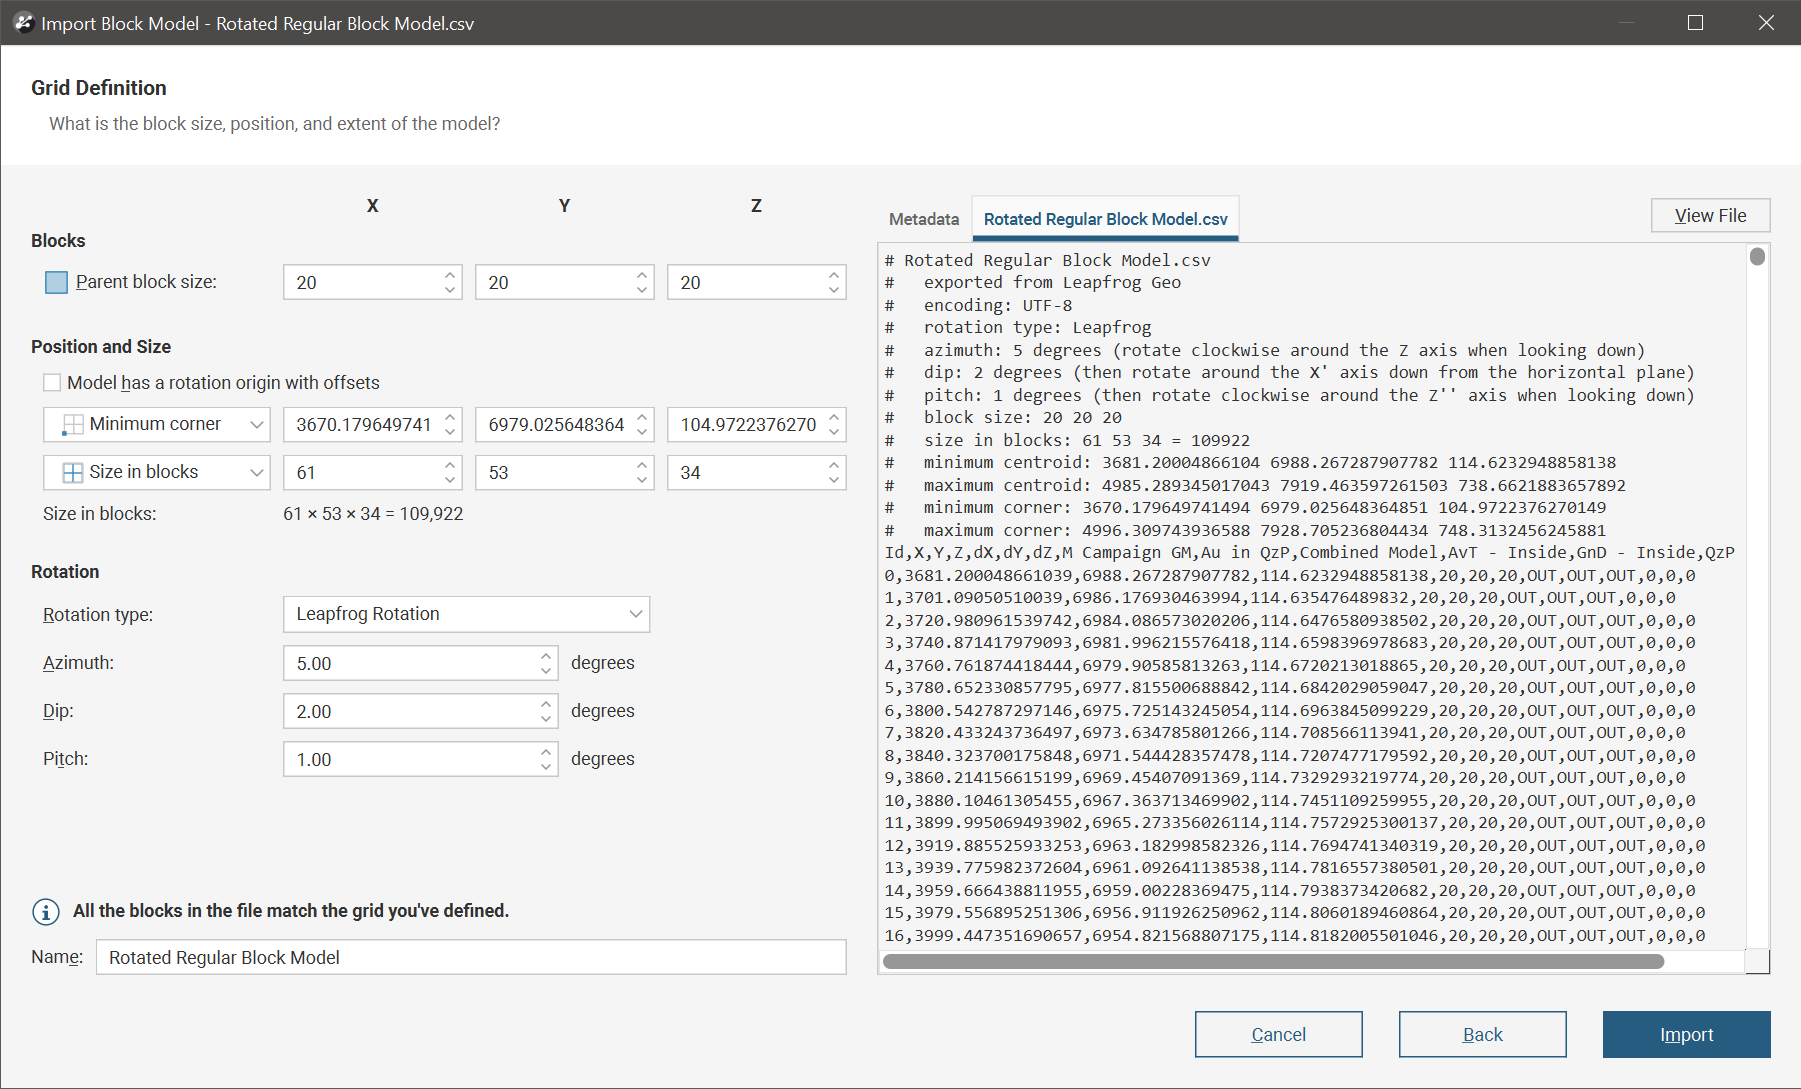
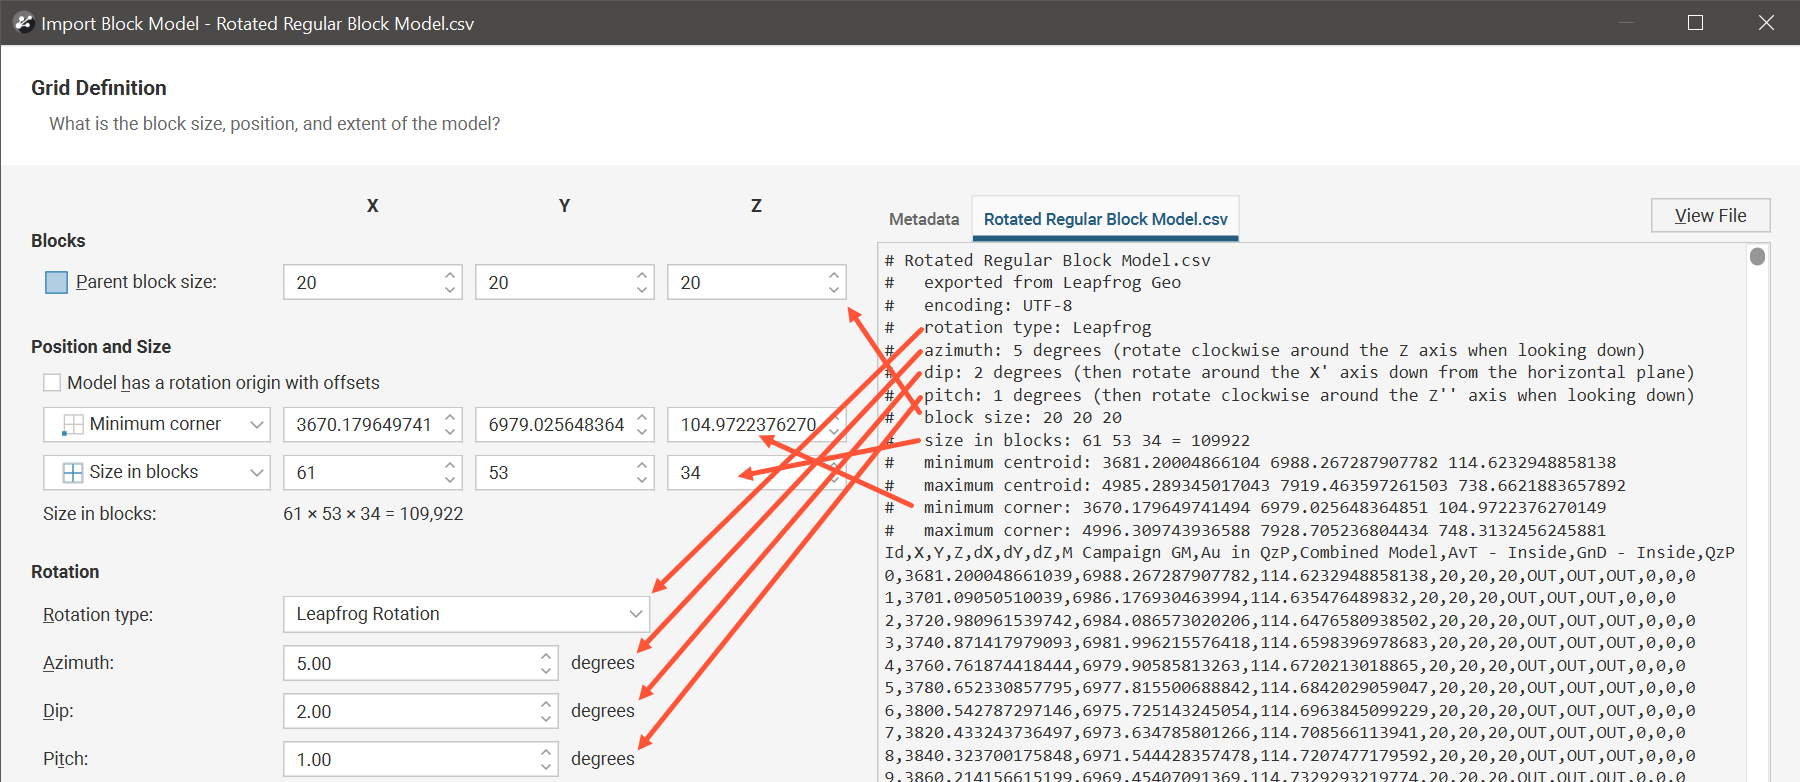
If the naming conventions used in the block model definition data can be interpreted by Leapfrog Geo, those values will be automatically imported into the appropriate grid definition fields. Here is an example showing how fields for a regular block model have been automatically populated:
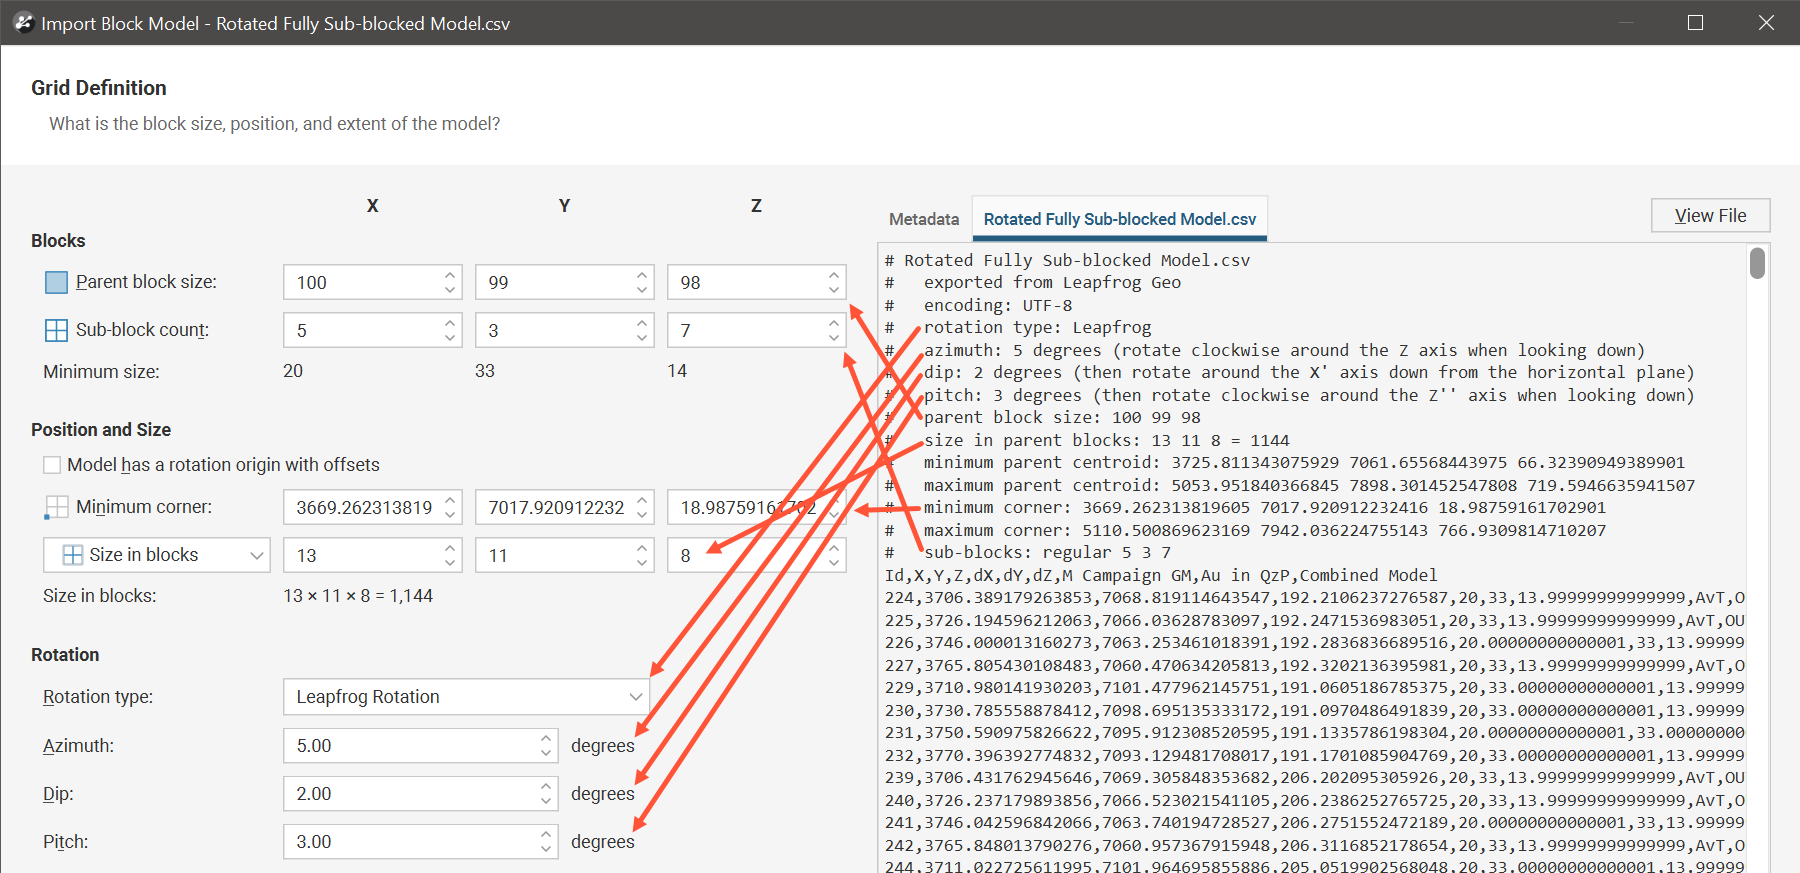
Here is an example showing how the fields for a sub-blocked model have been automatically populated:
It is possible to manually populate the details in the grid definition, and this may be necessary if Leapfrog Geo cannot determine the correct location for the model definition data in the file. To make the process easier, the grid definition window lets you select and drag data from the right side of the window onto grid definition fields on the left side of the window.
1. Select a number or a series of numbers from the file data on the right side of the screen.
You can include other text such as the data labels or separator symbols.
2. When the data is highlighted, click-and-drag the highlighted text toward the left side of the screen.
As the cursor passes over fields that can accept the data, the fields that can accept the data will be highlighted with a blue box. If you have selected several numbers, you will see several adjacent fields being highlighted with a blue box at the same time.
3. Release the mouse button to drop the data into the highlighted field or fields.
If you cannot drop the selected data into the current location, the mouse cursor will indicate that this is not possible, showing a red circle with an oblique line through it.
If you do not know the grid definition parameters for the block model being imported, you can attempt to manually align the grid definition using the points in the scene as a guide, but even if the importer reports that “all the blocks in the file match the grid you’ve defined” the resulting block model cannot be guaranteed to be the same as the block model exported to file. If at all possible, obtain the actual grid definition parameters and enter these parameters in the importer.
Drag the grid definition window aside to see the scene and you will see points representing the block model centroids, along with an outline for the current grid definition. This may assist in manual entry of the grid definition.
When you have successfully specified the grid definition to align with the file data, click Finish. The block model will be imported from the CSV file and will appear in the Block Models folder.
You can apply new triggers and evaluations to imported block models.
Got a question? Visit the Seequent forums or Seequent support
© 2023 Seequent, The Bentley Subsurface Company