
Section Layouts
The section layout editor is used to create and modify section layouts. The same layout editor is also used to create layout templates that can be applied to sets of sections to simply the process of creating similar section layouts.
This topic provides an overview of section layouts, layout templates and how they can be used to communicate important information to stakeholders. It is divided into:
- Working With Section Layouts and Layout Templates
- Creating New Section Layouts
- Creating Plan View Layouts for Plan Views
- Using the Section Layout Editor
- Displaying Section Layouts in the Scene
- Copying Section Layouts
- Exporting Section Layouts
The following topics describe different aspects of using the section editor that apply to both section layouts and layout templates:
Working With Section Layouts and Layout Templates
A section (1) is presented on a section layout (2) that arranges the section alongside other information such as the section title, legend and location reference. To make multiple section layouts consistent and to reduce the work involved in creating them, a layout template (3) can be created to define the overall layout structure that will be replicated on each section layout.

When creating a single, stand-alone section, it is not necessary to utilise a layout template. In other cases where multiple sections are being defined, it is usually desirable to:
- Start by creating a layout template. See Creating a New Layout Template for details.
- Create your section definitions using one of:
- Copy the layout template design to the sections to create a section layout for each section. See Applying Layout Templates to Sections
Any changes to the layout template will propagate to the child section layouts it was copied to. It is also possible to modify the child section layouts individually, but changing a child section layout breaks the relationship with the layout template, it does not affect the layout template, and future changes to the layout template will not change the modified child section layout.
You can create any number of layout templates, which is useful to manage section layouts that need different overall structures, such as wide panoramas versus tall slim slices.
Creating New Section Layouts
This describes how to set up a new section layout for sections other than plan sections. See Creating Plan View Layouts for Plan Views below for information on setting up layouts for plan sections.
When a number of similar section layouts are needed, it is not necessary to create them individually in this manner. The alternative method is to create a layout template and copy that template to the sections. This will automatically create the section layouts for each section the template is applied to. See Layout Templates for more information.
To create a section layout, right-click on the section in the project tree and select New Section Layout. A new tab will appear in which you will be able to make changes to the section layout. This tab has a layout tree that you can use to change different parts of the section and add data to it. See Using the Section Layout Editor below for detailed information on adding information to the section layout.

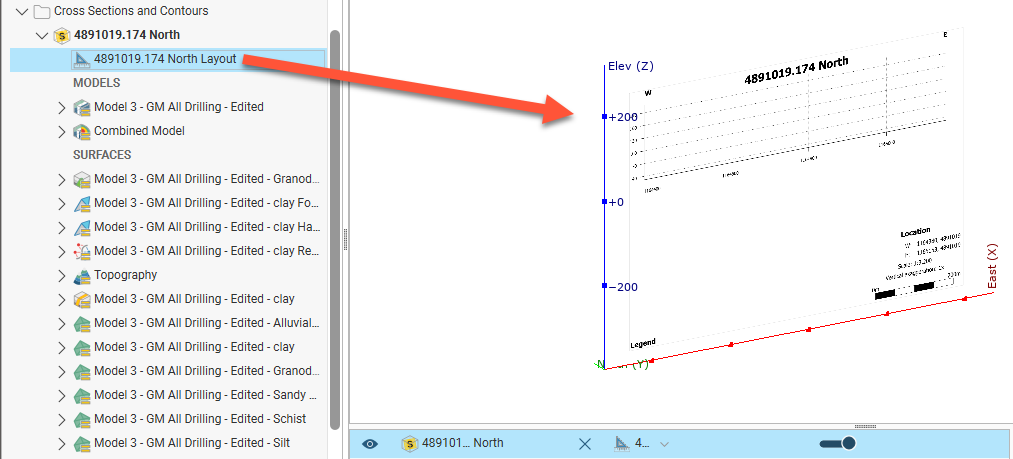
In the project tree, the section layout is saved as part of the section. Drag the layout into the scene to display it:
Edit the section layout by double-clicking on it in the project tree. See Using the Section Layout Editor below.
Creating Plan View Layouts for Plan Views
A plan view is a special type of horizontal section providing projected map imagery and other details to provide a wide contextual overview. Plan views have their own plan view layouts; section layouts cannot be applied to plan views.
If there is no existing plan view, first add a model to the scene and press the D key to get a top-down view of the model. Next, right-click on the Sections, Plans and Contours folder and select New Plan View. The New Plan View window will appear, together with a plan view plane and controls in the scene that let you adjust the position of the plan view plane:

Use the handles in the scene to position and size the plan view plane. The handles work in the same manner as the moving plane controls, as described in The Moving Plane.
Switch to a side view to set the elevation of the plan view. Use an elevation over the project area if you are creating a plan view purely for context, or choose a specific elevation in the project space to view horizontal sections through the scene.

Once the plan view plane is positioned as required, click OK to create the new plan view, which will appear in the Sections, Plans and Contours folder. Right-click on the plan view in the project tree and select New Layout. A new plan view layout window will open.
Plan view layouts are similar in most respects to section layouts, except plan views can also have a North Arrow feature added to them from the Comments folder.

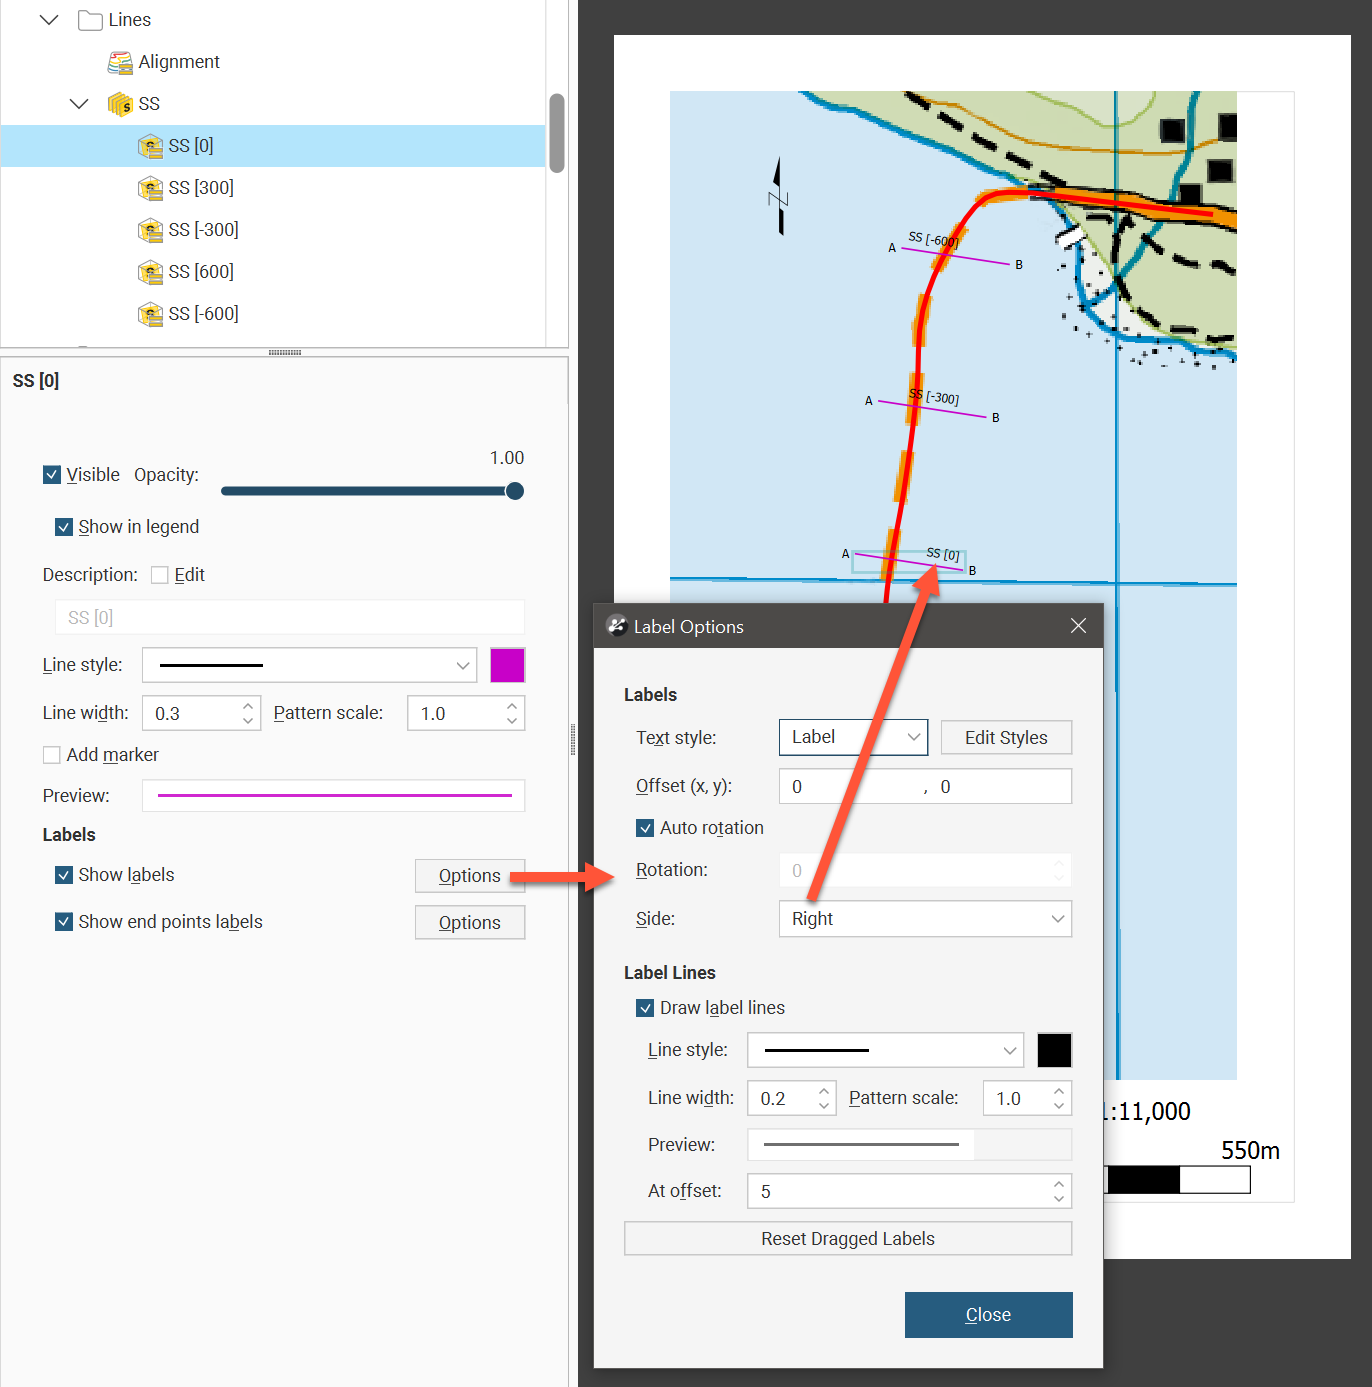
Along with other line colour, style and width controls, section lines can have their labels positioned to the Left, Centre or Right by clicking through to the labels options.
For more information on using the section layout editor to create plan view layouts, see Using the Section Layout Editor below.
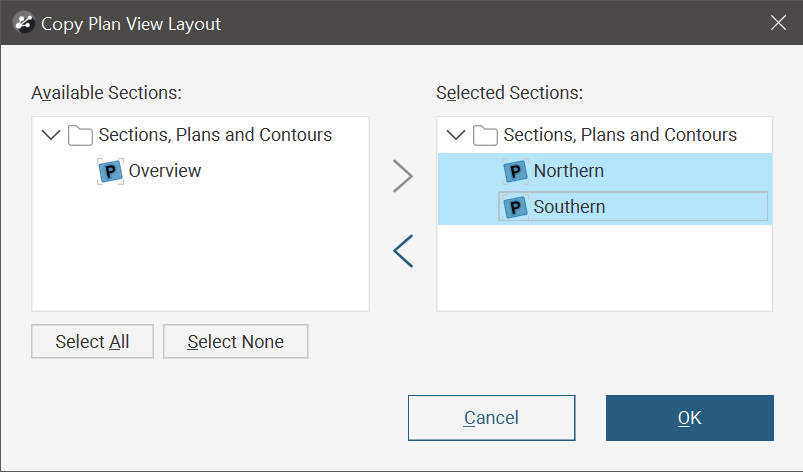
Plan view layouts can be reused and modified for other plan views. When multiple plan views are available, right-click on a preferred plan view layout in the project tree and select Copy Layout To. The Copy Plan View Layout window will show the Available Sections. Move plan views over to the Selected Sections list to apply the plan view layout.
Once created, a plan view can be added to a section layout from the Plan Views folder. Right-click Plan Views in the layout tree and select Add Plan View. The Add Plan View window will appear, listing the available options for plan view layouts. Select one and click OK.
Using the Section Layout Editor
The section layout editor is used for both section layouts and layout templates. To open the section layout editor, double-click on a section layout or a layout template in the project tree.
The section layout editor consists of a layout tree panel on the left and on the right a panel with a preview of the layout. The toolbar has zoom controls for the preview allowing you to choose a specific zoom percentage from a list of options, along with Zoom in(![]() ), Zoom out(
), Zoom out(![]() ), Actual size(
), Actual size(![]() ) and Fit window(
) and Fit window(![]() ) buttons.
) buttons.

The appearance of all objects can be customised without changing how objects from the project tree are displayed in the scene. You can customise the section layout by:
- Adding models, surfaces, lines, points and structural data
- Adding drillholes and planned drillholes
- Changing the page size, orientation and margins
- Adding a title and title bar, a scale bar, legends, annotations and images, such as a standard form or logo
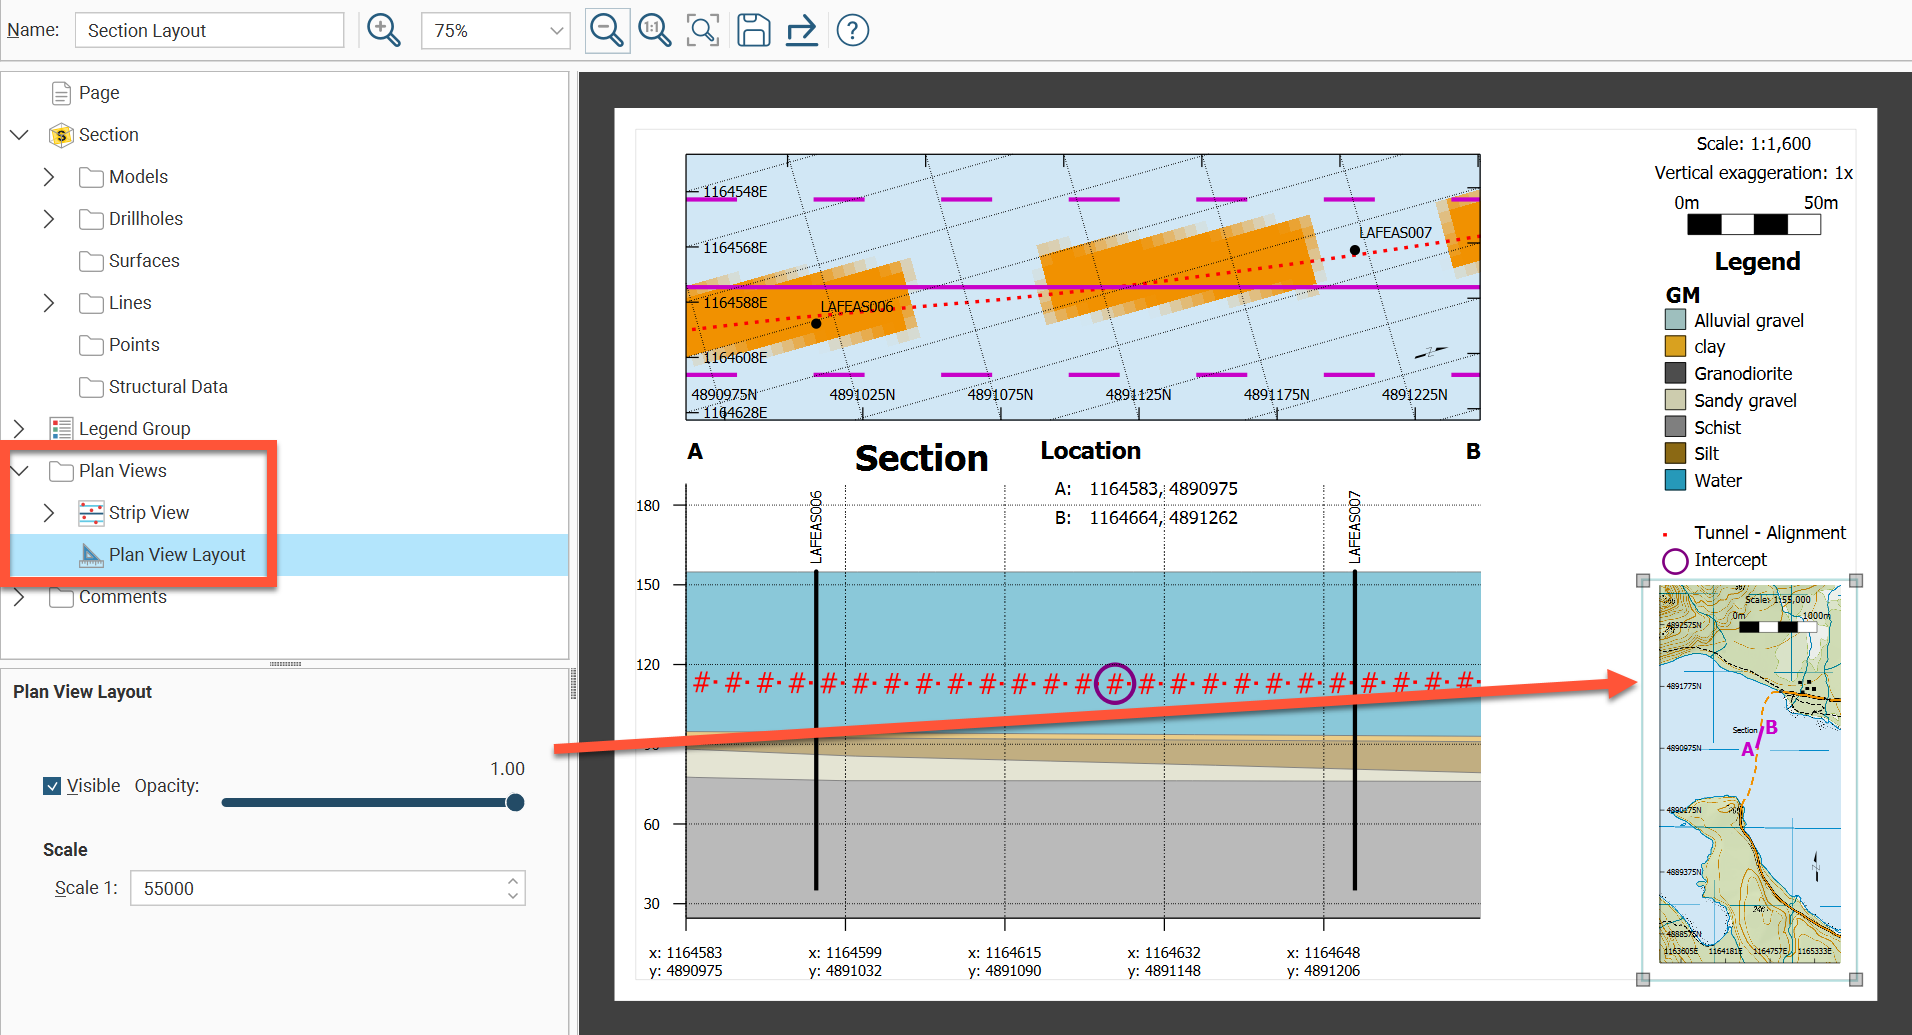
In the section editor, the layout tree shows the different layers that can be added to the page. The different parts of the layout tree as they relate to the page preview are shown below:
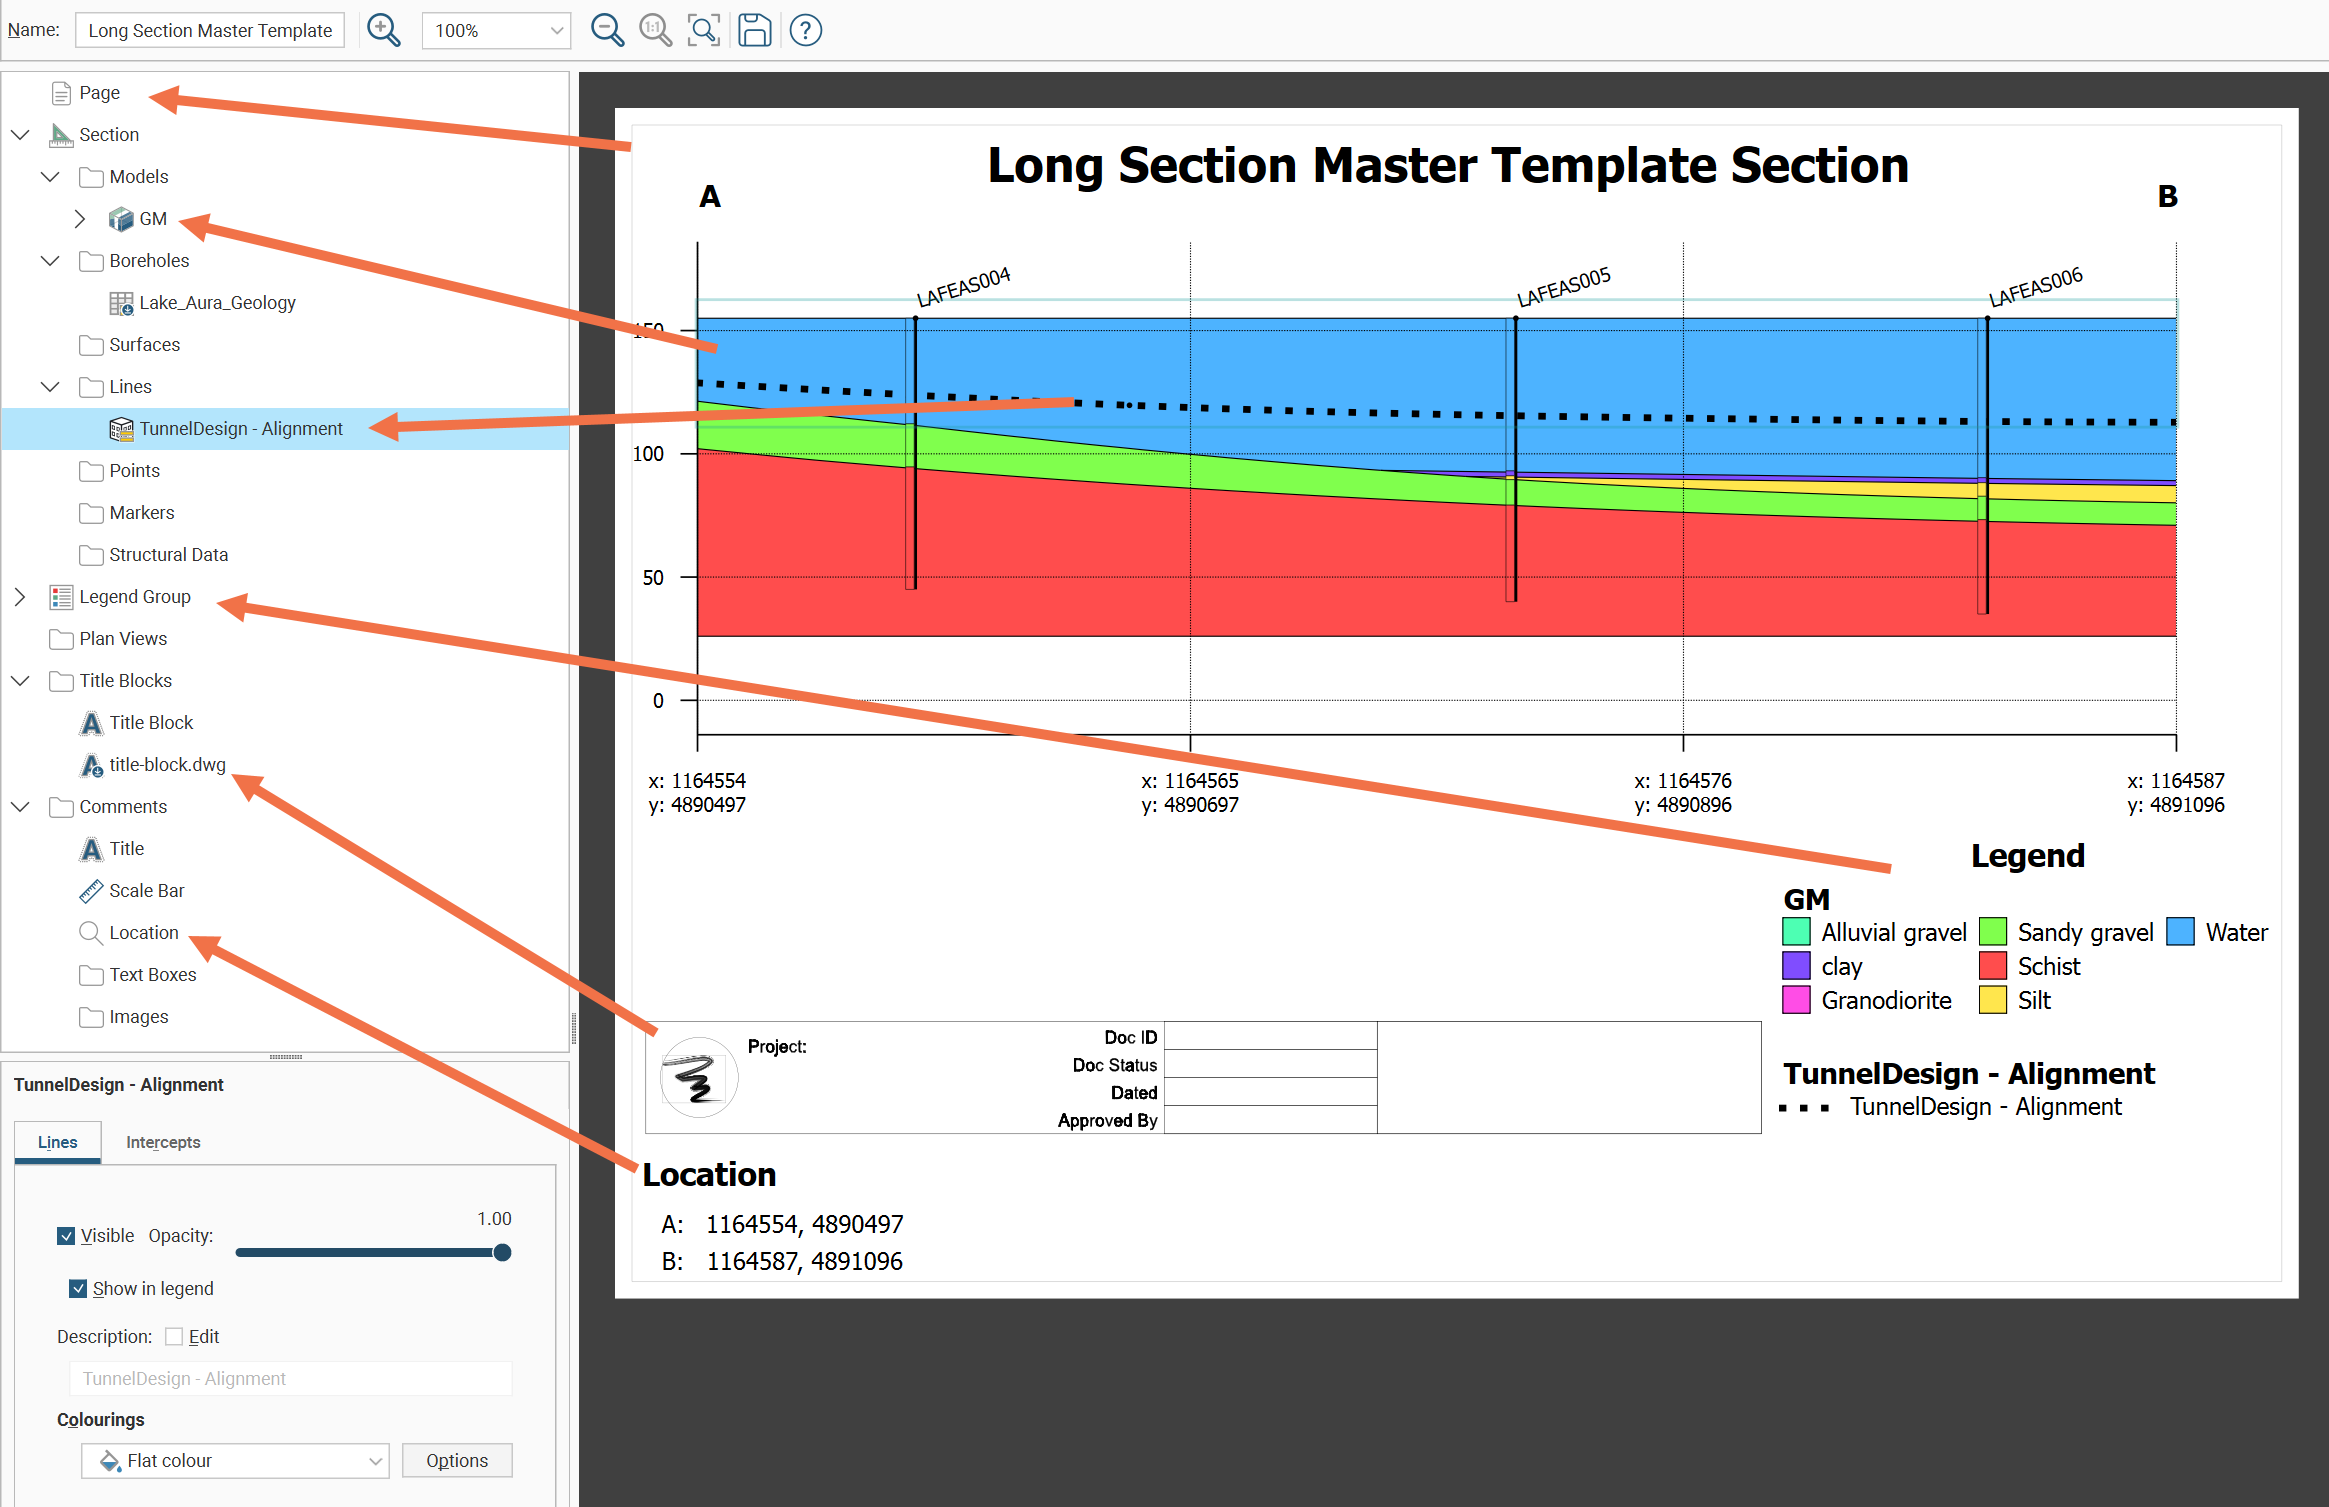
When you select an object in the layout tree, it will be highlighted by a blue line on the page. In the example above, the Lines object Tunnel - Alignment is selected. Click on an object in the page preview to move or resize it. This will also select the object in the layout tree and you can see what properties can be changed. For example, in the preview, click on the Title to view its styling options:

Text displayed in the section layout is controlled by a style sheet that can be accessed whenever you are editing a text object. For example, clicking on Edit Styles for the Title opens the list of Text Styles with the Title selected, but also allows you to change the appearance of styles used for other text objects visible in the preview:

For more details on how to customise the section layout with these objects, see Organising Section Layout Pages and Organising Models and Other Objects on the Section.
Displaying Section Layouts in the Scene
Sections can be displayed in the scene by dragging a layout into the scene to see the section in relation to models in the scene, but the usual way sections will be viewed is by exporting them as files to be imported into other software or as documents to be printed.

Some sections will be too large to display in the scene, which will be indicated in the section layout editor.
Copying Section Layouts
If you have already created a section layout and wish to reuse it, you can copy it to other sections.
When you have a number of similar sections in a project, instead of creating one section layout and copying it to other sections, use a layout template. Using a layout template maintains a reference from the parent template to the child layouts and they can all be updated by modifying the template layout. This does not happen when a section layout it copied to another section. See Layout Templates for more detail on how to create layout templates and apply them to sections.
To copy a layout, right-click on the layout you wish to copy and select Copy Layout To. In the window that appears, a summary of the information that will be copied is displayed so you can see what information will be copied to the selected sections. Move the sections you wish to copy the layout to into the Selected Sections list, then click OK.
Search for items in a list by pressing Ctrl-F. A Find window will appear that you can use to search the list. You can choose whether or not to match case in the search and whether or not to match the whole label. You can search forwards or backwards and you can select all list items that match the current search.
A copy of the layout will appear in the project tree under each section you selected.
Copying a section layout copies the evaluations used in the original section layout, together with the page size and orientation and the position of the layout tree objects on the page. How models, surfaces and drillholes are copied depends on the section to which the layout is being copied:
- All models, surfaces. lines, points and structural data objects that can be displayed on the section will be copied.
- The drillholes copied to the layout will depend on the type of section the layout is being copied from and whether or not a filter is set for the layout:
- If no distance filter was set for the original layout, all drillholes selected for the original layout will be copied.
- If a distance filter was applied to the original section, the filter will be applied and drillholes selected that are within that distance of the section to which the layout is being copied.
- When the original layout is from a long section, drillhole evaluations will not be copied with the section layout.
Exporting Section Layouts
Once you have finished adjusting the section layout, you can export it in one of the following formats:
- PDF Files (*.pdf)
- Scalable Vector Graphics Files (*.svg)
- PNG Image Files (*.png)
- GeoTIFF Files (*.tiff, *.tif)
GeoTIFF files are not an export option for long sections unless using batch export.
Click the Save and Export button (![]() ) at the top of the window or right-click the layout in the project tree and select Export Layout from the pop-up menu. You will be prompted for a filename and location.
) at the top of the window or right-click the layout in the project tree and select Export Layout from the pop-up menu. You will be prompted for a filename and location.
You can also batch export multiple section layouts. To do this, right-click on the Sections, Plans and Contours folder and select Batch Export Layouts. All selected sections can be exported as a single PDF or individually in PDF file (*.pdf), Scalable Vector Graphics file (*.svg), PNG image (*.png) or GeoTIFF (*.tiff, *.tif) formats. When section layouts are exported individually, all outputs can be combined into a zip archive.
In the window that appears, selection the layouts you wish to export, then select a format. If you select a format other than Single PDF, you can combine all outputs into a zip archive. Select where you wish to save the outputs, then click Export.

Progress will be displayed at the top of the Batch Export Section Layouts window. Click close when the export is finished.
Got a question? Visit the Seequent forums or Seequent support
© 2023 Seequent, The Bentley Subsurface Company