Planning Drillholes
In Leapfrog Geo, you can plan drillholes, view prognoses for models in the project and export planned drillholes in .csv format.
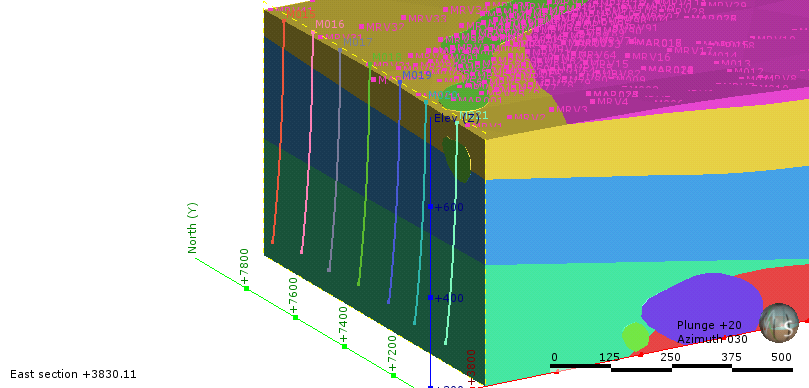
Planned drillholes are added to a project from the Planned Drillholes folder, which is in the Drillhole Data folder. When displayed in the scene, the planned drillhole is made up of a collar point, a target location and a path defined by lift and drift parameters:
The rest of this topic is divided into:
- Adding Planned Drillholes
- Planning Options
- Drilling Prognoses
- Exporting Planned Drillholes
- Importing Planned Drillholes
Adding Planned Drillholes
To plan a drillhole, first add the data objects to the scene that you will use in helping to define the drillhole, such as the topography and any existing drillholes. Next, right click on the Planned Drillholes folder and select Plan Drillhole. In the window that appears, you can define the drillhole by specifying its collar or its target:
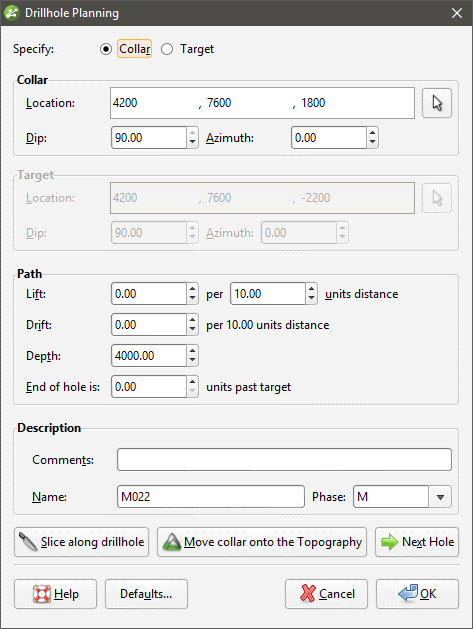
You can change whether Collar or Target is selected when this window is opened by clicking on the Defaults button. See Planning Options below.
A name is automatically generated for the new planned drillhole based on the IDs in the collar table. If there is more than one phase available, you can select a different phase from the list.
There are three ways to define the drillhole collar or target:
- Click in the scene to set the collar or target location. First, click on the Select button (
 ) for the Collar or Target, then click in the scene to define the Collar or Target. The drillhole will appear in the scene and you can adjust the coordinates using the controls in the Drillhole Planning window. Click the Slice along drillhole button to draw a slice in the scene. This is useful in adjusting the drillhole path and in defining subsequent drillholes.
 - Draw the drillhole in the scene. Click on the Select button () for the Collar or Target, then click and drag in the scene to define a basic path for the drillhole. If you are defining the drillhole from the collar down, click first on or near the topography. Likewise, if you are defining the drillhole from the target up, click first at or near the target point.
- Enter the coordinates for the Collar or the Target in the Drillhole Planning window.
Clicking the Move collar onto the Topography button adjusts the elevation of the drillhole so that it lies on the topography.
Click the Next Hole button to create another planned drillhole. The new planned drillhole will be created at a specific distance from the currently displayed planned drillhole using the Path settings for the currently displayed drillhole. The distance is determined by the Offset To Next Hole settings in the Drillhole Planning Options window. See Planning Options below.
Once you have specified the collar or target, adjust the drillhole path:
- Lift is how much the drillhole deviates upward.
- Drift is how much the drillhole deviates laterally.
- Leapfrog Geo automatically calculates the Depth value when the drillhole is defined by the Target location.
- Adding an End of hole length extends the drillhole past the Target location.
Planned drillholes will appear in the Planned Drillholes folder. You can change a planned drillhole by right-clicking on it and select Edit Drillhole.
Planning Options
When planning drillholes using the Drillhole Planning window, the Path values entered apply only to the current drillhole. If you wish to set default values for these parameters for new planned drillholes, either right-click on the Planned Drillholes folder and select Edit Planned Drillholes Defaults or click on the Defaults button in the Drillhole Planning window. The Drillhole Planning Options window will appear:
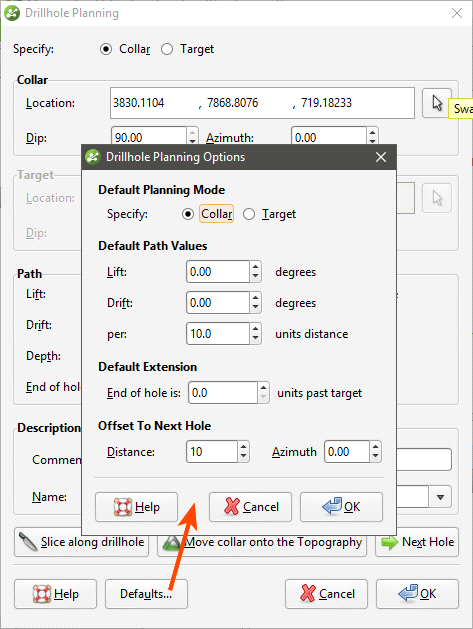
Select whether new planned drillholes are specified by the Collar or by the Target.
In the Drillhole Planning window, clicking Next adds a new planned drillhole. In the Drillhole Planning Options window, the Offset To Next Hole values determine how far the new planned drillhole is from the selected planned drillhole.
Enter the information required and click OK. The new settings will be applied to the next new planned drillhole added to the project.
Drilling Prognoses
Planned drillholes can be evaluated against any model in the project. To view drilling prognoses for a drillhole, right-click on it and select Drilling Prognoses. The Drilling Prognoses window will appear:
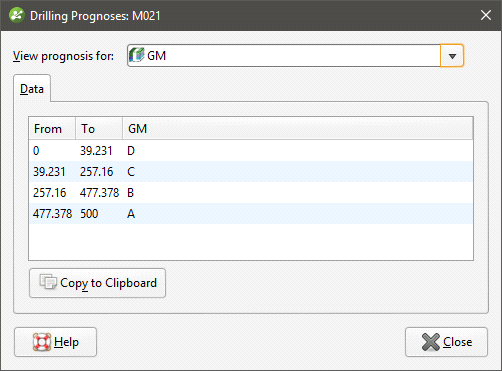
You can display prognoses for different models by selecting them from the list. For numeric models, you can view a plot of the data by clicking on the Plot tab.
In each tab, you can copy the information displayed to your computer’s clipboard by clicking the Copy to Clipboard button. The information in the Data tab will be copied as tab delimited text, which can be copied into a spreadsheet application such as Excel. The plot displayed in the Plot tab will be copied as a bitmap image.
Exporting Planned Drillholes
To export planned drillholes, either right-click on the Planned Drillholes object and select Export Planned Drillholes or right-click on a planned drillhole and select Export. The Export Planned Drillholes window will appear:
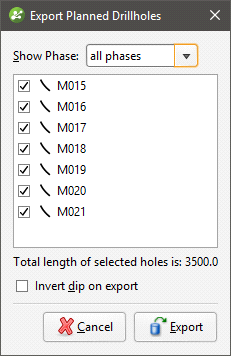
Selecting a phase from the Show Phase list will select all planned drillholes in that phase.
The total length will be updated as you add or remove drillholes.
In Leapfrog Geo, positive dip points down for planned drillholes. To invert the dip for exported planned drillholes so that negative dip points down, tick the box for Invert dip on export.
Click Export. You will be prompted for a filename and location.
Importing Planned Drillholes
Leapfrog Geo imports planned drillholes from files in CSV format. The columns expected are:
- A drillhole identifier
- X-Y-Z coordinates for the planned drillhole
- Azimuth
- Dip
- Lift rate
- Drift rate
- Distance
- Extension
- Target Depth
- Comment
To import planned drillholes, right-click on the Planned Drillholes folder and select Import Planned Drillholes. If the IDs in the file are already in the project, you will be prompted to resolve the conflict:
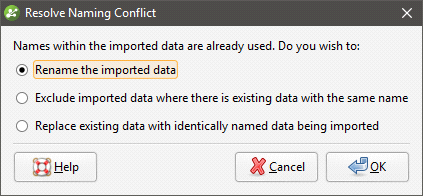
You can:
- Rename the imported drillholes. Leapfrog Geo will automatically assign new names and import the planned drillholes.
- Exclude planned drillholes that already exist in the project. Planned drillholes will only be imported if they have an identifier that does not already exist in the project.
- Replace existing planned drillholes with the imported drillholes. Use this option if you are importing information previously exported from the project and subsequently updated in an external application.
Click OK to process the file.
If there are no conflicts, the planned drillholes will be imported and added to the Planned Drillholes folder.