Importing a Mesh
Mesh formats Leapfrog Geo supports include:
- Leapfrog Files (*.msh, *.ara)
- Gocad Files (*.ts)
- DXF Files (*.dxf)
- Surpac Files (*.str, *.dtm)
- Gemcom Files (*.tri)
- Datamine Files (*pt.asc, *tr.asc)
- Micromine Files (*MMpt.dat, *MMtr.dat)
- DXF Polyface Files (*.dxf)
- Alias Wavefront Object Files (*.obj)
- Vulcan Files (*.00t) (with Maptek Link)
If you have the Maptek Link module, you can also import meshes in VULCAN .00t format. Contact Customer Support as described in Getting Support for more information about licensing the Maptek Link module.
Once a mesh has been imported to the project, you can evaluate it against any interpolant or distance function in the project. See Evaluations for more information.
To import a mesh, right-click on the Meshes folder and select Import Mesh. Navigate to the folder that contains the mesh file and select the file. You can select multiple files using the Shift and Ctrl keys. Click Open to import the file.
The Cleanup Mesh window will be displayed. See Cleaning Up a Mesh below.
Meshes with Textures
Leapfrog Geo can import OBJ meshes with textures. If you have the Maptek Link module, you can also import Vulcan 8 meshes with textures.
Textured OBJ Meshes
For OBJ meshes, a materials file (.mtl) is required, together with the referenced images. Image formats supported include:
- PNG Files (*.png)
- JPEG Files (*.jpg, *.jpeg)
- TIFF and GeoTIFF Files (*.tiff, *.tif)
- Windows Bitmap Files (*.bmp)
- Graphics Interchange Format Files (*.gif)
The texture is automatically imported when the mesh is imported and will appear in the project tree under the mesh.
Textured Vulcan 8 Meshes
This feature is only available if you have the Maptek Link module.
When importing a Vulcan 8 mesh that contains a path to an associated texture, Leapfrog Geo will also import the texture. If the path to the texture does not exist, you can import it once the mesh has been imported. Do this by right-clicking on the mesh in the project tree and selecting Import Texture. Navigate to the folder containing the texture file and click Open. The texture will be imported and stored in the project tree as part of the mesh.
Cleaning Up a Mesh
There are several options for cleaning up a mesh that can be applied to meshes imported into Leapfrog Geo and to non-editable meshes created in Leapfrog Geo.
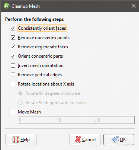
To clean up a mesh, double-click on the mesh in the Meshes folder or right-click on the mesh and select Open. The Cleanup Mesh window will be displayed:
The Cleanup Mesh window will also be displayed when you import meshes.
The first four options are automatically applied to meshes created in or imported into Leapfrog Geo:
- Consistently orient faces ensures that a mesh can be used for inside/outside testing.
- Remove non-vertex points removes points that are not used by any triangles.
- Remove degenerate faces removes triangles with duplicate vertices.
- Orient concentric parts ensures that internal parts have the correct orientation.
Other options are:
- Invert mesh orientation reverses the polarity of the mesh.
- Remove vertical edges removes any vertical faces from the mesh boundary.
- Rotate locations about X axis lets you rotate the mesh 90 degrees clockwise or anticlockwise.
- Move Mesh lets you offset the mesh by a vector. Tick the Move Mesh box and enter the required values. The offset values can be changed by opening the Clean Mesh window once again.
Select the options required, then click OK.
The mesh will be added to the project tree under the Meshes folder.
