Drillhole Correlation Tool
With the drillhole correlation tool, you can view and compare selected drillholes in a 2D view. You can then create interpretation tables in which you can assign and adjust intervals and create new intervals. Interpretation tables are like any other interval table in a project and can be used to create models. You can also save and export correlation set layouts and styles that can be exported and used in other Leapfrog Geo projects.
This topic describes creating correlation sets and creating interpretation tables. It is divided into:
- Selecting Collars
- The Correlation Set Window
- Correlation Column Layouts
- Managing Styles
- Interpretation Tables
Selecting Collars
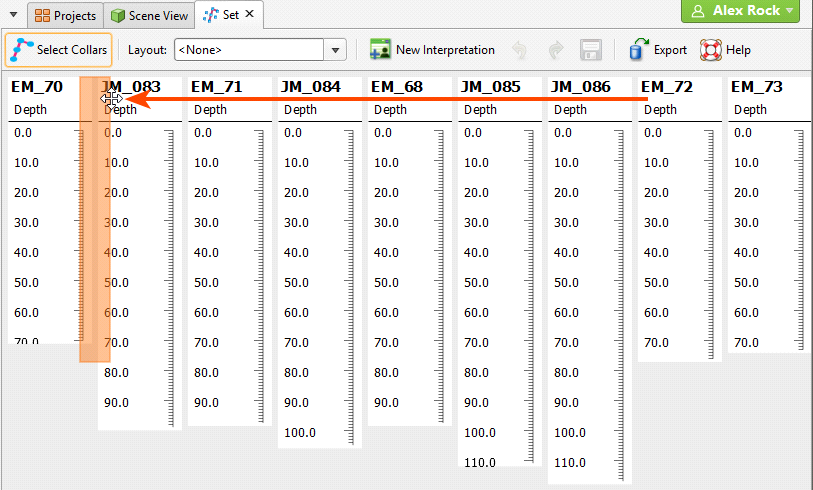
To select collars, you need to create a drillhole correlation set, which you can do from the scene. First, add the collars you wish to work with to the scene. A useful way of limiting the number of collars displayed is to draw a slice in the scene and set it to a thick slice (![]() ) and set the slice width to hide collars on either side of the slice.
) and set the slice width to hide collars on either side of the slice.
Next, right-click on the Drillhole Correlation folder and select New Drillhole Set. The new set will be created and opened, but is empty until you select collars. Click the Select Collars button (![]() ) to switch to the scene and begin selecting collars:
) to switch to the scene and begin selecting collars:
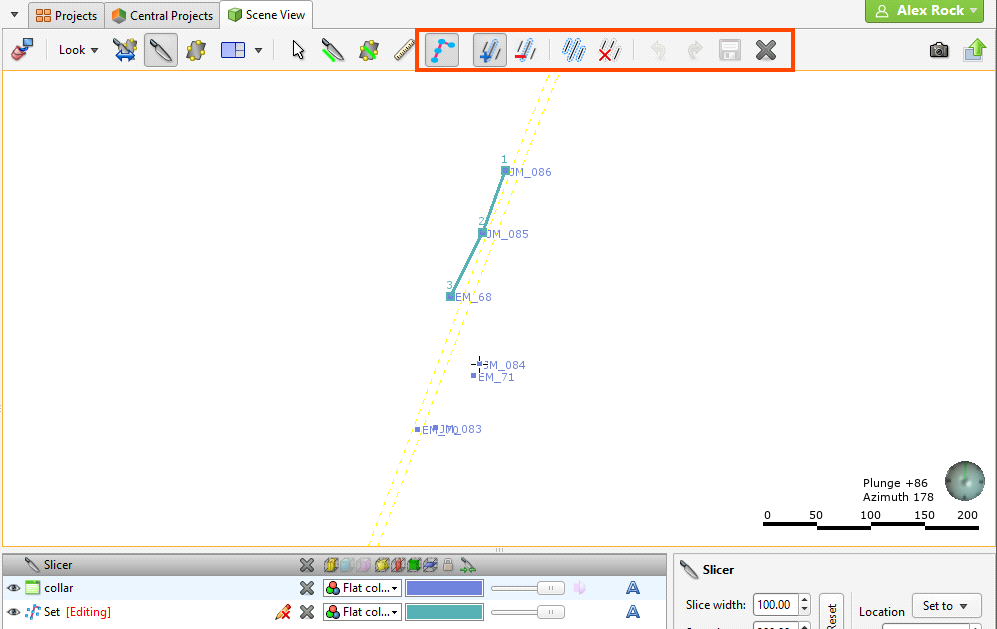
The line in the scene indicates the order in which collars will appear in the set.
- To select collars one-by-one, click on the Select collar button (
 ), then on the Add collar button (
 ). Click on a collar to add it to the nearest end of the set. Hold down the Ctrl key while clicking to remove a collar from the set.
 - To temporarily switch to the Select button (
 ), hold down the Shift key while clicking.
 - To select all collars visible in the scene, click on the Select all collars button (
 ). This will select collars using the best fit line.
 - To remove a collar from the selection, click on the Remove collar button (
 ), then click on the collar you wish to remove from the set.
 - To clear the selection, click on the Clear collar selection button (
 ).
).
If you want to change the order, you can easily do so in the set tab once you have selected collars.
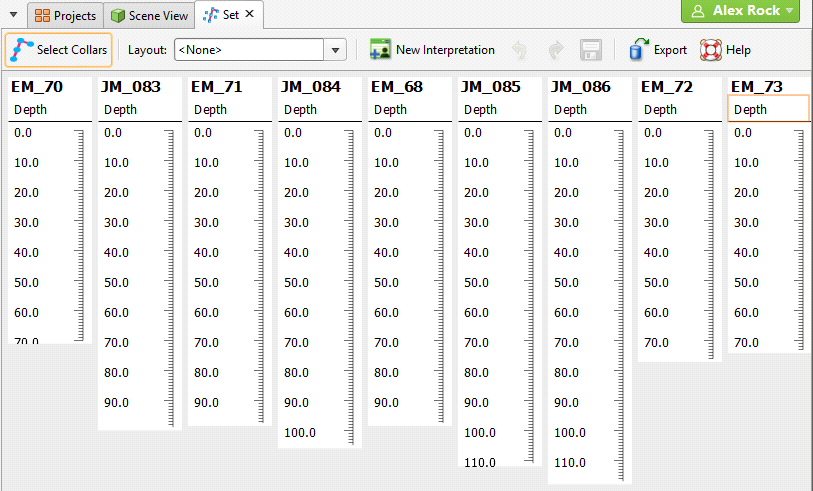
Once you have selected the required collars, click the Save button (![]() ). The selected collars will be added to the set window:
). The selected collars will be added to the set window:
The Correlation Set Window
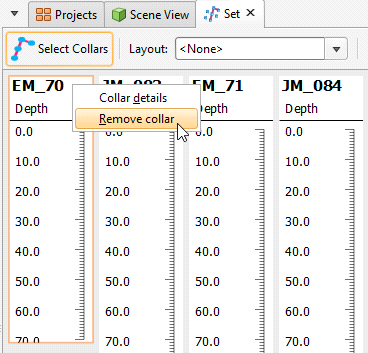
Remove collars from the correlation set by either editing the set in the scene, as described in Selecting Collars above, or right-click on a column and select Remove collar:
You can change how data is displayed by clicking on the column header, then selecting Format:
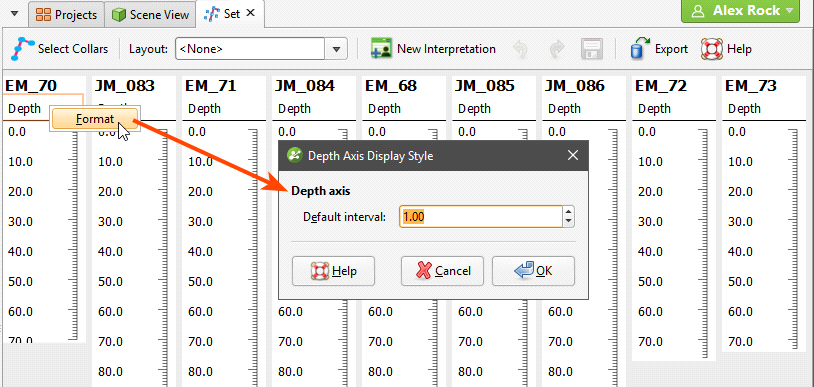
The options available depend on the type of column being formatted.
Click on drillholes and drag them in the correlation set window to change the order in which they appear:
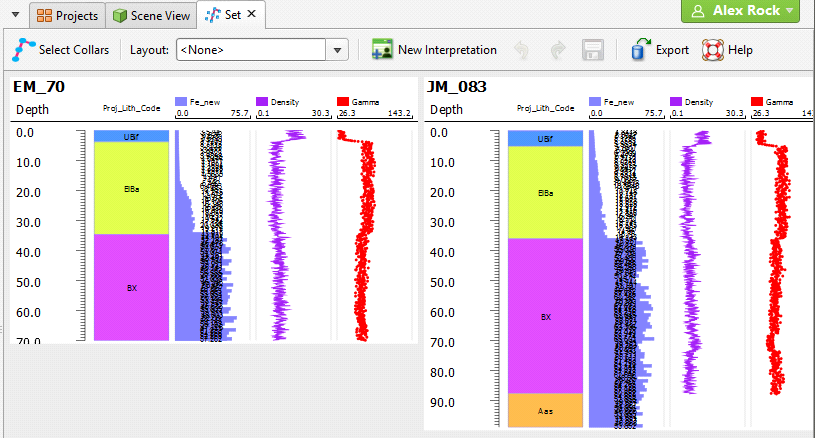
Add columns to the set by dragging them from the project tree into the set window. Here, four columns have been added to the set. From right to left they are a lithology column, an assay data column, a points data column formatted as a line and a points data column formatted as points:
You can then format the columns to get a better view of relationships between them. Format columns by right-clicking on their headers and selecting Format:
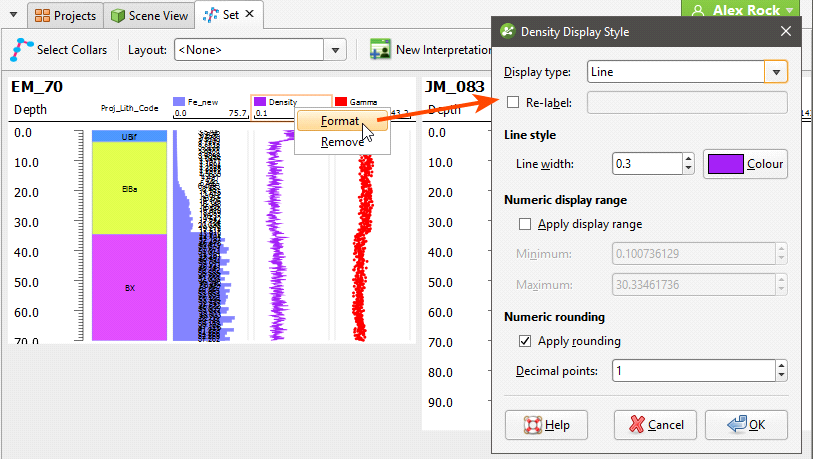
The styles used to display columns can be used by other sets in the project and can be exported to other projects. See Managing Styles below.
You can also drag some types of columns on top of other columns, although it is not possible to display category data on top of other category data. You can select multiple columns using the Shift and Ctrl keys.
Navigating in the Correlation Set Window
Navigate in the correlation set window using the following mouse and keyboard combinations:
- Use the scroll wheel to move up and down.
- Hold down the Shift key while scrolling to move right and left.
- Hold down the Ctrl key while scrolling to zoom in and out.
- Hold down the Alt key while scrolling to stretch the data vertically.
Correlation Column Layouts
Once you have organised data columns and how they are displayed, you can save this information as a column layout that can be applied to other correlation sets. To do this, click the Layout button in the toolbar and select Save Current Layout from the list:
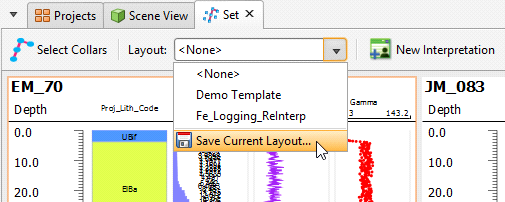
You will be prompted for a name. Click OK to save the layout, which can then be applied to other correlation sets by selecting the layout from the list.
To view the layouts available in the project, right-click on the Drillhole Correlation folder in the project tree and select Layout Manager. In the window that appears, you can easily see what columns are used for each layout and apply a layout to all correlation sets in a project:
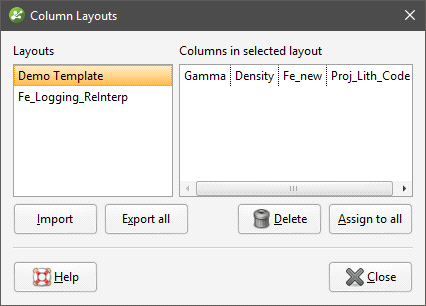
You can also export column layouts for use in other projects and import layouts from other projects. Clicking Export all exports layouts as a text file.
Managing Styles
The styles used to display data columns can also be exported to other projects. To view the styles used in the project, right-click on the Drillhole Correlation folder in the project tree and select Style Manager:
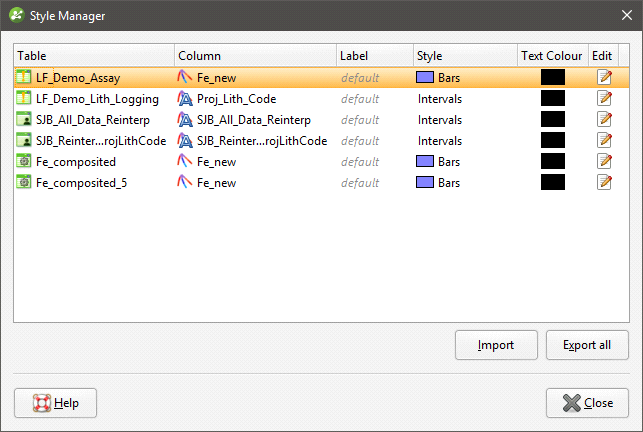
Click Edit to change a style, which will update objects that use the selected style throughout the project.
Click Export all to export the styles in the project as a text file that can be imported into other projects.
Interpretation Tables
With interpretation tables, you can assign and adjust intervals and create new intervals. Interpretation tables are like any other interval table in a project and can be used to create models.
To create an interpretation table, click the New Interpretation button in the correlation set window. The New Interpretation Table window will be displayed:
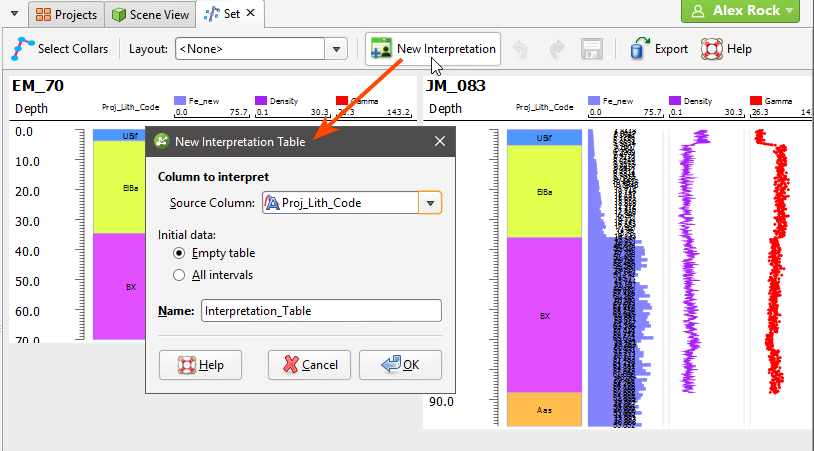
There are three options for creating an interpretation table:
- Create the table without using a base table. Each drillhole will have an empty legend and a single empty interval from 0 to its maximum depth. Select <None> for the Source Column.
- Create the table from a base column but have no intervals. This copies the base column’s legend but no intervals. Select the Source Column, then select Empty Table.
- Create a copy of a table. Select the Source Column, then select All Intervals.
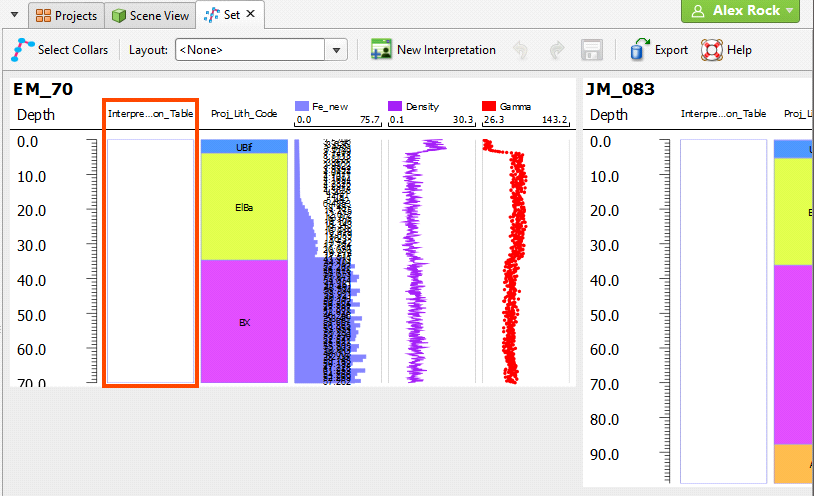
Click OK to create the table. A new interpretation table will be added to the project tree under the Drillholes object and the column will be added to the correlation set window:
Assigning Lithologies
If you have created the interpretation table without using a base table, you will need to assign lithologies to the new table. Do this as part of working with the table in the correlation set window, which is described below.
Modifying the Interpretation Table
In the correlation set window, the blue line is used to create intervals. Position the blue line then right-click on it and select one of the options:
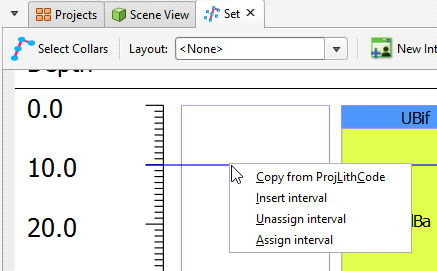
- The Copy from option assigns intervals from the base table.
- The Insert interval option adds an empty interval that overrides any intervals already defined.
- The Unassign interval option clears the lithology assigned to the interval.
- The Assign interval option opens the legend for the interpretation table so you can select a lithology to assign to the interval. If you need to add lithologies, you can do so in this window.
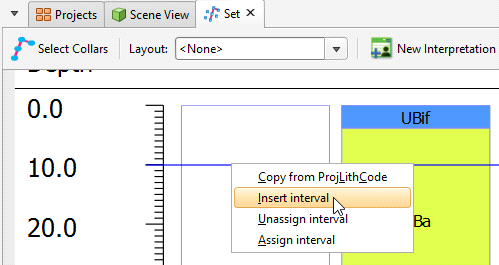
For example, to create an interval at the top of the table called “High Density”, move the blue line near to where you wish to create the interval. You do not need to be precise as you can adjust the interval once you have added it. Right-click and select Insert interval:
In the legend window, click the Add button and add a lithology called “High Density”:
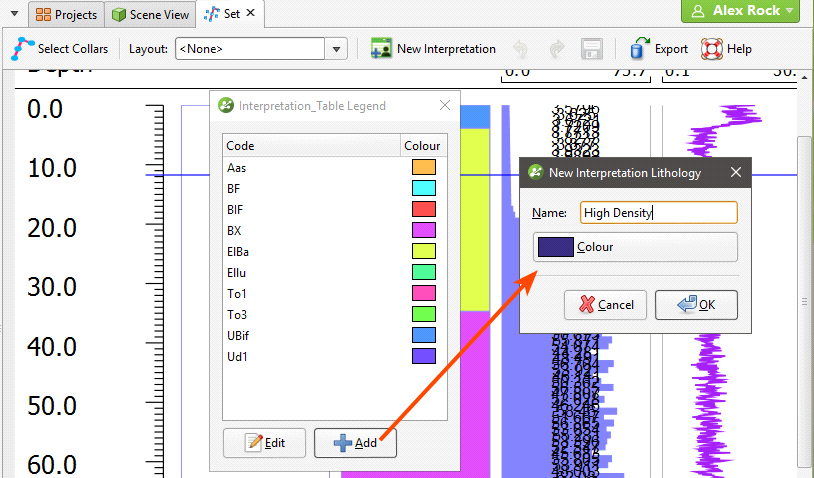
Click OK, then select the new lithology to close the legend window. The new lithology has been assigned to the interval:
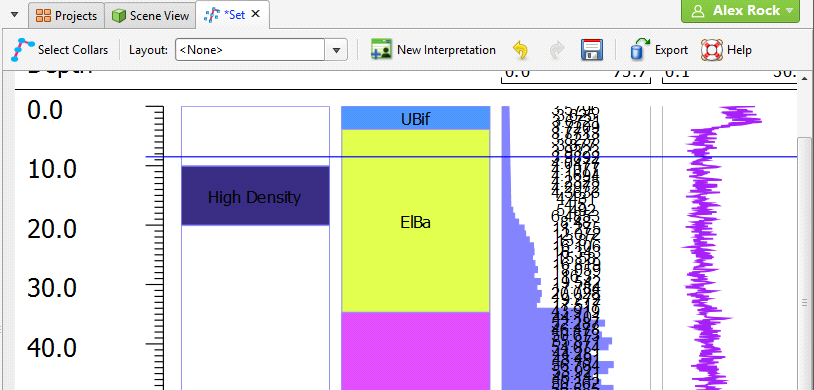
To resize the interval, click and drag the interval end points:
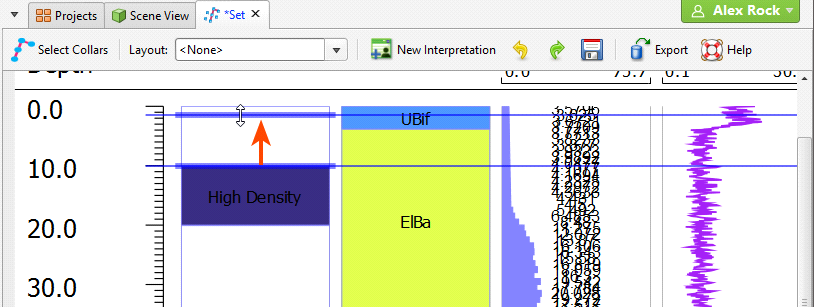
You can move the interval end point and snap it to a data point in another column. To do this:
1. Click on the interval end point and drag it into position without releasing the mouse button.
2. Move the mouse across to the data point you wish to snap to.
3. Release the mouse.
You can also snap to points along the depth axis.
Continue making changes to the interpretation table, using the Undo button to step backwards if necessary. Save changes to update the table.
Got a question? Visit the My Leapfrog forums at https://forum.leapfrog3d.com/c/open-forum or technical support at http://www.leapfrog3d.com/contact/support