Correcting Data Errors in Leapfrog Geo
This topic describes how to correct errors in data tables in Leapfrog Geo. It is divided into:
- Identifying Errors in Data Tables
- Exporting Data Errors
- Viewing and Correcting Errors in Leapfrog Geo
- Common Errors and How to Fix Them
- Handling Special Values
Identifying Errors in Data Tables
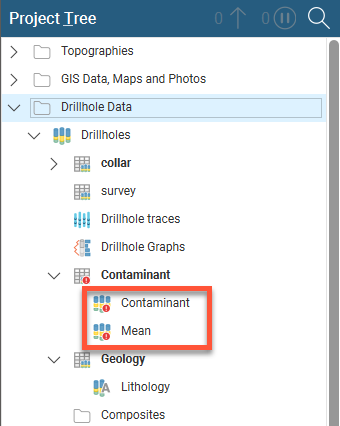
Leapfrog Geo automatically identifies and flags common data errors when data tables are imported. In the project tree, there are three ways Leapfrog Geo marks tables that contain conflicts or errors:
- Tables marked with a red exclamation mark (
 ) contain errors that mean data cannot be used for processing. These errors can be corrected by opening the Errors window, which is described in Viewing and Correcting Errors in Leapfrog Geo below.
 - Numeric data columns marked with a red exclamation mark (
 ) contain non-numeric values, which means that the rules that are used to handle non-numeric and negative values need to be reviewed. If a table has data that contain non-numeric and negative values, the affected rows cannot be used for further processing until the rules are verified, which is described in Handling Special Values below.
 - Tables marked with a yellow exclamation mark (
 ) contain warnings. Affected rows can be used for further processing, but the information in the warning can indicate that the data requires further attention. For example, if a warning indicates there is data missing for a drillhole defined in the collar table, it may be that a drillhole has been duplicated or that not all required data files have been loaded. Warnings are listed along with table errors in the Errors window.
Until errors are corrected, the rows that contain those errors are excluded for all processing that uses the table, including viewing in the scene. For example, if the ID for a collar position contains an invalid coordinate, that collar will not be displayed in the scene as its location is not known. Likewise, any processing will ignore data associated with this drillhole.
It is worth correcting errors as soon as possible, as correcting them later can result in significant recomputation time.
When a table contains errors and warnings, only the errors will be apparent in the project tree view. However, all errors and warnings relevant to a particular table will be displayed in the Database Errors window.
There are two approaches to correcting errors in data:
- Correct the data in the primary source. Export the errors as described in Exporting Data Errors below. Then, when the errors have been corrected, reload the drillhole data as described in Reloading Data Tables.
- Correct the data in Leapfrog Geo. If you need a record of corrected errors, first export the errors as described in Exporting Data Errors below. Then correct errors as described in Viewing and Correcting Errors in Leapfrog Geo below.
Exporting Data Errors
If you need a record of corrected errors, first export the errors. This must be done first, as once errors have been corrected in Leapfrog Geo, they cannot be exported, as they no longer exist.
For individual drillhole tables, points tables and structural data tables, export the errors by right-clicking on the table and selecting Export Errors. Choose a location where the file will be saved and click Save.
To export all errors in the drillhole data set, right-click on the Drillholes object and select Export > Export Errors. The Export Drillhole Errors window will appear:
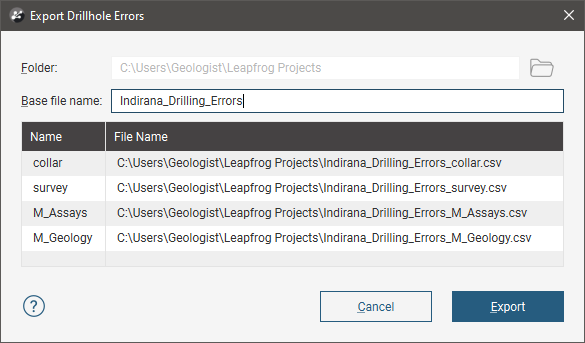
The list shows the files that will be created, one for each table that contains errors. Choose a folder where the files will be saved, then enter a Base file name, which will be added to the front of each file name.
Click Export to export the error files.
Viewing and Correcting Errors in Leapfrog Geo
If you require a record of the errors in data, export the errors as described in Exporting Data Errors above before starting to correct the errors in Leapfrog Geo.
To correct errors in a data table, right-click on the table and select Fix Errors. The Errors window will appear. For drilling data, you can display collated errors for the data set as a whole or on a table-by-table basis. To display collated errors for the whole data set, right-click on the Drillhole Data object in the project tree and select Fix Errors.
Leapfrog Geo identifies a range of common errors, and all errors identified are grouped by type. Click on an error type to expand it and see more information. Here the errors are shown for a survey table. The Hole ID not in collar table error has been expanded and the error in row 9 is displayed, showing the value that is causing the error:
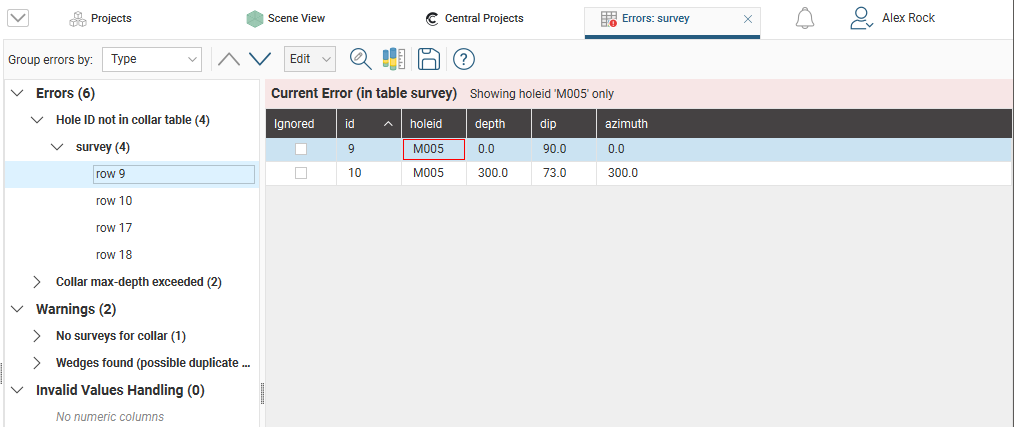
You can change the size of the Errors window and the columns in the table to view more information easily. When you have finished fixing errors, click the Save button (![]() ). Leapfrog Geo will then update the database.
). Leapfrog Geo will then update the database.
Errors are automatically grouped by Type, but if there are many errors, you may find it useful to view them grouped by Table or by the Hole:

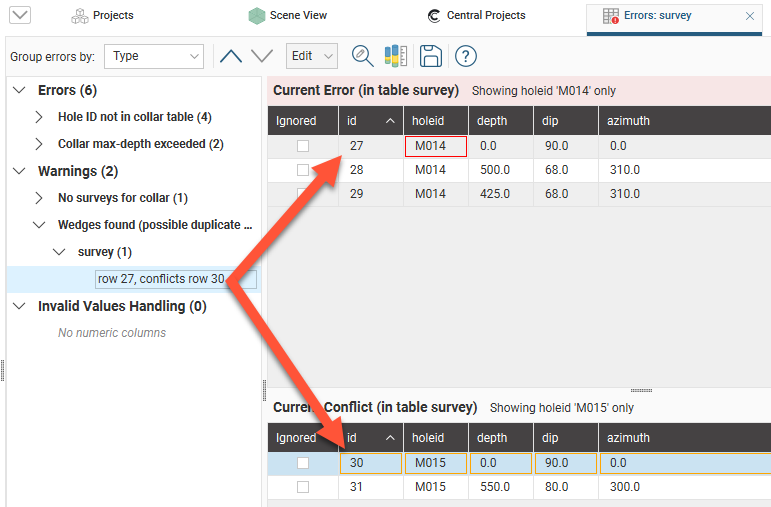
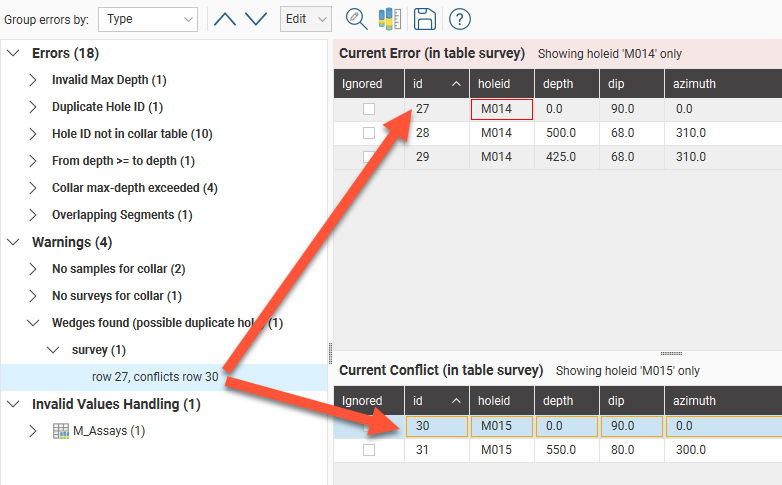
When a row that contains an error is selected, a red box indicates the source of the error. When two rows of data conflict, both rows will be displayed, which may be useful in determining how to fix the error:
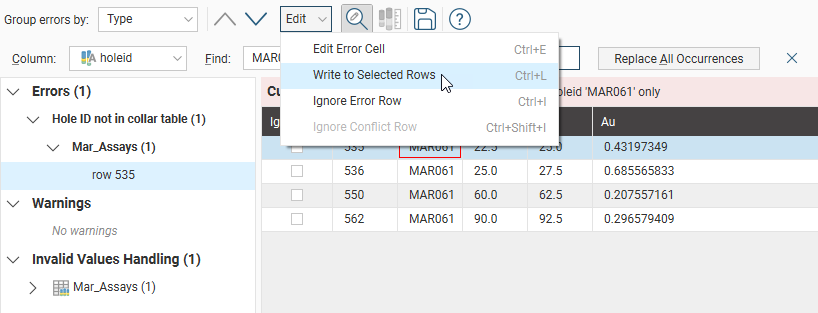
The Edit button gives you a number of options for correcting data errors:
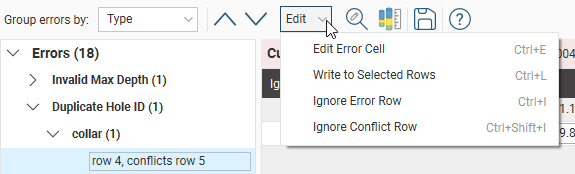
- Use Edit Error Cell to edit the incorrect value.
- The Write to Selected Rows option opens the Replace All option, which is described below, in Replacing Values in a Column.
- Use Ignore Error Row to mark selected rows to be ignored.
- When two rows of data conflict, use Ignore Conflict Row to mark the conflicting row as ignored.
Replacing Values in a Column
The Replace All button (![]() ) in the toolbar may be useful in correcting any errors without closing the Errors window. With the Replace All button, you can replace an incorrect value that occurs multiple times in a column. To do this, click the Replace All button. Select the Column to search and enter the new value:
) in the toolbar may be useful in correcting any errors without closing the Errors window. With the Replace All button, you can replace an incorrect value that occurs multiple times in a column. To do this, click the Replace All button. Select the Column to search and enter the new value:

Click Replace All Occurrences to make the changes.
You can also select a number of rows and replace values in a selected column with a single value. To do this, use the Shift and Ctrl keys to select the rows you wish to edit, then click the Edit button and select Write to Selected Rows:
The Replace All Occurrences button will change to a Write to Selected Rows button. In the fields that appear, enter the New value, then click the Write to Selected Rows button:

Common Errors and How to Fix Them
There are many possible sources of error in the data itself and you may be able to correct the errors directly in the Errors window. With drillhole data, however, the message given in the Errors may actually point to an error elsewhere in the dataset, in which case you will need to open the other table from the project tree and edit it directly.
The errors and warnings described are:
- Duplicate Points Error (Points Tables)
- Duplicate Hole ID Error
- Hole ID Not in Collar Table Error
- Collar Max Depth Error
- Invalid Max Depth Error
- From Depth Exceeds To Depth Error
- Overlapping Segments Error
- No Samples for Collars Warning
- No Surveys for Collar Warning
- Wedges Found Warning
Duplicate Points Error (Points Tables)
Points tables will have Duplicate Points errors when rows have identical x, y and z values:
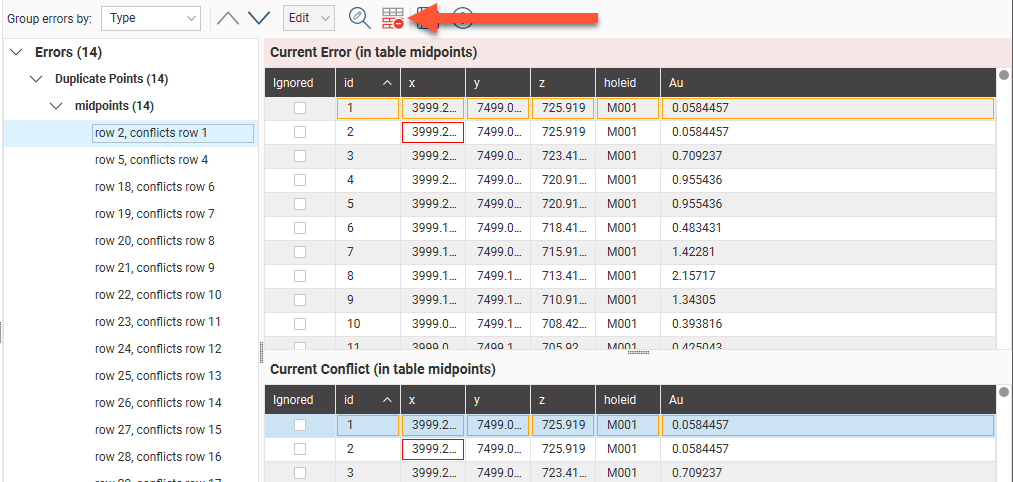
Tick Ignored for the rows you wish to ignore. If there are many duplicate points in the table, click the Ignore Duplicates button (![]() ). When you save the table, all duplicate rows will be marked as Ignored.
). When you save the table, all duplicate rows will be marked as Ignored.
Duplicate Hole ID Error
Collar tables will have Duplicate Hole ID errors when collars have been assigned the same ID. Here, rows 4 and 5 have the same ID but are clearly different holes:

Changing the hole ID for one of the drillholes will correct the error. If the collar has been recorded twice by accident, tick the Ignored box for the duplicate collar.
Hole ID Not in Collar Table Error
Interval tables will have Hole ID not in collar table errors when the hole ID specified in the interval table is not found in the collar table.
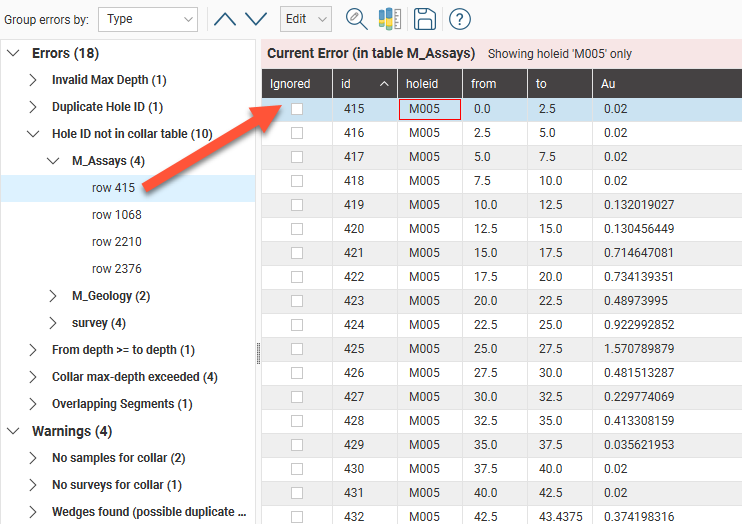
Affected intervals cannot be displayed. There are two possibilities for fixing this error:
- The collar table uses the wrong hole ID. Edit the collar table to correct the hole ID.
- The interval table uses the wrong hole ID. Use the Replace All tool to the incorrect values with the correct one. See Replacing Values in a Column above.
Collar Max Depth Error
Interval tables will have Collar max-depth exceeded errors when the depth values in the interval table exceeds the maxdepth value defined in the collar table. The maxdepth defined in the collar table is often a theoretical value established before drilling. If the depth value flagged as an error is not unrealistic, click on the Fix Max Depths button (![]() ):
):
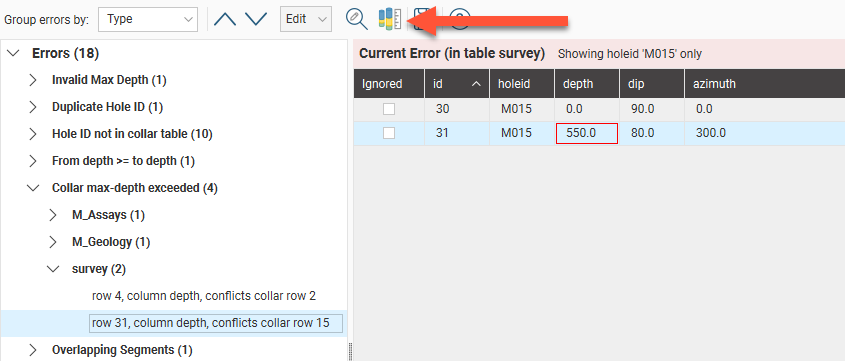
This results in the collar table being updated with a maximum depth value that reflects the data in the interval tables.
Invalid Max Depth Error
Collar tables will have Invalid Max Depth errors when the maxdepth value is negative or non-numeric:
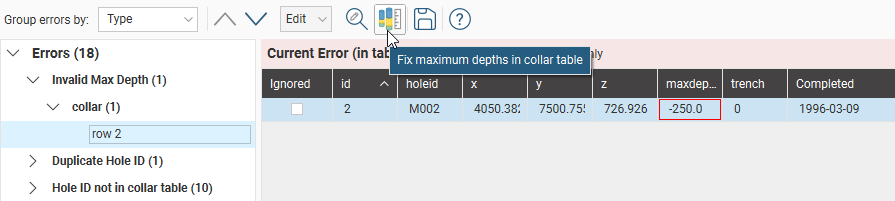
These errors are often the result of data entry mistakes and can be corrected by editing the table in the Errors window.
From Depth Exceeds To Depth Error
Interval tables will have From depth > = to depth errors when the from and to values in a row do not make sense:
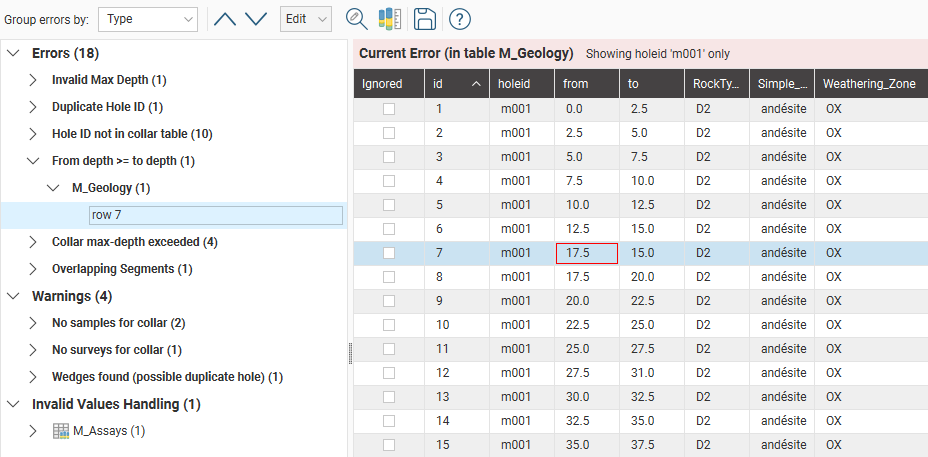
These errors are often the result of data entry mistakes and can be corrected by editing the table in the Errors window.
Until the error is corrected, the affected interval cannot be displayed, although all non-conflicting intervals will still be displayed for that drillhole.
Overlapping Segments Error
Interval tables will have Overlapping Segments errors when intervals are in the same place for the same hole or when two holes are in the same place. Here, row 12 overlaps row 13 and the error can be corrected in the Errors window by entering the correct to value for row 12:
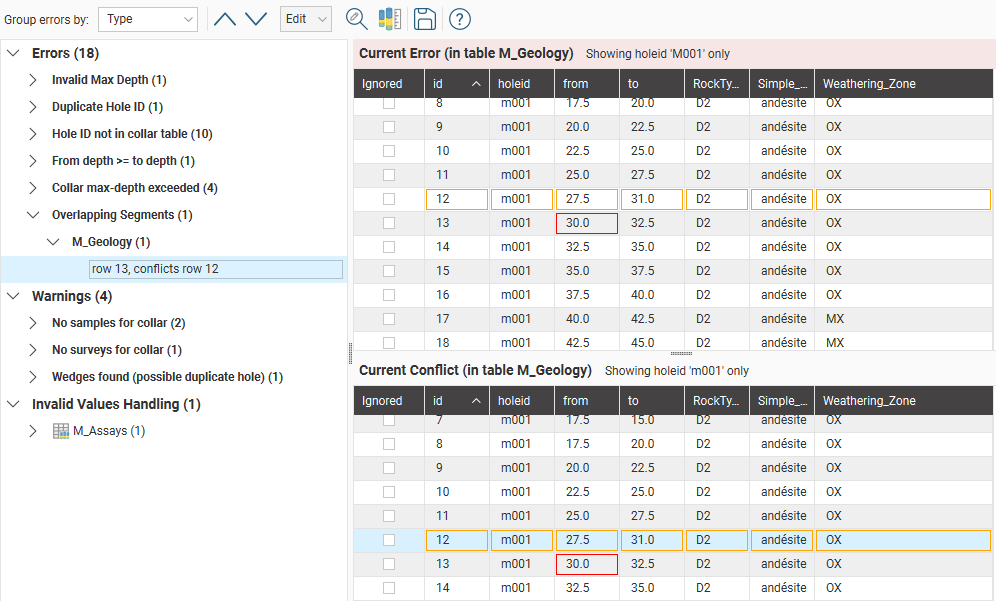
If an interval has been defined twice, click Ignored for one of the rows. Until the error is corrected, the affected intervals cannot be displayed, although all non-conflicting intervals will still be displayed for that drillhole.
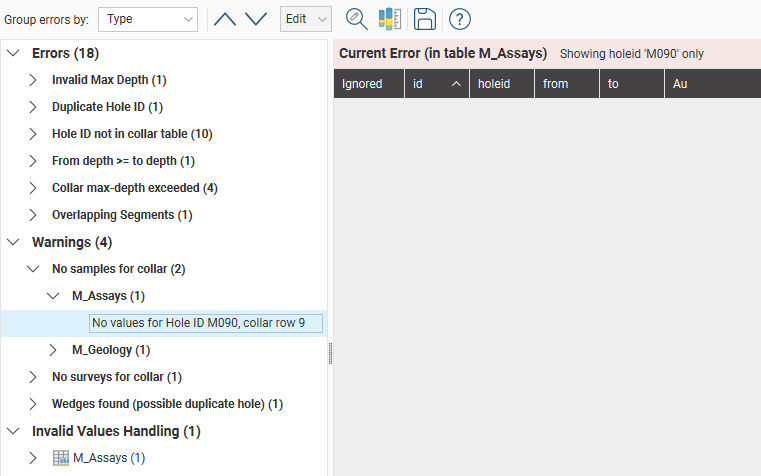
No Samples for Collars Warning
Interval tables will have No values for Hole ID warnings when there are no values in the interval table that correspond to a collar defined in the collar table. In this example, a hole called M090 has been defined in the collar table, but there is no data for it in the M_Assays table.
There are three possibilities:
- There are no values in this interval table for that collar. There is no need to do anything to remedy the warning as it will not affect further processing of the data.
- The collar table uses the wrong hole ID. This may be the case if there is also a Hole ID not in collar table warning listed. Edit the collar table to correct the hole ID.
- There are values for that collar in the interval table but they use the wrong collar ID. Again, there may also be a Hole ID not in collar table warning listed. Edit the interval table and correct the hole ID for the affected intervals.
No Surveys for Collar Warning
This survey table error is similar to No Samples for Collars Warning above: there are no values in the survey table that correspond to a collar defined in the collar table. Check that the collar table and the survey table are using the right hole ID. You will need to edit the survey table or collar table directly before this warning can be cleared.
Wedges Found Warning
Wedges found warnings occur in the collar table or in the survey table when drillholes appear to be duplicates because they are very close together in space.
Leapfrog Geo flags drillholes that are less than 1° apart as possible duplicates; if you have two drillholes that are that close together, you may need to adjust the collar location of one of the drillholes to clear the warning. You can do this by editing the collar table.
Handling Special Values
Assay data often contains special values to represent different situations, such as grade values that are below a detection limit, cores that have been lost or segments that were not sampled. In addition, it is not uncommon for a drillhole to contain some intervals that have no values.
When drillhole data tables and points data are imported, Leapfrog Geo will mark columns containing non-numeric special values and missing intervals so that you can review these missing and non-numeric values and determine how Leapfrog Geo will handle them. For example, here numeric data columns that contain errors are marked with a red X:
To review these errors, double-click on the column. The Errors window will appear with the error displayed for the selected column:
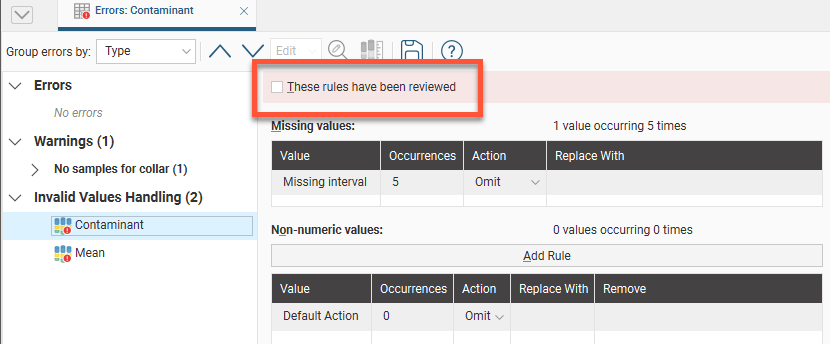
Leapfrog Geo will automatically set missing and non-numeric intervals to be omitted from further processing. Negative values are automatically set to keep. To change the Action, select another action from the list:
- Select replace to enter a numeric value to be used for further processing.
- Select keep to use a negative value in further processing.
For non-numeric and negative values, all values are initially treated as a single rule. However, if values have different meanings, you can define specific rules to determine how each value is handled. To do this, click on the Add Rule button. The window that appears will show the values present in the data. To define a new rule for a specific value:
- Select that value in the list.
- Tick the box for The value I want is not in the list.
- Enter the Value.
- Click OK.
In the Invalid Value Handling window, the value will be listed separately and you can choose the Action to apply.
Once you have reviewed the rules that will be applied to the column, tick the These rules have been reviewed box and click OK. The rules will be applied and used in further processing.
When you open a data table, the original values will be displayed. In all further processing of that data, the assigned special values will be used.
Got a question? Visit the Seequent forums or Seequent support