Query Filters
Query filters can be used to select or view a subset of rows in a table. A query filter can be created for any type of table in a Leapfrog Geo project, including drillhole data, GIS data, points data and structural data.
Two different query builders are used in Leapfrog Geo, the standard query builder that is used for most data tables and the points query builder that is used for imported points data tables.
The rest of this topic describes how to build and use query filters in Leapfrog Geo. It is divided into:
- Using a Query Filter in Displaying Data
- Using a Query Filter in a Model
- The Standard Query Builder
- The Points Query Builder
Using a Query Filter in Displaying Data
To apply a query filter to the scene, select the object in the shape list, then select the filter from the Query filter list in the shape properties panel:
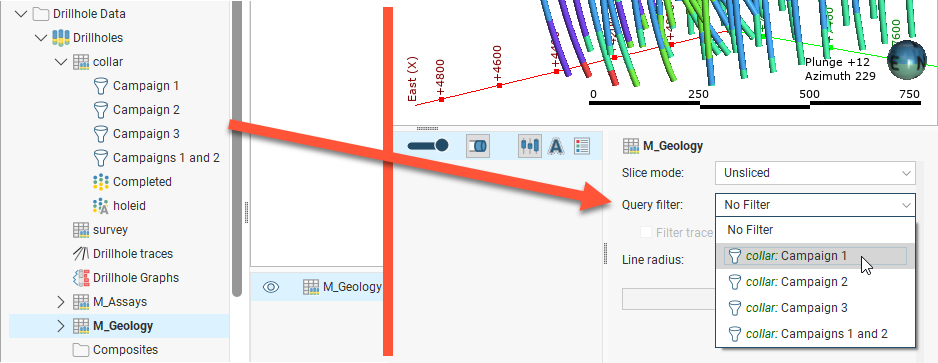
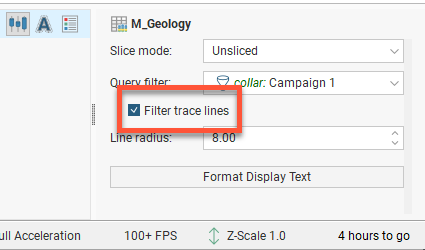
For a drillhole data table, this displays only the data selected by the filter. The trace lines remain displayed in the scene. To filter out the trace lines so they are not displayed in the scene, tick the Filter trace lines box:
Using a Query Filter in a Model
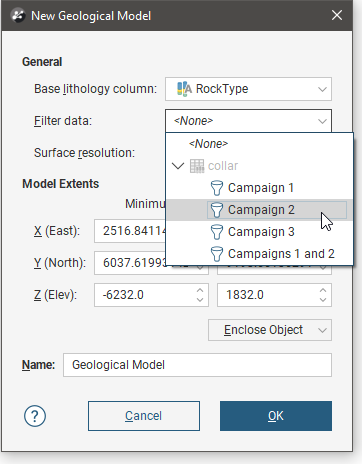
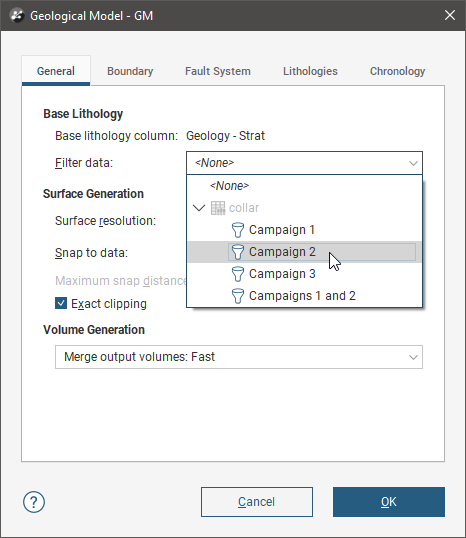
When creating or editing a model, you can use a query filter to filter the data used. For example, here you can use one of the query filters defined for the drillhole data to create a new geological model from the drillhole data for a specific drilling campaign:
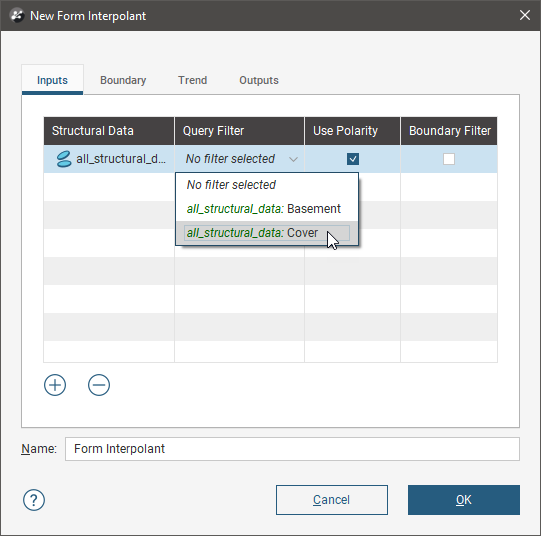
Here a structural data table is used to create a form interpolant. The query filters on the structural data table can be used to filter the data used in the interpolant:
It is also possible to change the filter used for a model after the model has been created. In a geological model, for example, you cannot change the data column used for the model, but you can edit the model and apply a new query filter to the data:
The Standard Query Builder
The standard query builder is used for creating queries for all data tables in Leapfrog Geo except for imported points data tables. For information on building queries for points data tables, see The Points Query Builder below.
There are three windows that make up the standard query builder:
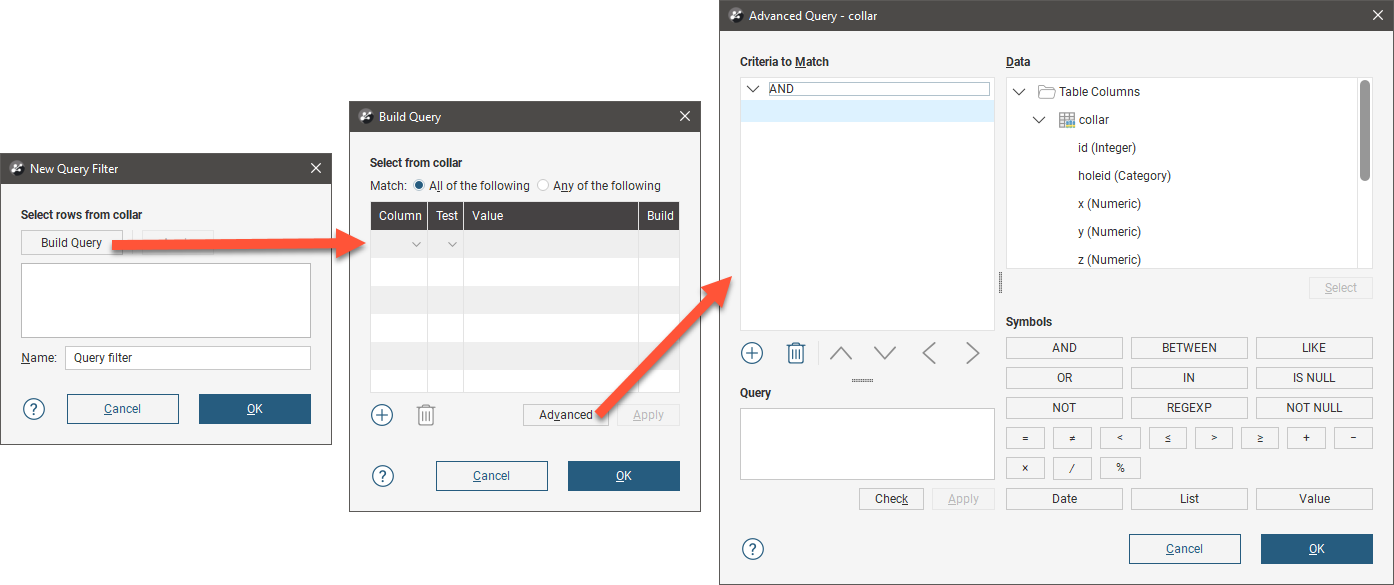
In the first window, the New Query Filter window, you can type in a query using the query syntax described in Leapfrog Geo Query Syntax. Press Ctrl-Enter for a new line in longer queries.
The second window, the Build Query window helps you build some common queries by selecting from the data columns in the table and defining different tests. Open the Build Query window by clicking the ... button in the New Query Filter window. See The Build Query Window for more information on building queries in this way.
The third window, the Advanced Query window, shows all the data columns and possible operations. See The Advanced Query Builder for more information.
To create a query filter for a data table, right-click on the table in the project tree and select New Query Filter. The New Query Filter window will appear and you can choose which way you prefer to build your query. Assign the filter a name and click OK to save it. It will appear in the project tree under the table to which it applies:
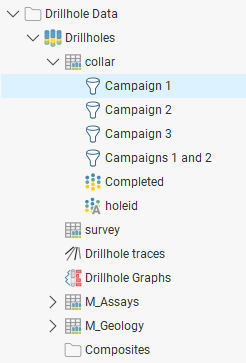
Query filters defined for collar tables are available to all other drillhole data tables.
Leapfrog Geo Query Syntax
The Leapfrog Geo query syntax is based on the WHERE clause of the Structured Query Language (SQL) with some restrictions:
- Unary operators are not allowed
- SQL functions cannot be used
- The SELECT statement should not be used (as in 'holeid in (SELECT holeid FROM ...)')
- Following statements are also prohibited: CASE, WHEN or MATCH
There is also one main SQL extension:
- IN and NOT IN will accept a partition group for the value list. E.g. 'zone IN layers.weathered' where "layers" is a partition of the "zone" column that has a group called 'weathered'.
These are some examples of valid Leapfrog Geo query statements:
- holeid in ('m-001', 'm-002')
- holeid not in ('m-001', 'm-002')
- holeid not like 'MAR%'
To enter a query that contains an apostrophe, enter two apostrophes. Adding the second apostrophe lets the query builder treat this as a mid-phrase apostrophe instead of an end-of-phrase marker, and results in a valid query.
The Query box allows the following shortcut queries:
- Typing a single word will match all hole-ids starting with that string. For example, typing "MAR" is a shortcut for "holeid like 'MAR%'"
- Typing a comma-separated list of words will match all hole-ids that exactly match the given words. For example typing "M001, M002" is a shortcut for "holeid in ('M001', 'M002')".
The Build Query Window
Many common queries can be built using the Build Query window:
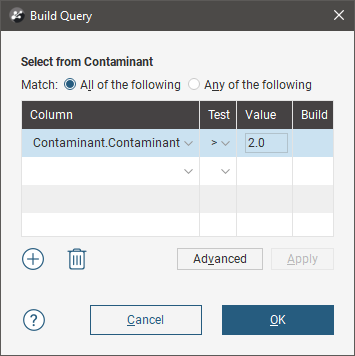
This window aims to be easy to use rather than comprehensive in its support for the full Leapfrog Geo query syntax.
To add a criteria, click Column to view a list of columns available in the table. Select a Test and enter a Value. What can be entered for the Value depends on the type of column and test selected.
Quotes are not required around text values entered in the value column as they are in SQL. Leapfrog Geo will add quotes and brackets to the value "MX, PM" to make a valid SQL list of strings "('MX', 'PM')" when the query is saved.
Click on the Apply button to apply to query to the context in which the dialog was opened.
Use the Delete button to delete the criteria in the selected row and the Add button to add a blank row.
The Advanced Query Builder
The Advanced Query window provides a powerful and flexible query building using the Leapfrog Geo query language.
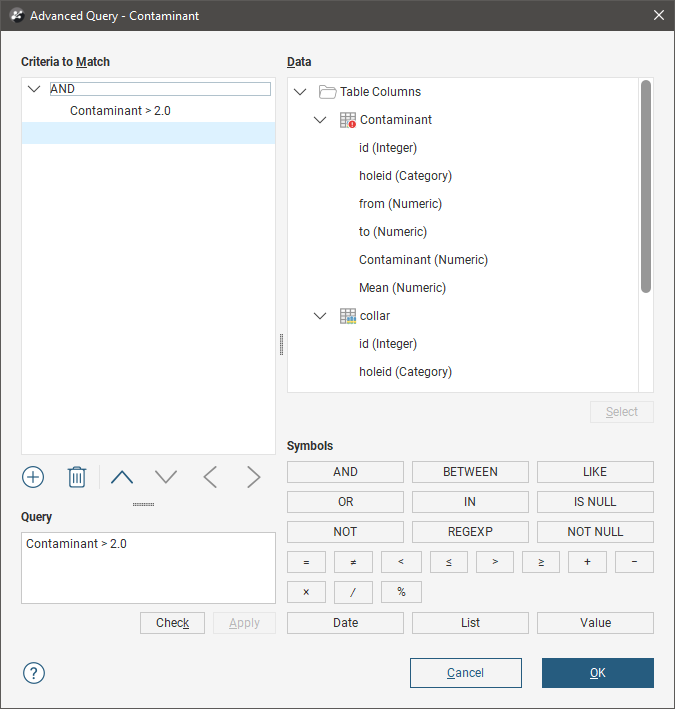
Enter the query in the Criteria to Match area on the left. The query is displayed as a tree structure with AND and OR terms as the branch nodes and conditions as the leaves. Use the Delete button to delete a row from the query and the Add button to add a blank row. The Check button can be used at any time to check if the current query statement is valid. Below the buttons is a box showing the raw SQL form of the query.
Except for the arrow buttons, the buttons down the middle of the dialog are used for entering values into the query. The arrow buttons are used for moving the currently selected criteria to a different position in the query. The Date, List and Value buttons will open a builder dialog for the column selected in the current row. If there is no column found or the column is of the wrong type, an error message is displayed.
The tree on the right contains all the columns available to the query. Double-click on a column name to insert it into the query.
The Points Query Builder
Imported points data tables use a different query builder from that used for other data tables.
To create a query filter for a points data table, right-click on the table in the project tree and select New Query Filter.
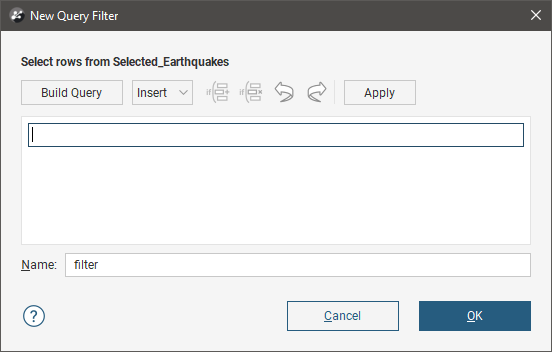
You can define filters by three methods:
- Construct the query using the Insert options to add columns, operators and other elements
- Write the query using query syntax directly in the query editor
- Use the query builder
Insert Query Elements Using Ready Reference
Click the Insert button to expand the window to see an adjacent ready reference. This provides quick access to all the numeric columns, metadata variables, operators and functions that can be used in constructing a query.
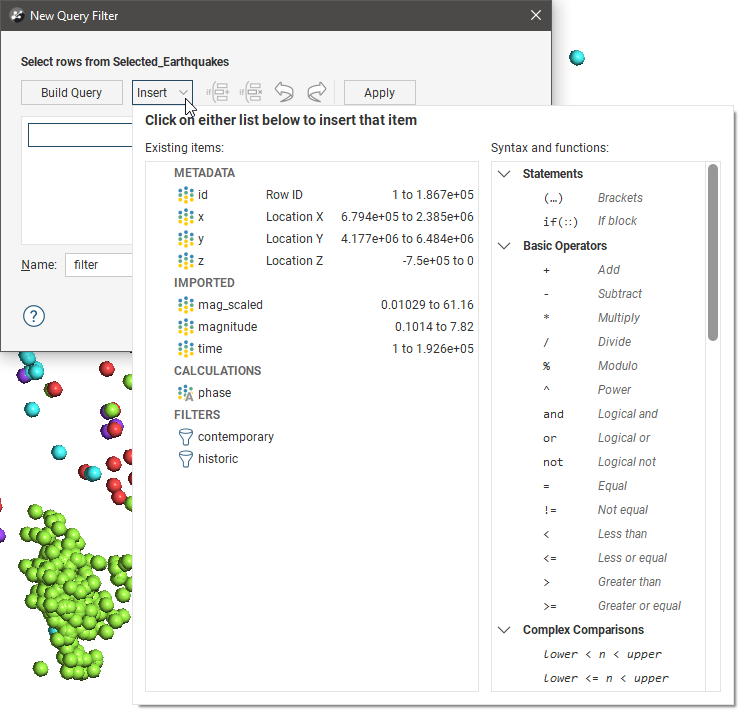
The Insert list will assist you in constructing a valid query in the same syntax as used for Calculations and Filters. For full details on each of the Existing items and Syntax and Functions, see Catalogue of Metadata, Syntax and Functions.
Select an item from the Insert list and the item will be added to the query at the cursor location.
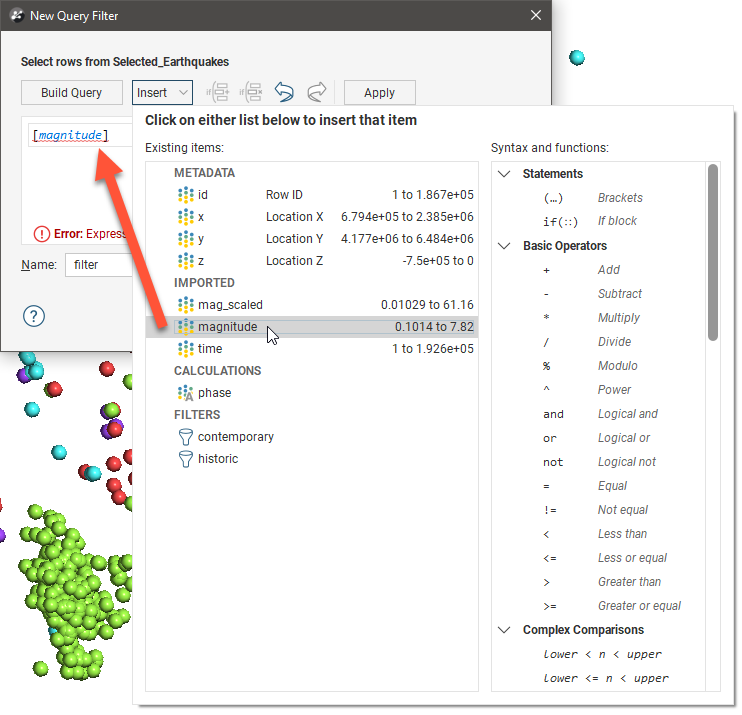
While the query is being built, it is normal to see errors appear under the partly-constructed query. This is because the query is incomplete. Once you have completed building your query, if you still see an error message, the description of the error can help you identify what you need to change in the query to make it valid.
The if(::) if block option is special in that it allows for multiple rows of conditions to be defined. Once added, putting the cursor inside the if block will result in the Add Row button (![]() ) becoming available. If condition rows have been added, the Delete Row button (
) becoming available. If condition rows have been added, the Delete Row button (![]() ) will be available whenever the cursor is inside a condition row.
) will be available whenever the cursor is inside a condition row.
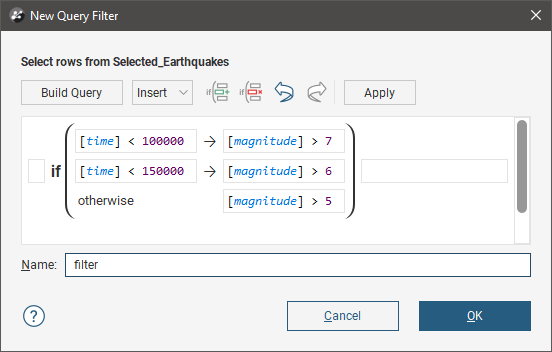
The Undo and Redo buttons make it easy to revert a change you made to a query, or repeat a change you have just reverted.
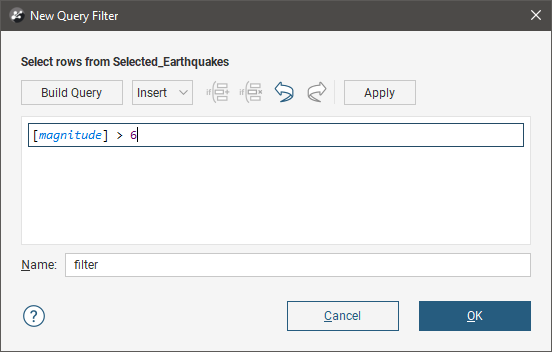
Assign the filter a name and click OK to save the filter and close the query filter window. It will appear in the project tree under the table to which it applies. Apply will change the filter in use so the effect may be seen in the scene without closing the query filter window.
Write a Query in Query Editor
It is not necessary to use the Insert list to add elements to the query under construction. Once you become familiar with the query syntax you may find it quicker to simply type the query directly into the query editor window.
For full details on the syntax for this query filter editor, please see Catalogue of Metadata, Syntax and Functions.
Write a Query Using the Query Builder
Many common queries can be built using the Build Query window:
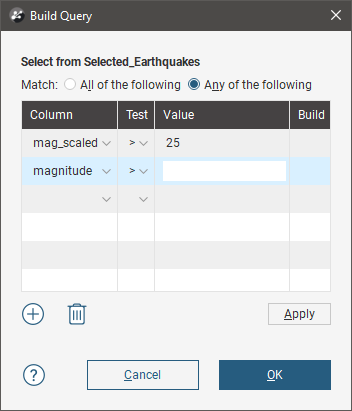
This window aims to be easy to use rather than comprehensive in its support for the full Leapfrog Geo query syntax.
To add a criteria, click Column to view a list of columns available in the table. Select a Test and enter a Value. What can be entered for the Value depends on the type of column and test selected.
Click on the Apply button to apply to query to the context in which the dialog was opened.
Use the Delete button to delete the criteria in the selected row and the Add button to add a blank row.
Got a question? Visit the Seequent forums or Seequent support