Triangulated Meshes
A triangulated mesh is a type of editable mesh (![]() ). A triangulated mesh uses Delaunay triangulation to create the mesh and can handle more points than an interpolated mesh. Triangulated meshes can be created from points data, GIS data and polylines. Large datasets representing horizontal surfaces can be used to create a triangulated mesh.
). A triangulated mesh uses Delaunay triangulation to create the mesh and can handle more points than an interpolated mesh. Triangulated meshes can be created from points data, GIS data and polylines. Large datasets representing horizontal surfaces can be used to create a triangulated mesh.
The steps for creating a mesh from data in the project are similar, regardless of the data used to create the mesh. To create a triangulated mesh from data in the project, right-click on the Meshes folder and select from the New Triangulated Mesh options.
Here, a new triangulated mesh is being created from points:
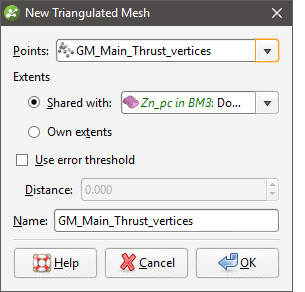
Select the required object from the list.
When defining the mesh’s extents, you can set the extents to be independent of other objects in the project (Own extents) or you can use the extents of another object (Shared with). When you select the Shared with option, the mesh will be updated when the extents object it shares is updated.
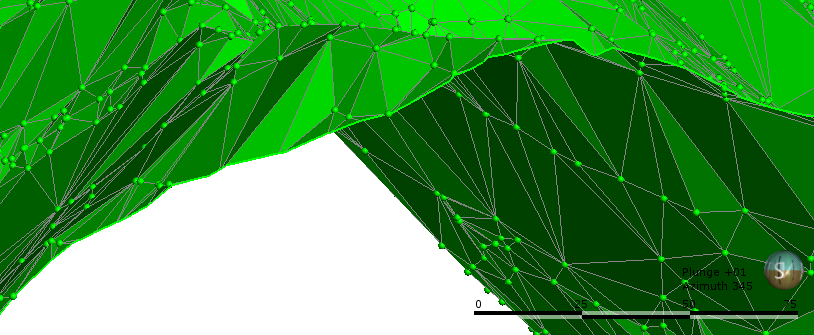
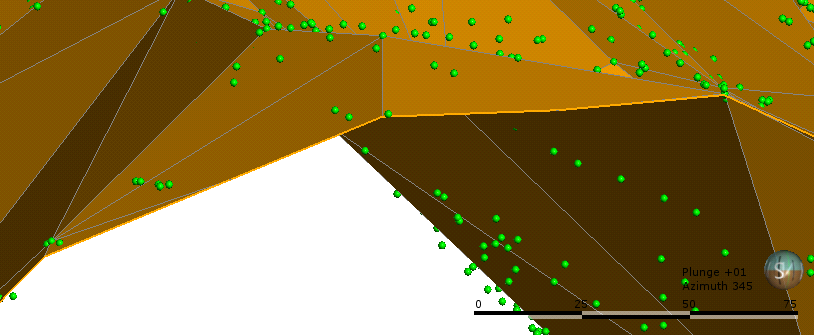
The Use error threshold setting lets you exclude data points that fall within the threshold. This can be useful if you are using a large dataset and you require a more coarse surface that omits some data. When Use error threshold is disabled, the mesh will follow all the data.
Here, a mesh created from points has the Use error threshold disabled. The mesh follows all the points:
Here, a mesh has been created with the Distance set to 20. The mesh ignores points that fall outside the threshold:
You will be able to change the Use error threshold setting once the mesh has been created.
Enter a name for the new mesh and click OK.
If you are creating the mesh from a polyline, you will be prompted to select an existing polyline or draw a new one. If you draw a new polyline, it will not be able to be used elsewhere in the project unless it has been shared. To share the polyline, expand the mesh in the project tree, right-click on the polyline and select Share.
The new mesh will appear in the Meshes folder and you can edit its settings by double-clicking on it.
To add data to a triangulated mesh, right-click on it and select one of the options from the Add menu. A list of objects available in the project will be displayed. Select the required object and click OK. The mesh will be updated and the object used to modify it will appear under it in the project tree.
It is not possible to add structural data or polylines with orientation information to a triangulated mesh. If you edit a triangulated mesh with a polyline, your options for editing the polyline will be limited.
Got a question? Visit the Seequent forums or Seequent support