Saved Scenes
A saved scene is a way of storing the objects in the shape list and their settings. Saved scenes are stored in the Saved Scenes and Movies folder and can be dragged into the scene, restoring the list of objects and their settings. A saved scene is, in effect, a bookmark of a specific view of the project data. A saved scene does not maintain an independent copy of the data in the project, and so if the data changes, then the appearance of the scene will also change.
When a scene is saved, comments can be entered documenting what is in the scene. Saved scenes provide a stable point of reference in a project and can explain important features of the project, which is especially useful for explaining features of a model to others using the project or viewing scene files.
Saved scenes can also be:
- Exported to Leapfrog Viewer. You can export a single scene or a series of scenes.
- Used to create a movie. See the Movies topic for information on using a series of saved scenes to create and export a movie.
The rest of this topic describes:
Saving Scenes
To save the list of objects currently displayed in the Scene View tab, right-click on the Saved Scenes and Movies folder and select Save Current Scene. The Save Scene window will be displayed:
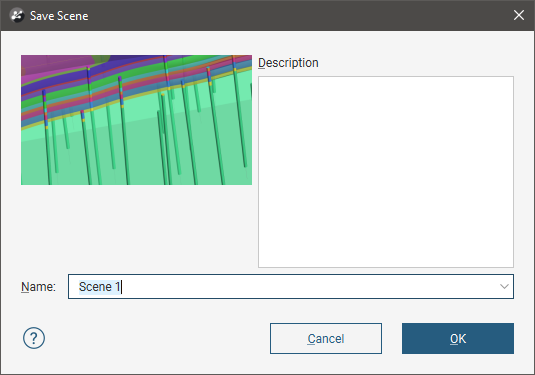
Enter a name and description for the scene and click OK. The scene will be saved and added to the Saved Scenes and Movies folder.
When you save a scene, the properties settings in the shape list are saved for the objects displayed in the scene. For example, if a lithology table is displayed with the legend in the scene, the legend will be displayed when the scene is restored. However, saved scenes do not store copies of the objects in the project tree, and objects deleted from the project tree are no longer available in saved scenes.
To edit a scene, double-click on it. The Edit Saved Scene window will be displayed and you can update the information.
To display a scene, drag it into the Scene View tab.
Exporting Scenes
Once you have a series of saved scenes, you can use them to create a scene file that can be opened in Leapfrog Viewer.
To export a scene, right-click on the Saved Scenes and Movies folder and select Export Scenes. The Export Scenes window will be displayed. Move the scenes you wish to export to the Selected scenes list and reorder them, if required.
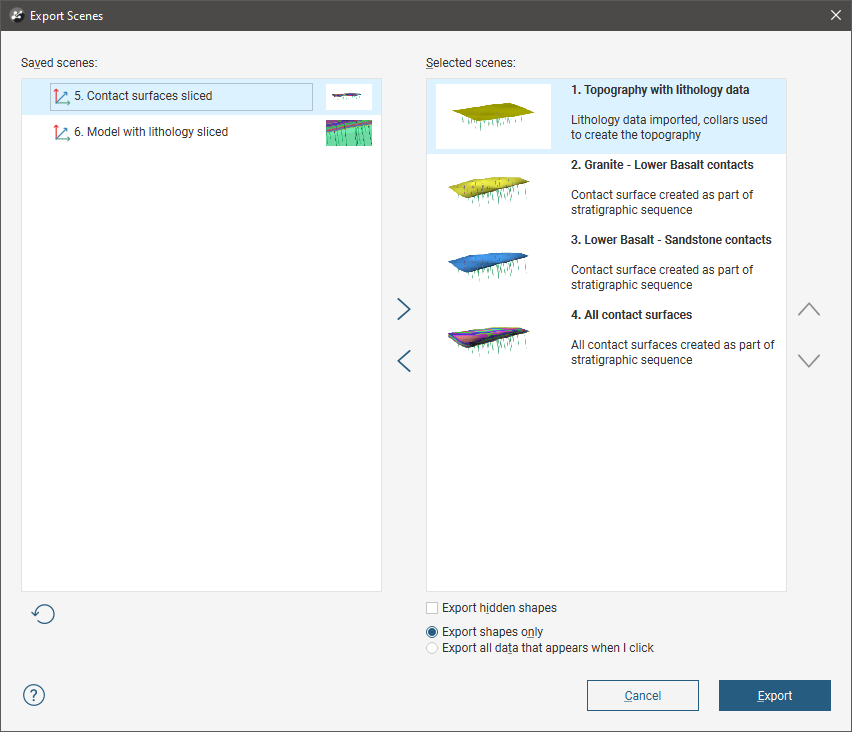
You can also export an individual scene by right-clicking on the scene and selecting Export.
If you tick the Export hidden shapes box, objects in the shape list that are not visible in the scene window will be included in the exported scene.
You can also export the data associated with the objects in the scene window, if required. To do so, select the Export all data that appears when I click option. If viewing the data is not required, or if you wish to keep sensitive data secure, select the Export shapes only option.
When the Export all data that appears when I click option is selected, all data represented by shapes in the exported scene will be accessible when the scene is opened in Leapfrog Viewer.
When you have the scenes arranged, click Export. You will be prompted for a filename and location.
Exported scenes cannot be reimported to the project.
Linking to Scene Files
Links to scene files can be included in HTML files using the following format:
<a href="LeapfrogViewer:[path or URL]">link text</a>
Linked scene files will be opened directly in Leapfrog Viewer only from browsers that support custom URI schemes.
Got a question? Visit the Seequent forums or Seequent support