Octree Sub-Blocked Models
Octree block models are an established type of sub-blocked model in which blocks are subdivided into smaller sub-blocks where triggering surfaces intersect the blocks. The primary difference between Leapfrog sub-block models and octree sub-block models is instead of dividing a block entirely into small sub-blocks when sub-blocking is triggered, the block is first divided in half in a particular direction, and then only the partitioned blocks that still trigger a further division are divided into smaller units. This creates a series of sub-blocks of different sizes, and because many are larger than the smallest sub-block and the smallest sub-blocks only exist where a contact requires it, processing can be more efficient.
Sub-blocked models can be rotated in two axes by adjusting the dip and azimuth.
This topic describes creating and exporting octree block models. It is divided into:
- Creating an Octree Sub-Blocked Model
- Octree Block Model Statistics
- Importing Octree Sub-Blocked Models
- Manually Setting the Grid Definition for an Imported Octree Block Model
- Exporting Octree Sub-Blocked Models
Creating an Octree Sub-Blocked Model
To create a new octree sub-blocked model, right-click on the Block Models folder and select New Octree Block Model. The New Octree Block Model window will appear, together with a set of controls that will help you set the size, location and orientation of the model in the scene:
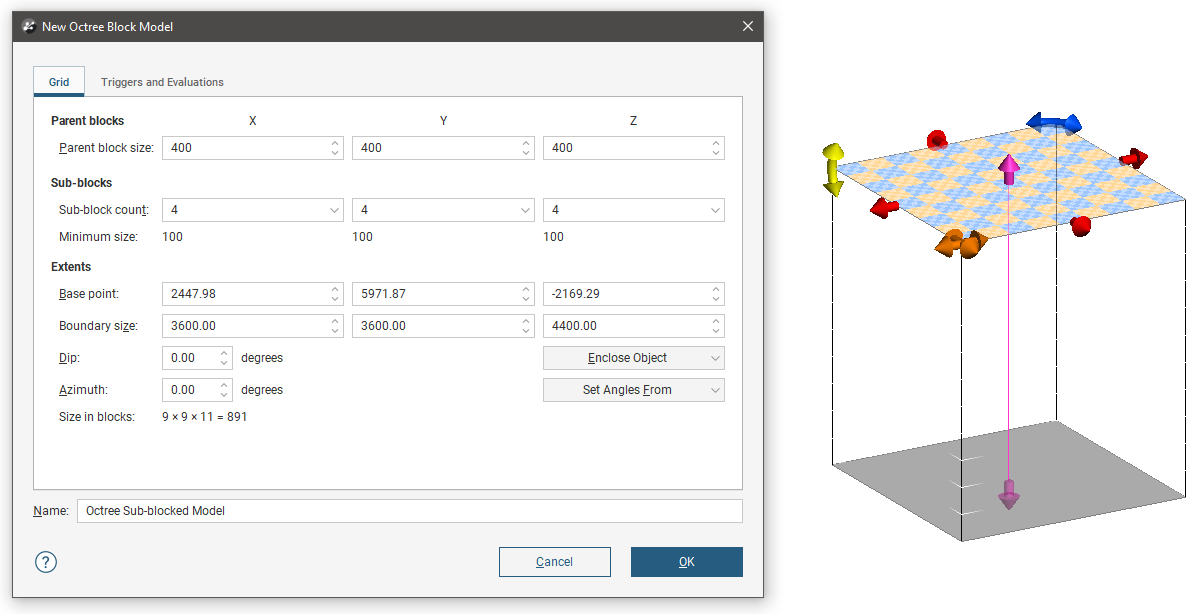
The block model is defined from its Base point, and the reference centroid is the Base point plus one half the Block size. Block models extents always include complete blocks, even when sub-blocking, and when changes are made to the Block size parameter, the model’s extents will be enlarged to fit the Block size.
Model Extents and Rotation
It is a good idea to set the octree block model’s extents from another object in the project, selecting the required object from the Enclose Object list.
The Dip and Azimuth set the rotation of the model. If you know the values you wish to use, enter them in New Octree Block Model window. You can also:
- Use the controls in the scene to set the orientation. The yellow handle adjusts the Dip and the blue handle adjusts the Azimuth.
- Use either the slicer or the moving plane to set the orientation. To do this, add the slicer or the moving plane to the scene and adjust the orientation. Then select the object to use from the Set Angles From list.
If you have set the extents from another object and then rotated the model, you will need to reset the extents by selecting the object again from the Enclose Object list.
The Grid Pattern
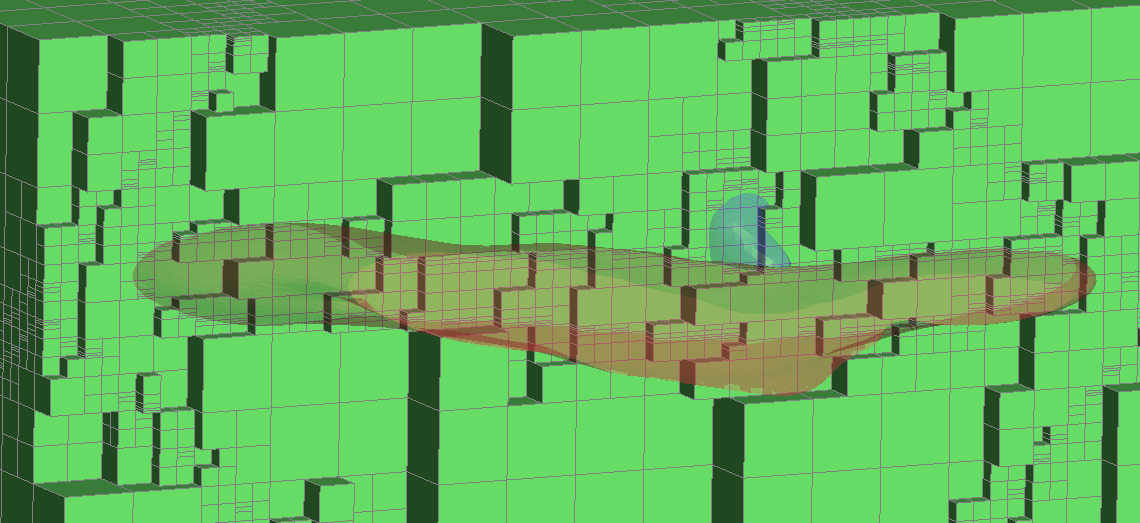
The cross-hatched pattern shows how the parent blocks will be divided into sub-blocks. These properties can be changed by adjusting the Parent blocks and Sub-blocks settings. The Sub-block count is the maximum number of divisions a parent block can be divided into in a particular direction when it intersects a trigger. Note the block can only be divided into numbers of divisions that are a power of two to a maximum of 64, as the sub-blocking strategy is to repeatedly divide units in half. Variable height sub-blocks are not supported in octree block models.
Here the block size is 100 and the sub-block count is 4 x 4 x 32, so blocks will range in size from 100x100x100 down to 25x25x3.125. Note the variety of sub-block sizes as the sub-blocking is triggered on the geological model surfaces, two of which are shown (in red and blue):
Triggers and Evaluations
Click on the Triggers and Evaluations tab to select from the volumes available in the project.
Triggers can be:
- Geological model volumes
- Combined model volumes
Meshes and interpolants cannot be used to trigger octree block model sub-blocking.
Evaluations can be:
- Geological model volumes
- Combined model volumes
- Grouped meshes
- Interpolants
- Distance functions
All suitable objects in the project will be displayed in the Available evaluations list.
Move the models you wish to use into the Selected evaluations list, then select the Eval. Mode. You can select from Existing sub-block centroids or Parent block centroids. Models that can trigger sub-blocking will also have the option to Trigger new sub-blocks. These selected options are abbreviated in the edit window as Sub-block, Parent, and Trigger respectively.

Enter a Name for the octree block model and click OK. The model will appear under the Block Models folder. You can make changes to it by double-clicking on it.
Octree Block Model Statistics
You can view statistics for all evaluations and calculations made on an octree block model. To view statistics, right-click on an octree block model in the project tree and select Statistics, then choose from the options: Table of Statistics, Scatter Plot, Q-Q Plot and Box Plot.
See Viewing Block Model Statistics in the Block Models topic for more information.
Importing Octree Sub-Blocked Models
Right-click on the Block Models folder in the project tree and select Import Octree Block Model. An open file dialog will appear for you to find the *.CSV file you want to open.
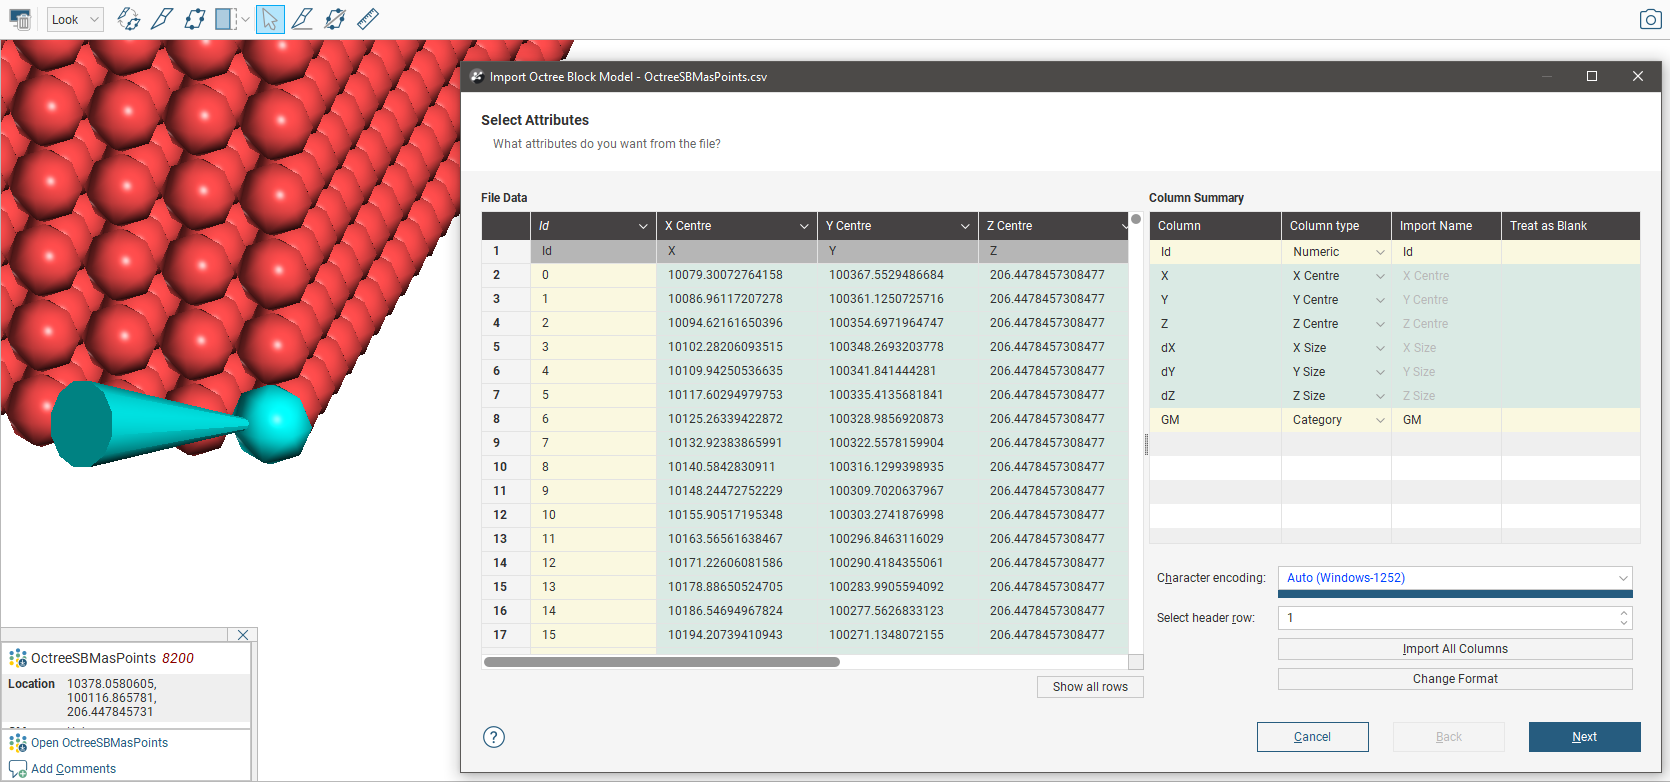
Choose which columns in the *.CSV file you want to import in the Select Attributes window, then click Next.
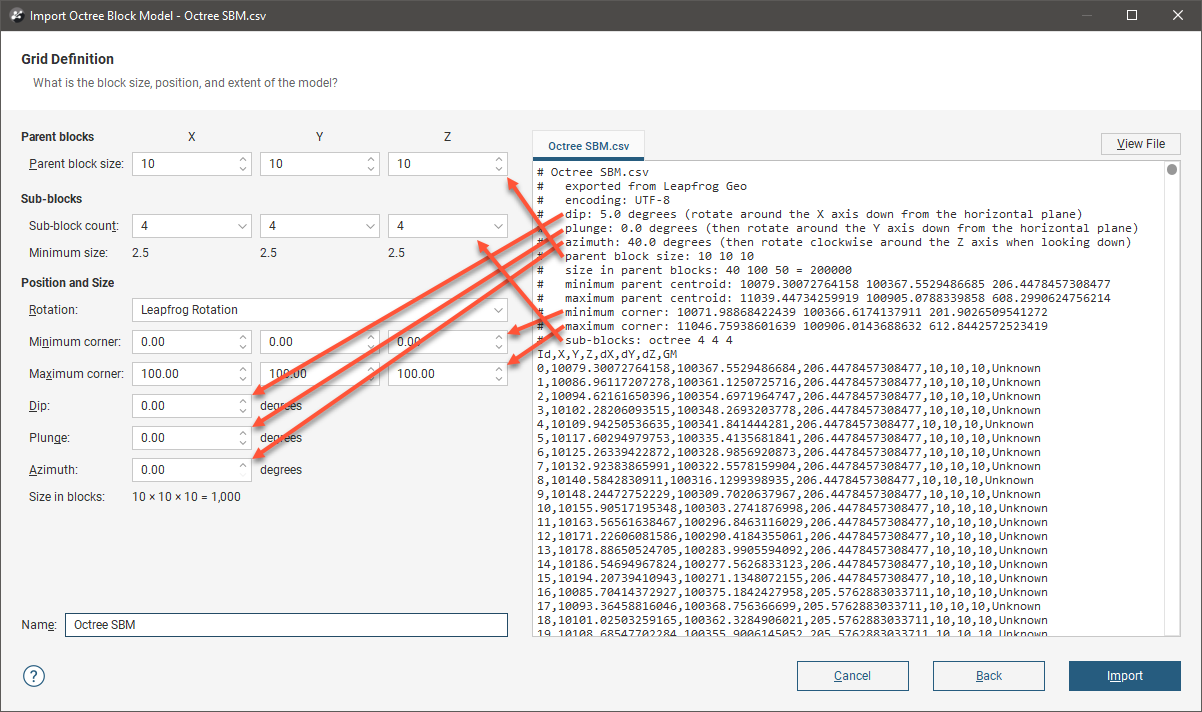
In the Grid Definition window, enter the block size, position and extent values for the block model you are importing. This is not an automated process, however some octree block models will have this information in a header at the top of the *.CSV file, which is displayed on the right side of the screen. Copy the relevant information from the header into the Parent blocks, Sub-blocks and Position and Size fields.
Some *.CSV octree block model files do not have the file metadata in a header at the top of the file, but instead have the information in a second 'sidecar' file that accompanies the block model file. If no file meta-data header is apparent for the file you have selected, check the source folder to see if there is another file that contains the metadata information. If the octree block model was exported from Leapfrog Geothermal, the file will be named the same but also have “.txt” at the end.
Some *.CSV octree block model files may only have the origin coordinates in the header, or no metadata at all. If it is possible, ask the source of the file you are using for the Grid Definition information used on the original block model; reconstructing the information as described below is rather involved.
If you need to figure out the Grid Definition information manually, follow the process outlined in Manually Setting the Grid Definition for an Imported Octree Block Model.
Manually Setting the Grid Definition for an Imported Octree Block Model
First, import the *.CSV file as points instead of as a block model. To do this, right-click on Points in the project tree and select Import Points.
Once imported, add the points to the scene. Turn on Make points solid and set the point radius to half of the size of the blocks you are expecting. The points should appear as spheres that are just touching; if you need to, adjust the point radius until it looks right.
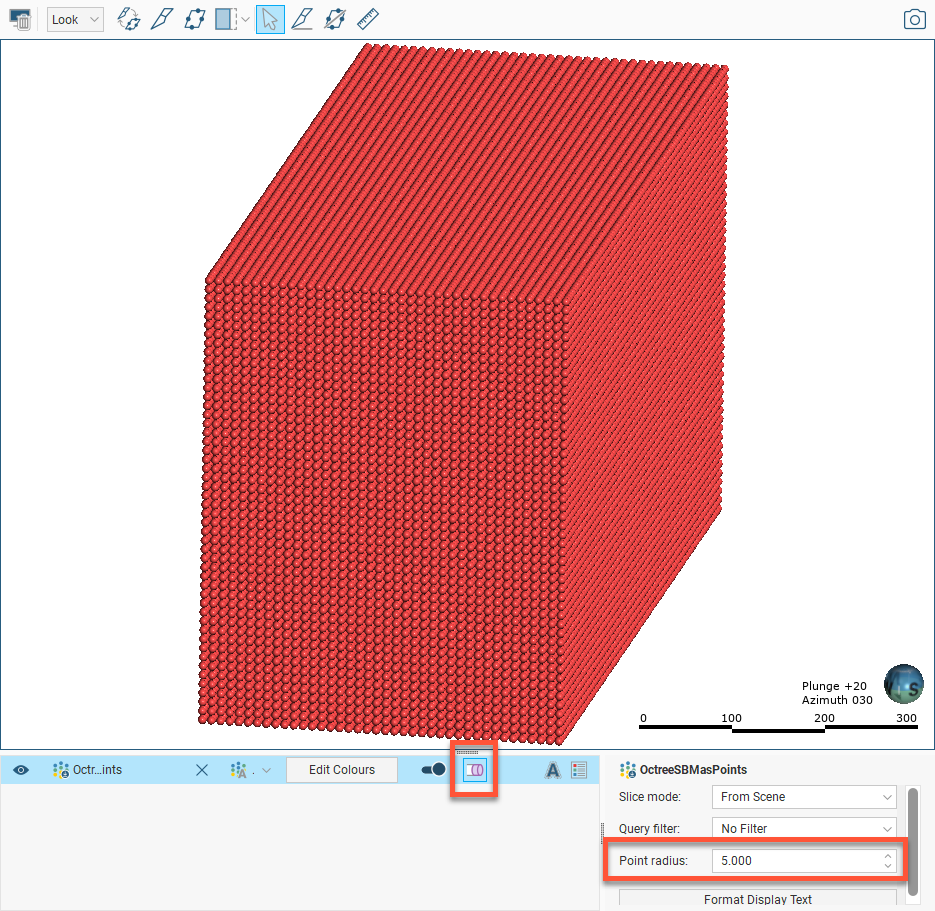
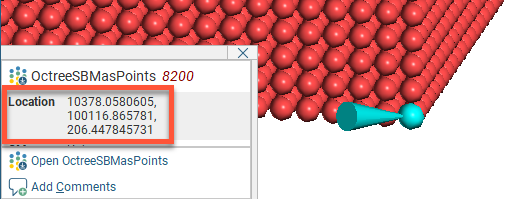
Next, click on the point with the lowest X, Y and Z position. You will see an info box with the point’s coordinates.
Next, right-click on Block Models in the project tree and select Import Octree Block Model. Select the *.CSV file again, then position the Import Octree Block Model window and move and scale the scene view so you can see at least the minimum corner point in the scene:
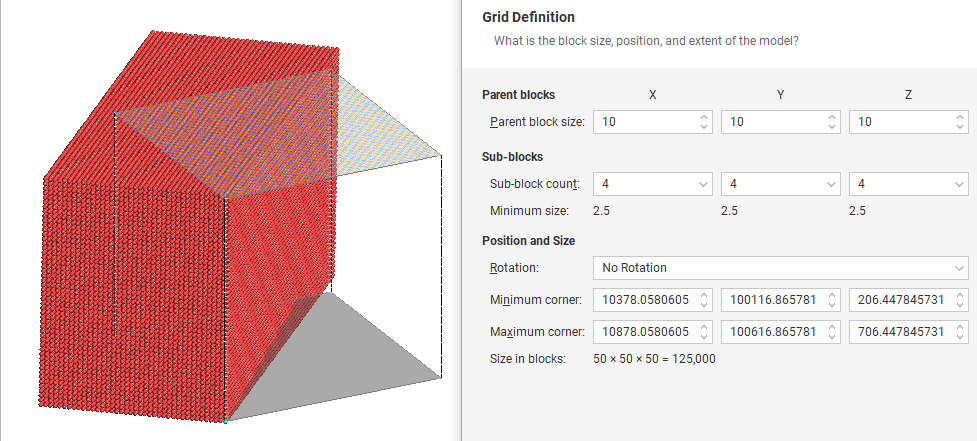
Copy the selected point coordinates into the Minimum corner, then add a bit to the coordinates and enter those values in the Maximum corner fields. We will adjust these numbers later, so precision is not important at this stage.
Use the ruler to draw along the edge of the points. Note the orientation in degrees. While these will not give you the numbers to enter in for the next step, it should provide some helpful hints.
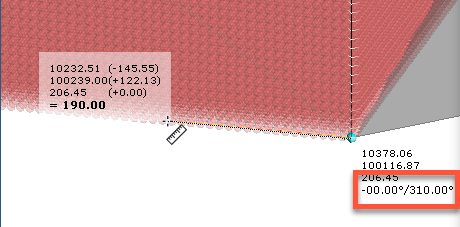
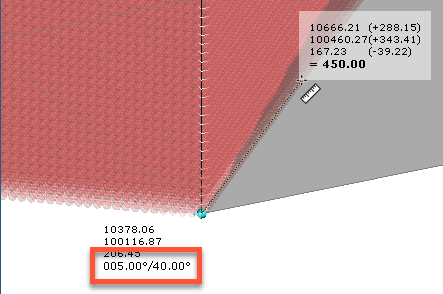
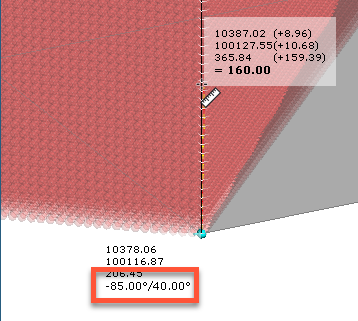
Select Surpac Rotation from the Rotation options, then change the Bearing, Dip and Plunge fields so the block model preview box aligns with the points. The values should make sense with respect to the measurements found using the ruler; for instance here the Bearing of -50° is equivalent to a bearing of 310°, and the Dip of -5° is related to the 5° measurement in the second image, above.
Next, change the Maximum corner values to the size of one parent block larger than the Minimum corner values. The block model preview box should appear as a box near the minimum point in the scene, but it will be offset from that minimum point. Adjust the Minimum corner and Maximum corner points down until the box is nicely enclosing the minimum point. As there is a small amount of leeway allowed for in the import, you do not need to be super precise, but try to align the centroids of the cube and the point sphere as best you can.
You might have to go back and forth a bit to fit the box around the sphere, refining the position a little more each time.

Change the Maximum corner values until the block model preview box just surrounds all the points. Because the block model is defined only in terms of parent block sizes, the Maximum corner will jump in steps as the number of parent blocks increases or decreases.
Finally, zoom in and check the block model preview box is just enclosing all the points, indicating that the origin is well positioned and the dimensions and orientation are correct. When you are satisfied, click the Import button. The octree block model will be imported and will be added to the Block Models folder in the project tree.
Note that the Grid Definition fields for an imported block model cannot be modified once the block model has been imported.
Exporting Octree Sub-Blocked Models
Octree block models created in Leapfrog Geothermal can be exported in the following formats:
- CSV Octree Block Model (*.csv) - this has an embedded header containing the octree block model definition
- CSV Octree Block Model + Text header (*.csv, *.csv.txt) - the octree block model definition is stored in a separate sidecar file with an additional .txt suffix appended
- CSV Points (*.csv) - the file contains only points and the block model definition and block size information is not retained
- Datamine (*.dm)
To export a sub-blocked model, right-click on the model in the project tree and select Export. Select whether you would like to save the file as a CSV Block Model File (*.CSV) or a Datamine file (*.dm). Enter a name and location for the file and click Save.
If you wish to export the model in one of the CSV formats, select CSV Block Model Files (*.csv) in the Export Block Model window. You will be able to choose between the three CSV formats in the next step.
If you select CSV Block Model File you will be prompted to select a specific CSV file format: one with an embedded metadata header, one with a sidecar *.txt file containing the metadata information or a file containing only points data with no associated metadata.
The rest of this topic provides more information about exporting sub-blocked models in CSV and Datamine formats.
Exporting Octree Block Models in CSV Format
The selections you make when you export a block model will be saved. This streamlines the process of subsequent exports of the model.
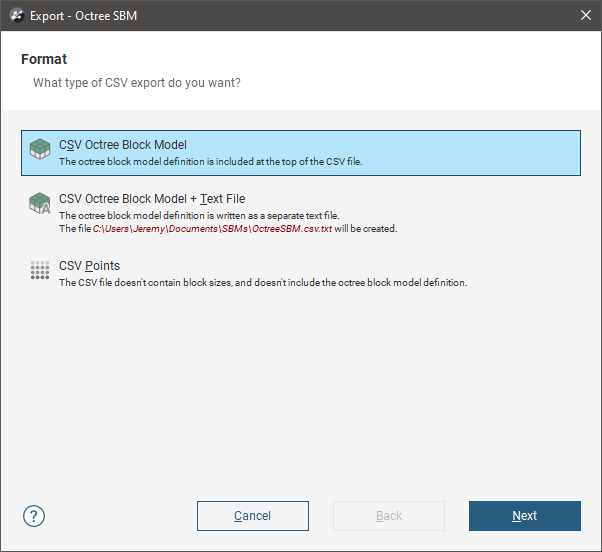
When you choose to export an octree block model in CSV format, you must first choose the type of CSV export. Options are:
- CSV Octree Block Model (*.csv) - this has an embedded header containing the octree block model definition
- CSV Octree Block Model + Text header (*.csv, *.csv.txt) - the octree block model definition is stored in a separate sidecar file with an additional .txt suffix appended
- CSV Points (*.csv) - the file contains only points and the block model definition and block size information is not retained
Click Next. The steps that follow are:
- Selecting From Evaluated Items
- Setting Row Filtering Options
- Setting Numeric Precision
- Setting Status Code Text Sequences
- Selecting the Character Set
Selecting From Evaluated Items
Choose which objects will be included in the exported file. The Available items list includes all evaluations made onto the model.
Click Next.
Setting Row Filtering Options
If you have the Leapfrog Edge extension, you can use a Query filter to filter rows out of the data exported.
This is different from exporting filters as columns, as selected in the previous step.
The second option in this window is useful when all block results are consistently the same non-Normal status. Select from Error, Without value, Blank or Outside; all rows that consistently show the selected statuses will not be included in the exported file.
Click Next.
Setting Numeric Precision
There are three encoding options for Numeric Precision:
- The Double, floating point option provides precision of 15 to 17 significant decimal places.
- The Single, floating point option provides precision of 6 to 9 significant decimal places.
- The Custom option lets you set a specific number of decimal places.
To change either the Centroid and size precision and Column data precision options, untick the box for Use default precision and select the required option.
Click Next.
Setting Status Code Text Sequences
When a block model is exported, non-Normal status codes can be represented in the exported file using custom text sequences.
The Status Code sequences are used for category status codes and filter status codes exported as columns. For filter status codes, Boolean value results will show FALSE and TRUE for Normal values or the defined Status Codes for non-Normal values.
Boolean values on block models are only available if you have the Leapfrog Edge extension.
Numeric Status Codes can be represented using custom text sequences. This is optional; if no separate codes are defined for numeric items, the defined Status Codes will be used.
Click Next.
Selecting the Character Set
The selection you make will depend on the target for your exported file. You can choose a character set and see what changes will be made.
Click Next to view a summary of the selected options, then click Export to save the file.
Exporting Octree Block Models in Datamine Format
The selections you make when you export an octree block model will be saved. This streamlines the process of subsequent exports of the model.
When exporting an octree block model in Datamine format, the steps to follow are:
- Selecting From Evaluated Items
- Setting Row Filtering Options
- Setting Status Code Text Sequences
- Selecting the Character Set
- Renaming Items
Selecting From Evaluated Items
Choose which objects will be included in the exported file. The Available items list includes all evaluations made onto the model.
Click Next.
Setting Row Filtering Options
If you have the Leapfrog Edge extension, you can use a Query filter to filter rows out of the data exported.
This is different from exporting filters as columns, as selected in the previous step.
The second option in this window is useful when all block results are consistently the same non-Normal status. Select from Error, Without value, Blank or Outside; all rows that consistently show the selected statuses will not be included in the exported file.
Click Next.
Setting Status Code Text Sequences
When a sub-blocked model is exported, non-Normal status codes can be represented in the exported file using custom text sequences.
When exporting octree block models in Datamine format, both category and numeric status codes can use independent custom text sequences. Boolean values are exported using values 0 for false and 1 for true; specify if non-Normal values should be represented by 0 or by the numeric status codes.
Boolean Status Codes on sub-blocked models are only available if you have the Leapfrog Edge extension
Click Next.
Selecting the Character Set
The selection you make will depend on the target for your exported file. You can choose a character set and see what changes will be made.
Click Next.
Renaming Items
When exporting an octree block model in Datamine format, column names for the evaluated objects have a maximum length of 8 characters. Leapfrog Geothermal will recommend truncated column names, but if you wish to use different abbreviations, click on the item’s New Name to edit it.
Click Next to view a summary of the selected options, then click Export to save the file.
Got a question? Visit the Seequent forums or Seequent support