Importing Well Data
Well data can be imported from:
- Files stored on your computer or a network location. This process is described below.
- From any database that runs an ODBC interface. See Selecting the ODBC Data Source.
- From an acQuire database. See Connecting to an acQuire Database.
For each of these options, once the data source is selected, the process of importing well data is the same.
The rest of this topic discusses the data format required and the steps for importing well data. It is divided into:
Expected Well Data Tables and Columns
Leapfrog Geothermal expects well data that is stored in a collar table, a survey table and at least one interval table. A screens table can also be imported.
The following formats are supported:
- CSV Text File (*.csv)
- ASCII Text File (*.asc)
- Plain Text Files (*.txt)
- Data Files (*.dat)
- TSV Text Files (*.tsv)
The Collar Table
The collar table should contain five columns:
- A well identifier
- The location of the well in X, Y and Z coordinates
- The maximum depth of the well
A collar table can also contain a trench column, and collars marked as trenches will be desurveyed in a manner different from other wells. See Well Desurveying Options for more information.
Leapfrog Geothermal expects a 0 for a normal hole and a 1 for a trench. If there is no trench column in the collar table, Leapfrog Geothermal will create one.
The well ID is used to associate data in different tables with a single well. The ID for a well must be identical in all tables in order for data to be associated with that well. Inconsistencies in the way wells are identified are common sources of errors.
The maximum depth column is optional. If it is present, is used to validate the data imported for the interval tables. The maximum depth specified is often a planned quantity, whereas the interval table records actual measurements. For this reason, Leapfrog Geothermal has an option for fixing the maximum depth value in the collar table to match the data in an interval table.
If maximum depth information is not included in a collar file, Leapfrog Geothermal will determine it from the maximum depth sampled as indicated by data in the interval tables.
The Survey Table
For the survey table, Leapfrog Geothermal expects a well identifier and depth, dip/inclination and azimuth values. You cannot have both an inclination column and a dip column so if a table contains both columns, you will need to choose between the two. When you import an inclination column, the survey table in the project tree will include a dip column, calculated from the inclination values.
By default, Leapfrog Geothermal assumes that negative dip values point up. If this is not the case, tick the Negative survey dip points down option.
See Well Desurveying Options for more information on the well desurveying algorithms used in Leapfrog Geothermal.
The Screens Table
For the screens table, Leapfrog Geothermal expects a minimum of four columns:
- A well identifier
- Start/from and end/to depths
- A value column
Interval Tables
For interval tables, Leapfrog Geothermal expects, at minimum, four columns:
- A well identifier
- Start/from and end/to depths
- A column of measurements
If a well ID in an interval table does not correspond to one in the collar table, the table can still be imported but the interval table will contain errors.
Supported column types are:
- Lithology columns containing lithologic data, which can be used for geological modelling.
- Numeric columns containing numeric values, which can be used for interpolating data.
- Category columns, which is text representing categories such as company, geologist, or mineralisation.
- Text columns containing text data that is not categorical, such as comments. Text columns are not validated when imported.
- Date columns containing date data. Custom date and timestamps formats are supported.
- URL columns. Use the prefix file:/// to link to local files.
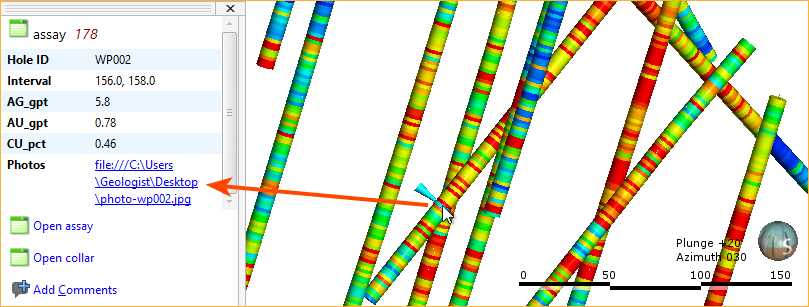
When an interval table is displayed in the scene and an interval is selected, clicking on a link in the URL column will open the link. This is a useful way of linking to, for example, data files or core photo images from within Leapfrog Geothermal:
Selecting Files
To import well data, right-click on the Well Data folder and select Import Wells. The Import Well Data window will appear:
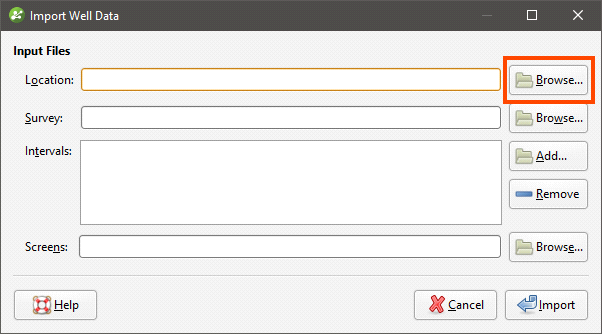
For the Collar, click on the Browse button to locate the collar file.
When a collar file is added to the Import Well Data window, Leapfrog Geothermal will look for interval tables with names such as “lithology” or “geology” in the same location and will add them to the Interval Tables list. If an interval table file is not automatically added to the list, click Add and browse for the required file.
You can also add any screens to import by clicking on the Screens – Browse button.
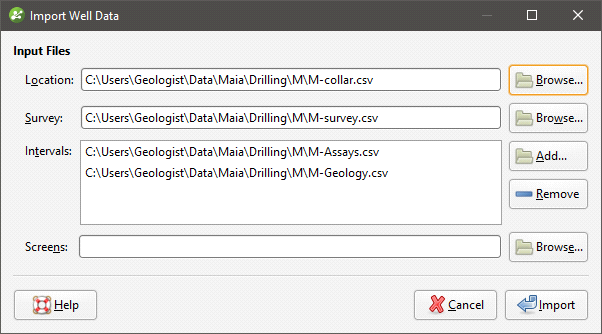
In the screen below, a collar file, a survey file and two interval tables have been selected for import:
Working Through the Data
Clicking on Import starts the process of importing data, which involves matching the data in the selected files with the columns Leapfrog Geothermal expects for each type of table. Leapfrog Geothermal will display a series of windows and will attempt to match the data in the files with the columns expected, based on the header rows in each file.
Progress in working through the data is shown at the top of the window:
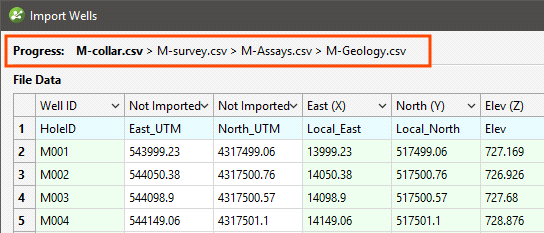
The file currently displayed is shown in bold.
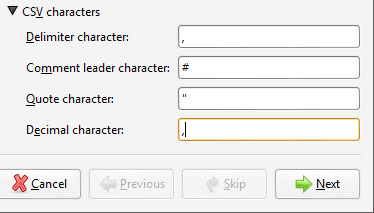
For *.csv files that use characters other than the comma as the separator, you can specify the delimiter, comment leader, quote and decimal characters in the Import Well Data window. Click on CSV characters to enter the characters used in the data files:
The row at the top of the table indicates the data type to which Leapfrog Geothermal will assign each column:
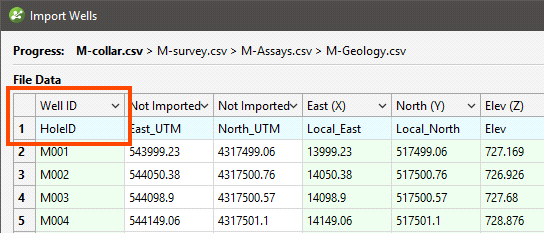
Click at the top of a column to view the column assignments available. The columns highlighted below are the column types required for the collar table:
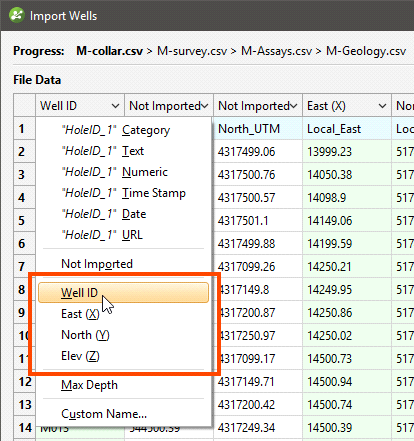
Each type of table being imported will have different column assignments available, but all table types will display:
- The categories columns can be assigned to (top of the list)
- The option to not import the column
- The required columns, e.g. well Id, East (X), North (Y) and Elev (Z) for the collar table
- Any optional columns, e.g. Max Depth and Trench
- The option to select a custom name
If the header row for a column cannot be matched, Leapfrog Geothermal will mark the column as “Not Imported” and you can select from the column assignments available. If you choose not to import a column then wish to do so later, you can add it later using the Import Column option. See Importing Columns.
You can also work with the Column Summary:
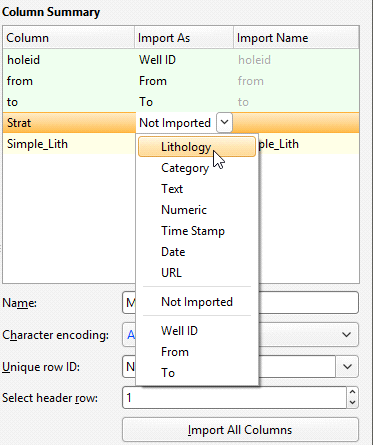
If you wish to import all columns, click on the Import All Columns button, then check that all columns have been correctly mapped.
You can select a column for import, then use it as a Unique Row ID. This can specify the column being used in other data systems to uniquely identify rows in a table. The column must not contain duplicate values. If a Unique Row ID is specified, Leapfrog Geothermal will use this column to match rows when appending columns or reloading tables.
If the data contains date and time information and the date and time format is not detected, click on Date and Time Formats to reveal more information:
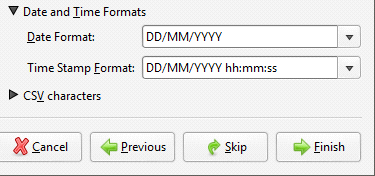
If the date and time format you wish to use is not among the options, you can create a custom format.
For each file, check the column mapping and click Next to proceed to the next step. If any of the information Leapfrog Geothermal expects is missing, an error message will appear. Return to the table and correct the problem described.
Once you have checked the last file, click on Finish. Once Leapfrog Geothermal has imported the data, it will appear in the project tree under a new Wells object.
Got a question? Visit the My Leapfrog forums at https://forum.leapfrog3d.com/c/open-forum or technical support at http://www.leapfrog3d.com/contact/support