The Ellipsoid Widget
The features described in this topic are only available if you are licensed to use Leapfrog Edge with Leapfrog Geothermal.
With variograms, you can display the ellipsoid in the 3D scene in order to:
- Visualise the variogram model in the scene
- Set variogram rotation and ranges
- Define search neighbourhoods
The ellipsoid has handles for changing the orientation, and if you have the Variogram Model window displayed alongside the scene window, you will see the settings in the Variogram Model window change as you change the ellipsoid in the scene.
The ellipsoid widget only has handles when it is in editing mode. If you drag the variogram model into the scene from the project tree, it is in view mode only. Open the variogram model by double clicking on the model in the project tree; the variogram model tab/window will open. If you switch back to the scene, you will see the ellipsoid widget in editing mode with drag handles.
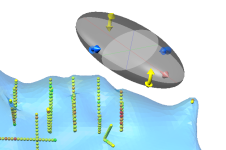
Click on the widget to toggle between control modes. Each mode offers different handles for directly manipulating the ellipsoid widget. When the arrows on the edge of the widget are yellow, blue and red, the handles adjust the ellipsoid trend.
Drag a yellow arrow handle to adjust the Dip, blue to adjust the Dip Azimuth and red to adjust the Pitch.
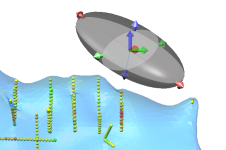
When the arrows on the edge of the widget are red, green and blue, the handles adjust the ellipsoid ranges.
Drag a red arrow handle to adjust the Max axis range, green to adjust the Int range and blue to adjust the Min range.
If you click on the widget and the outer arrows do not change, you probably have a variogram model with a second structure defined. Once the second structure is defined, the structure that is controlled by the arrows would be ambiguous, which is why the range arrows are disabled for multiple structure variograms.
In the properties panel for the variogram model trend, settings control the Centre Point of the ellipsoid widget. The X, Y and Z position can be specified directly.
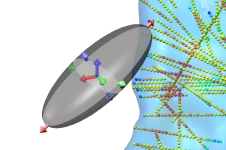
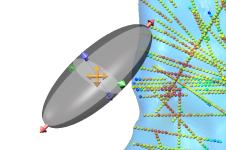
It is also possible to drag the ellipsoid to a different location. If the ellipsoid does not have arrows in the centre, click the ellipsoid so that the movement arrows appear. You can click the ellipsoid again to turn them off. Click and drag the movement arrows to reposition the ellipsoid widget in the screen. Two movement modes are possible: In the properties panel, you can choose to Align movement handles to the Axes or the Camera. When Align movement handles to is set to Axes, the handles in the centre of the widget are red, green and blue. Click on one of these arrows and you will be able to drag the widget back and forth along the orientation of your selected axis:
Don’t confuse the red, green and blue centre point arrows with the red, green and blue axis adjustment arrows that may appear on the edge of the widget.
When Align movement handles to is set to Camera, the handles in the centre of the widget are orange. Click on these arrows and you can drag the widget left-and-right and up-and-down in the viewing plane.
The Look button provides options for quickly changing the camera viewpoint.
To aid in the visualisation of the ellipsoid, the major-intermediate axial plane and the intermediate-minor axial plane have been drawn and shaded. The major, intermediate and minor axes are also drawn as red, green and blue lines respectively. This assists in visualising the orientation and shape of the ellipsoid. In some views, the planes are exchanged for alternate planes, such as when displaying octant or quadrant search sectors.
Got a question? Visit the My Leapfrog forums at https://forum.leapfrog3d.com/c/open-forum or technical support at http://www.leapfrog3d.com/contact/support


