
Strip Log Plot
Drillhole strip log options are provided in easy-to-use tab menus, enabling quick access to all the settings from a single dialog. The dialog includes sensible defaults; enabling easy creation of strip logs. Using the strip log tab dialog you can display up to 32 data/graph type selections in each plot.
To Create a Strip Log Plot:
-
On the DH-Plot menu, click Strip Log. The system displays the Strip Log Parameters dialog box.
-
To specify the Holes to plot, select one of the three options on the Page Layout tab.
-
Select the Hole Trace tab to specify hole trace parameters, such as Depth Ticks.
-
To plot data along the hole traces in the strip log, select the Data tab.
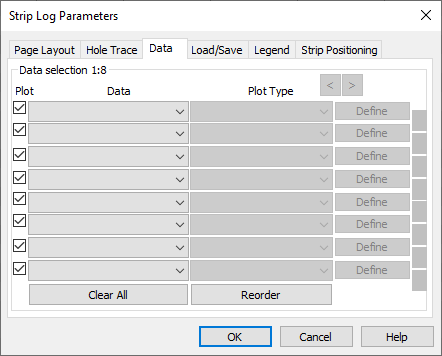
- The Plot check boxes enable/disable the Data selection dropdown lists. This is a convenient way to select or de-select individual data plots without clearing or re-selecting the data from the Data lists.
-
Select the data channel(s) available in the drillhole project from the Data drop-down list.
- The selections combine the name of the channel, along with the identifier for the project database in which the channel is found.
-
Using the Plot Type drop-down lists, select the plotting type for the data.
- Plot types displayed are based on the type of selected data.
-
To plot two data selections along the same drillhole trace, click the Link button found to the right of the Define buttons.
- The link buttons, on the far right of the Data dialog enables you to link the hole traces so that more than a single trace can be plotted down the same vertical hole.
Each button straddles two data selections. When the Link button is selected, a black half-link graphic appears on the button (
 ), joining the two data selections. Selections thus joined are plotted on the same trace.
- To specify the legend parameters, select the Legend tab. To enable the plotting of a legend, check the Plot Legend box.
-
To enable the plotting of data information, check the Plot data info box and then select the data information you wish to plot in the legend.
- To specify the positioning of the strip log traces, select the Strip Positioning tab. Use this tab to specify the spacing of the traces.
- Using the radio buttons you can select one of the following spacings: Equal spacing, Fixed spacing, Proportional spacing and Fixed offset.
- Click the Default button to calculate and display the default spacing values, based on the selected 'Spacing' method. You can also select the Nudge radio button to move the traces by a specified distance in centimeters.
Got a question? Visit the Seequent forums or Seequent support
© 2023 Seequent, The Bentley Subsurface Company
Privacy | Terms of Use