3D Navigation Tips
If you are new to ArcGIS Pro, some of the skills required to navigate in 3D may not come naturally, particularly if you are used to working mostly in a 2D environment. When working with 3D scenes, you might find useful some of the suggestions listed below.
You can also check the ArcGIS Pro Navigate tutorial to familiarize yourself on how to use the default mouse navigation tool, the on-screen navigator and the keyboard shortcuts for navigation.
On-Screen Navigation
For a more intuitive and powerful navigation experience, when using the Navigator control, switch from the default minimal display mode to a “full control" display. To switch to the full control mode, click on the up arrow in the top left corner of the tool:

When in full control mode, in order to move the scene around, you can click and drag directly on any part of the tool including the “doughnut ring”. You can also resize the tool to make it larger or smaller.
For 3D views, the navigator appears by default in the lower left corner of the view. To switch between showing or hiding the navigator, click the Navigator button in the Navigation group on the View tab, or use the scene's context menu (right-click in the view).
You can also configure your 3D scenes to show the navigator in "full control" mode every time a new scene is opened:
- Click the Project tab and from the list of menu items on the left, click Options.
- On the Options dialog box, click the Navigation tab and expand the On Screen Navigator section.
- Expand Show Navigator when opening 3D views and choose "Full Control".
Planar Navigation
Sometimes, it is helpful to switch from the standard 3D navigation mode to a planar navigation mode (e.g. when working with one-dimensional non-horizontal orientations) — this will stop the rotation and will allow for movements along a single flat plane.
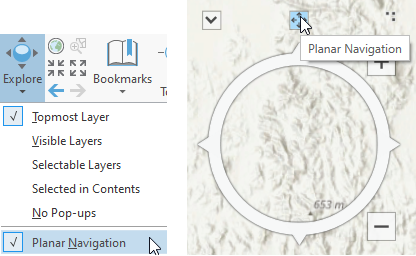
To turn on planar navigation, expand the Explore drop-down menu on the Map tab and check Planar Navigation:
The Mouse Wheel
The middle mouse button (the mouse wheel) can be very useful to rotate the scene quickly. However, there is a dramatic difference in how this action behaves depending on the type of the layer you have clicked on in the 3D scene (or if you have clicked on white, empty space). Being aware of what you click on before rotating can be very helpful. You need to be careful about where you click on the screen prior to rotation. The location in the 3D scene you click on will be the axis of rotation.
Bookmarks
Bookmarks can be extremely useful for saving and re-loading a specific viewpoint or viewing angle. For any scene or map, when you have a viewpoint that you would like to save, simply go to the Bookmarks option in the Navigate group on the Map tab.
Go to XY
The Go To XY tool can also be helpful – use the unit format drop down to select a unit of measure that is intuitive to you. Type in the x,y coordinates, hit enter, and you will navigate directly to the input location.

To display or hide the tool, click the Go To XY button in the Navigate group on the Map tab.
Got a question? Visit Seequent Forums or Seequent Support