
Geological Model Lithologies
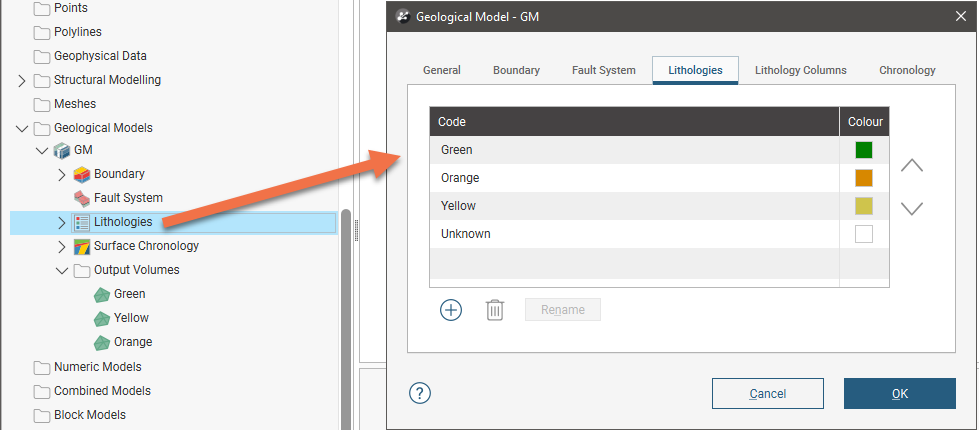
A geological model’s Lithologies object ( ) describes all the lithology codes to be modelled and the colours used to display them in the scene. To view the lithology codes used for a geological model, you can:
- Double-click on the geological model in the project tree and then click on the Lithologies tab.
- Double-click on the geological model’s Lithologies object in the project tree.
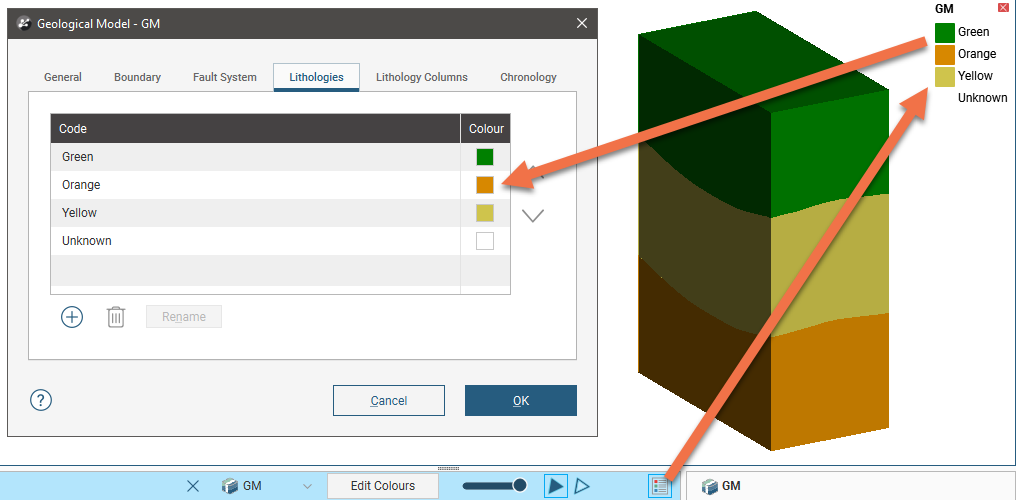
It is these lithology codes that are used in displaying a geological model in the scene and make up the model’s legend ():
The lithology codes used for a geological model can be derived in different ways:
- Derived from the base lithology column. If a model is created from lithology data, the codes used in the model are derived from that lithology data; changes to that data will be updated in the geological model, and vice versa. For example, if you edit the colour for the lithologies in the source data, those colours will be updated in the geological model, and editing the colours in the geological model will update the colours used in the source data.
- Derived from linked lithology data. Other lithology data in the project can be linked to the geological model. This can be done in the Lithology Columns tab, and is discussed below. As with the codes derived from the base lithology column, changes to that data will be updated in the geological model, and vice versa.
- Manually defined. You can add codes to the model in the Lithologies tab.
When you open the Geological Model window, how the lithology codes are displayed in the Lithologies tab tells you from what sources they were derived:
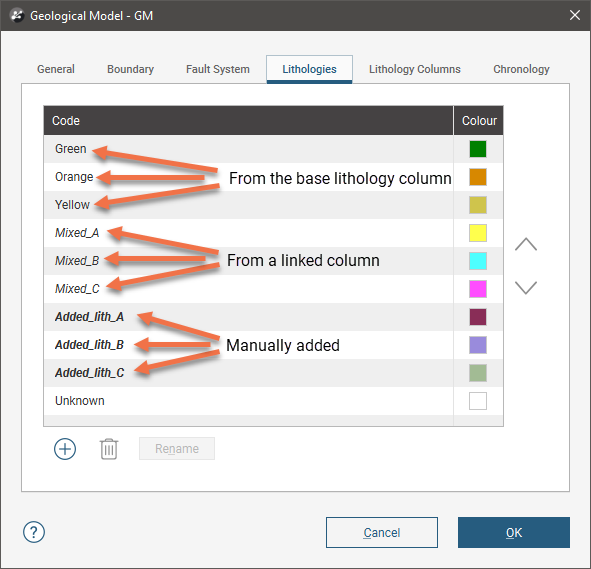
In the example above:
- The codes from the base lithology column are Green, Orange and Yellow, which are shown in plain text.
- The Unknown code is also shown in plain text. This is the code automatically defined for all geological models and is used to label lithologies that cannot be assigned to known lithologies. See Creating and Editing a Geological Model for more information.
- The codes Mixed_A, Mixed_B and Mixed_C come from another lithology column in the project, linked to the geological model via the Lithology Columns tab. These are shown in italic text.
- The codes Added_lith_A, Added_lith_B and Added_lith_C have been manually added to the model. These are shown in bold italic text.
The rest of this topic describes how to add, remove and organise the lithology codes for a geological model. It is divided into:
- Adding Lithology Codes
- Code Priority
- Code Colours
- Renaming Manually Defined Codes
- Deleting Manually Defined Codes
- Organising the Geological Model’s Legend
Adding Lithology Codes
There are two ways to add lithology codes to a geological model:
- Manually add codes in the Lithologies tab.
- Link in lithology columns from other data in the project in the Lithology Columns tab.
Manually defined codes are shown in Lithologies tab in bold italics.
- To add a new code, click the add button (
 ) in the Lithologies tab. Enter a name for the code and click the colour chip to change its colour, if necessary.
- To rename a code, double-click on it in the list or click on it, then on the Rename button. See Renaming Manually Defined Codes for more information, as renaming manually defined codes does have flow-on effects in a geological model.
- To delete a code, click on it in the list, then click on the Delete button (
 ). If the code is not used in surfaces built for the geological model, the code will be deleted when you click on the Delete button; you will not be asked to confirm your choice. When the code is being used by the model, you will be asked to confirm your choice. See Deleting Manually Defined Codes for more information.
To add codes from other lithology columns in the project, click on the Lithology Columns tab. Click the add button (), then select from the lithology columns available in the project:
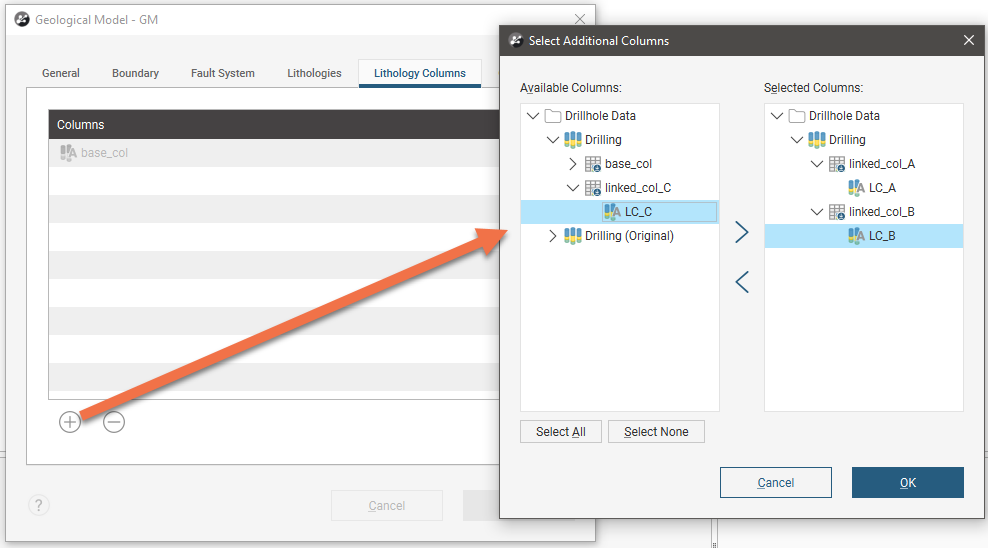
Click OK to close the Select Additional Columns window, then OK to close the Geological Model window. When you open up the Lithologies tab once again, codes from the linked columns will appear in the list, if they do not already exist in higher-priority sources, i.e. the base column and/or manually-defined codes.
See Code Priority below for more information on how codes from different sources are prioritised.
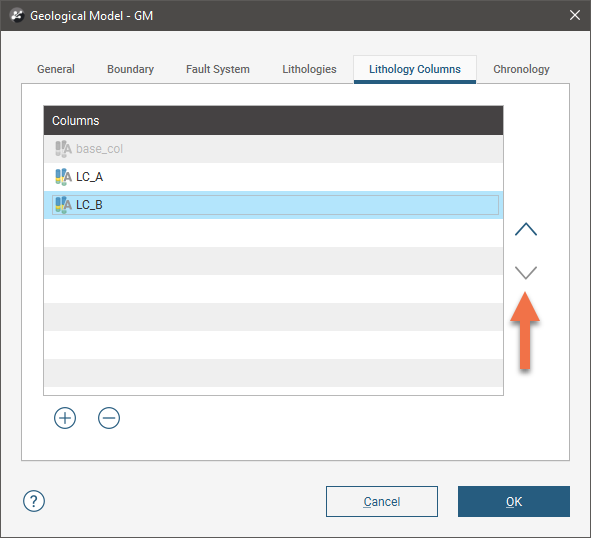
When you have multiple linked columns in the Lithology Columns tab, their order in the list determines their priority in whether or not their codes appear in the model’s Lithologies list. You can change a column’s priority using the arrow keys in the Lithology Columns tab:
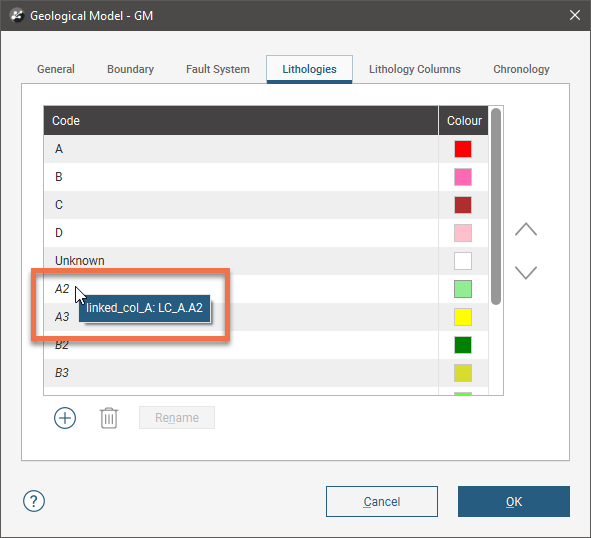
Codes from linked columns are shown in the Lithologies tab in italic text. Holding the mouse cursor over a code will show the name of the table and column the code is derived from:
To remove codes from linked columns, you will need to remove the column from the Lithology Columns tab. If any codes in the linked column are being used by surfaces in the geological model, the deleted codes will be replaced by the code set as the Background lithology (in the Surface Chronology tab).
Code Priority
Leapfrog Works prioritises a geological model’s lithologies as follows, from high to low:
- Base column codes
- Manually defined codes
- Codes from linked columns
When you have multiple linked columns in the Lithology Columns tab, their order in the list determines their priority in whether or not their codes appear in the model’s Lithologies list. You can change a column’s priority using the arrow keys in the Lithology Columns tab:
When you add, remove or reorder the columns in the Lithology Columns window, you will need to click OK to update the geological model before you can see the code changes in the Lithologies tab.
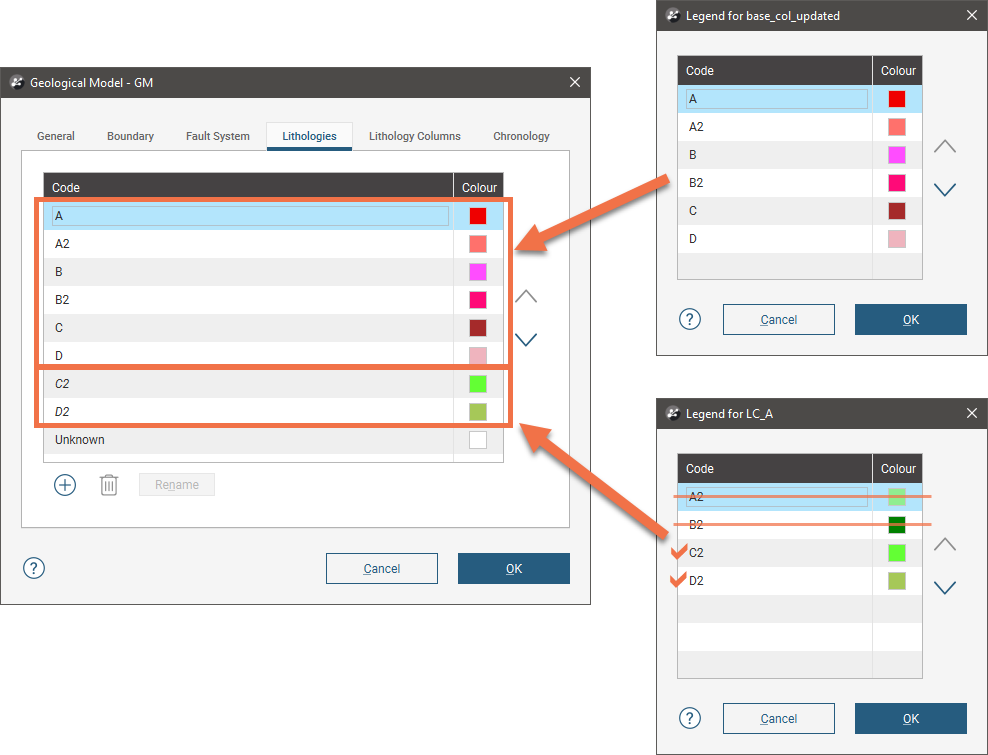
In this example, the geological model uses codes from the base lithology column (base_col) and a linked column (LC_A):
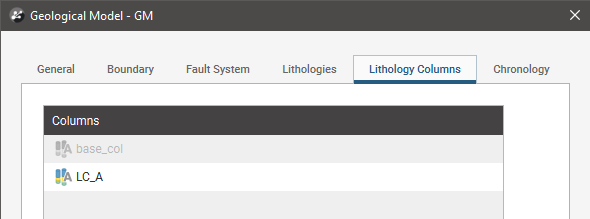
The lithology codes in both columns are unique, so when we look at the geological model’s lithology codes, we can see that the codes from both the base column (the red/pink codes) and the linked column (the green codes) appear in the model’s lithologies list:
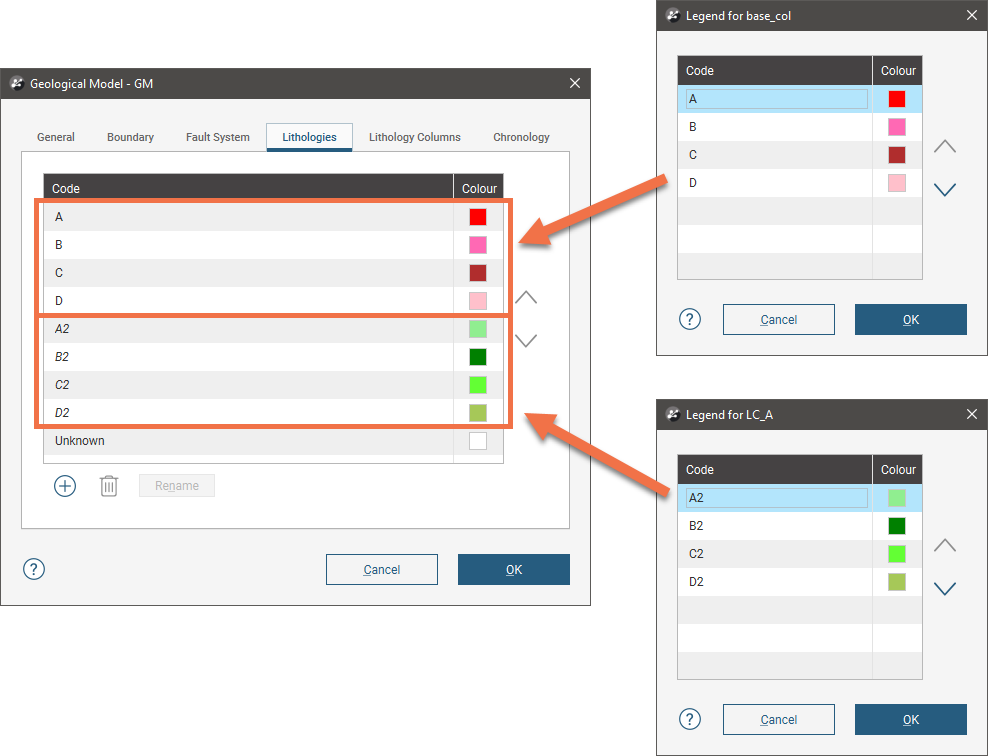
When the base column is switched to an updated column that contains codes that are also in the linked column (codes A2 and B2), we can see how the base column’s lithology codes (red/pink) take priority over the linked column’s codes (green):
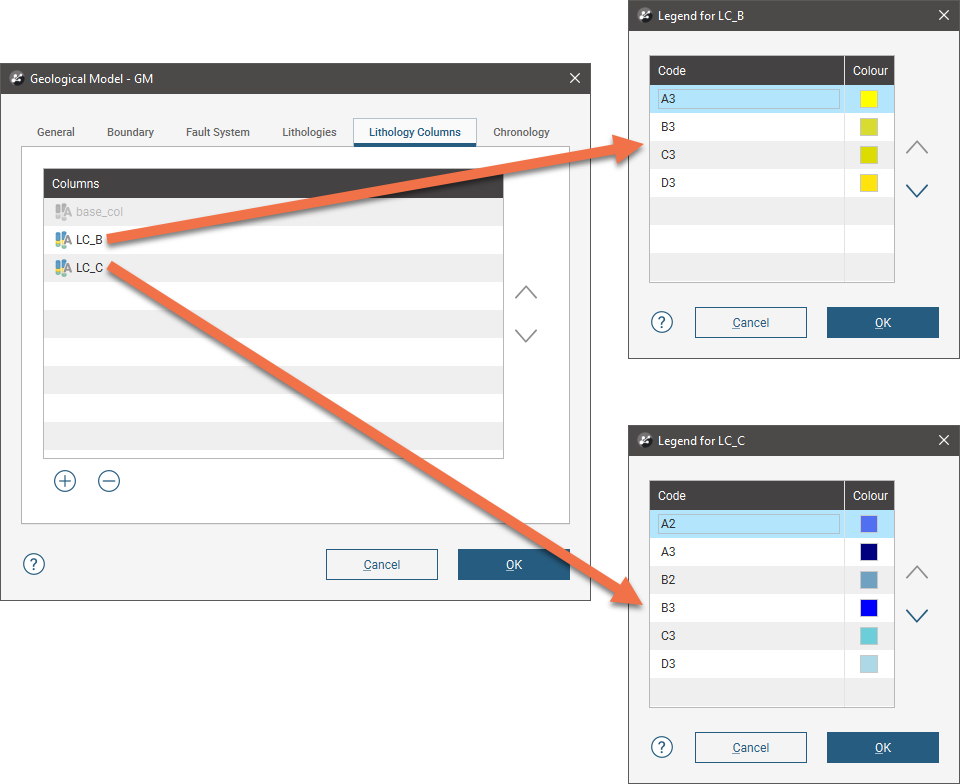
When you have more than one linked column, the order of the columns in the Lithology Columns tab is the priority each column has, with the first linked column having the highest priority.
In this example, there are two linked columns, LC_B (yellow codes) and LC_C (blue codes):
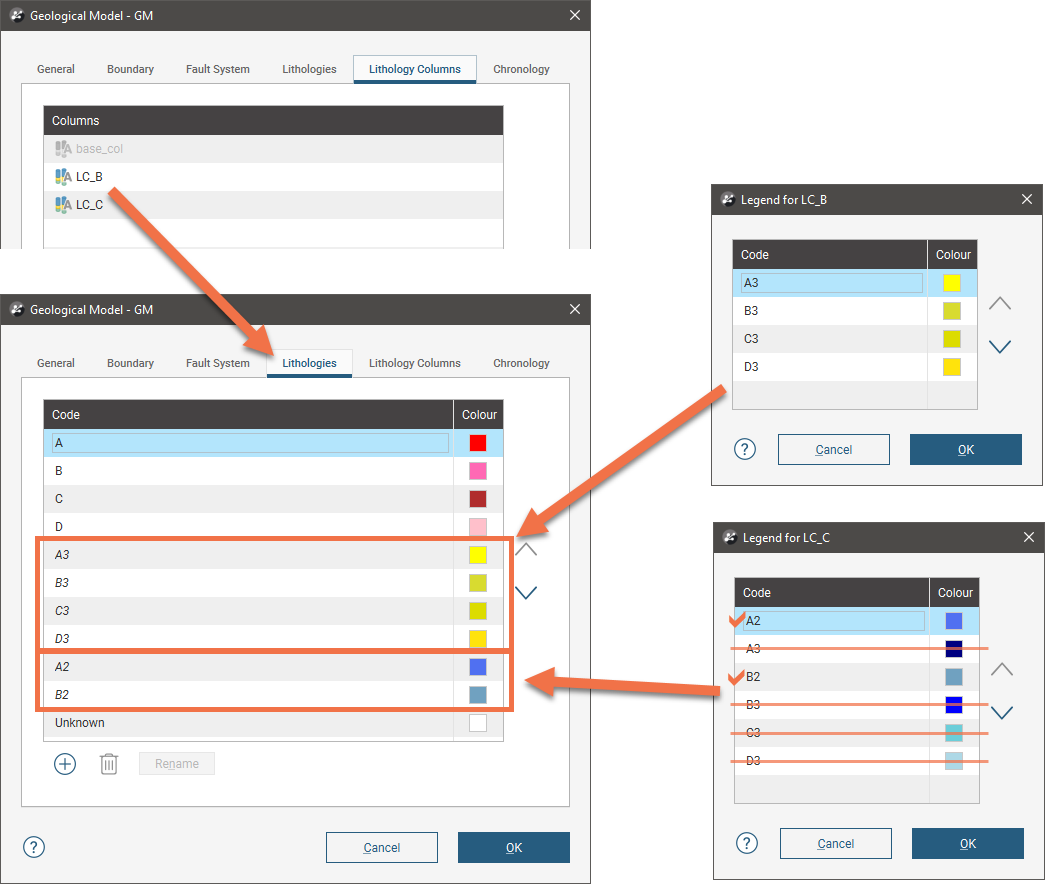
LC_C contains codes that are also in LC_B, codes A3, B3, C3 and D3. When LC_B has the higher priority, the model’s legend uses the codes from LC_B, ignoring the duplicate codes in LC_C:
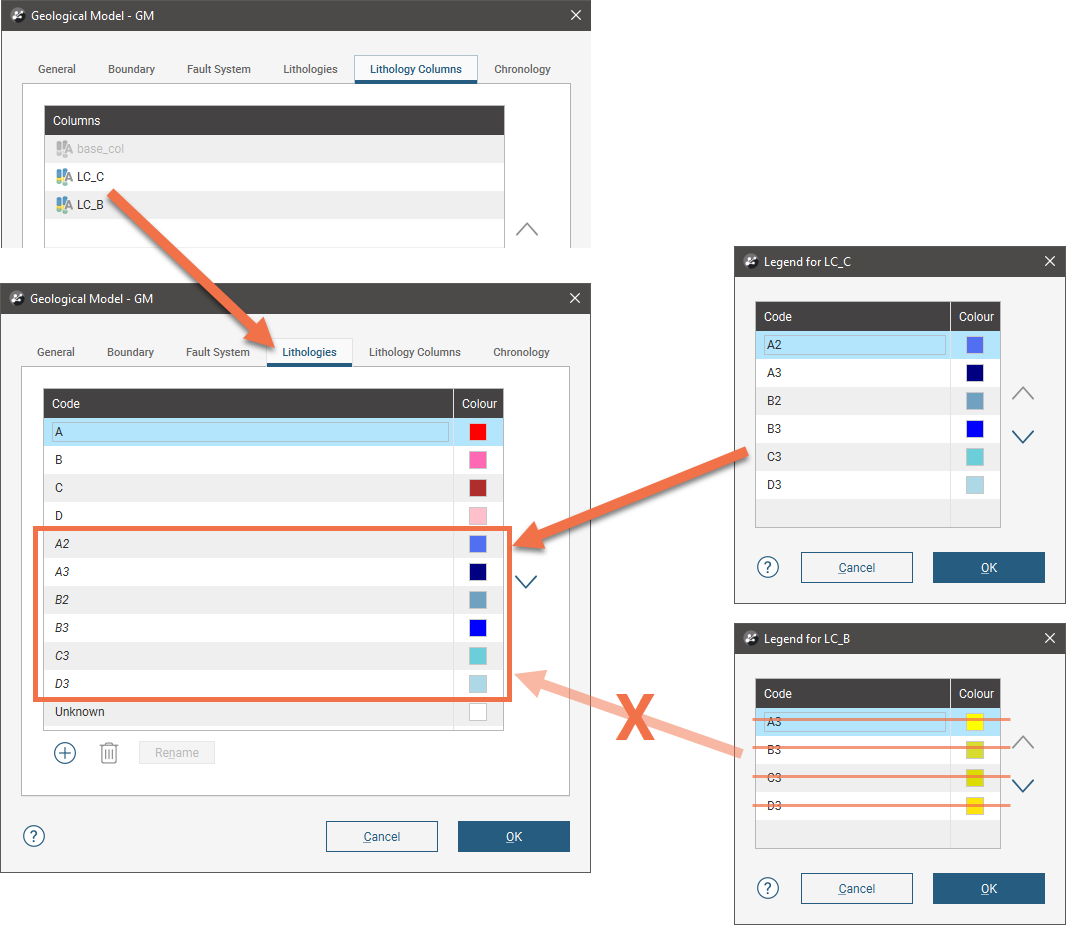
When LC_C has the higher priority, its codes are used in preference to those in LC_B. Because LC_B contains only codes that also exist in LC_C, none of LC_B’s codes are in the geological model’s lithology codes list:
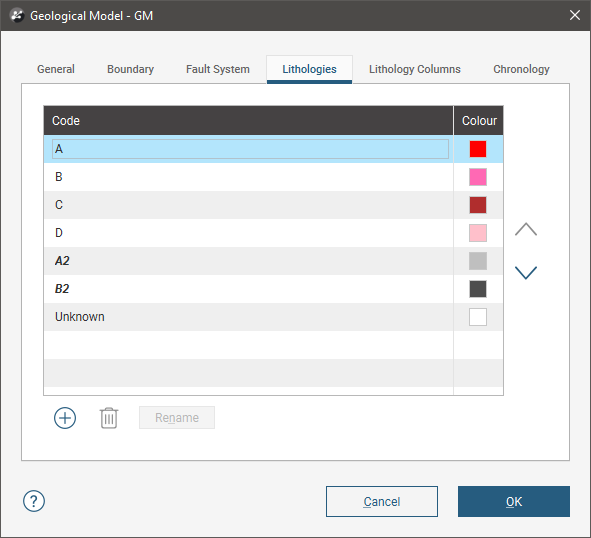
Manually defined codes are of lower priority than the codes from the base lithology column, but take precedence over codes from linked lithology columns. In this example, the geological model has the base lithology codes (A to D), plus two manually defined codes (A2 and B2):
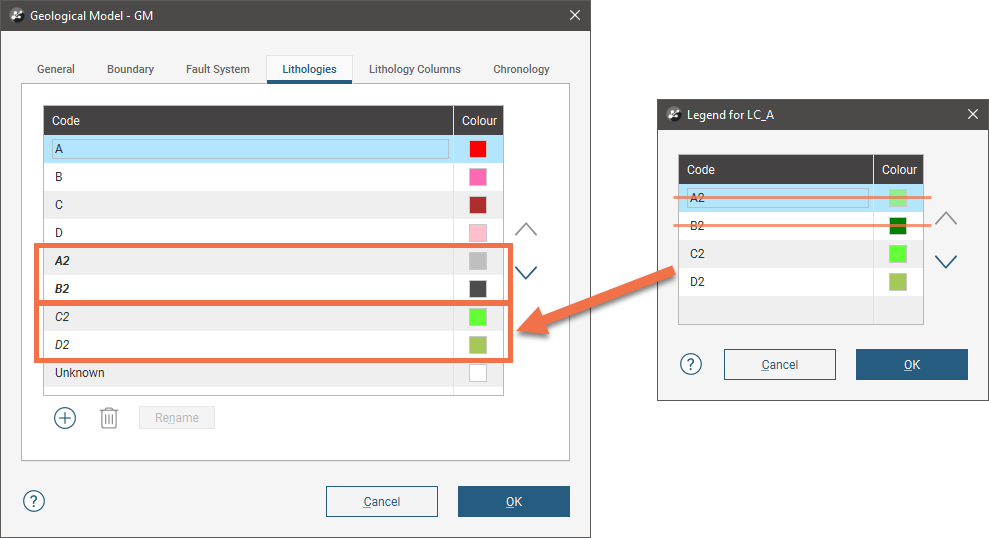
When column LC_A is linked, two of its lithology codes (C2 and D2) are added to the geological model’s lithology codes, but A2 and B2 are not, because the manually-defined codes are of higher priority:
Code Colours
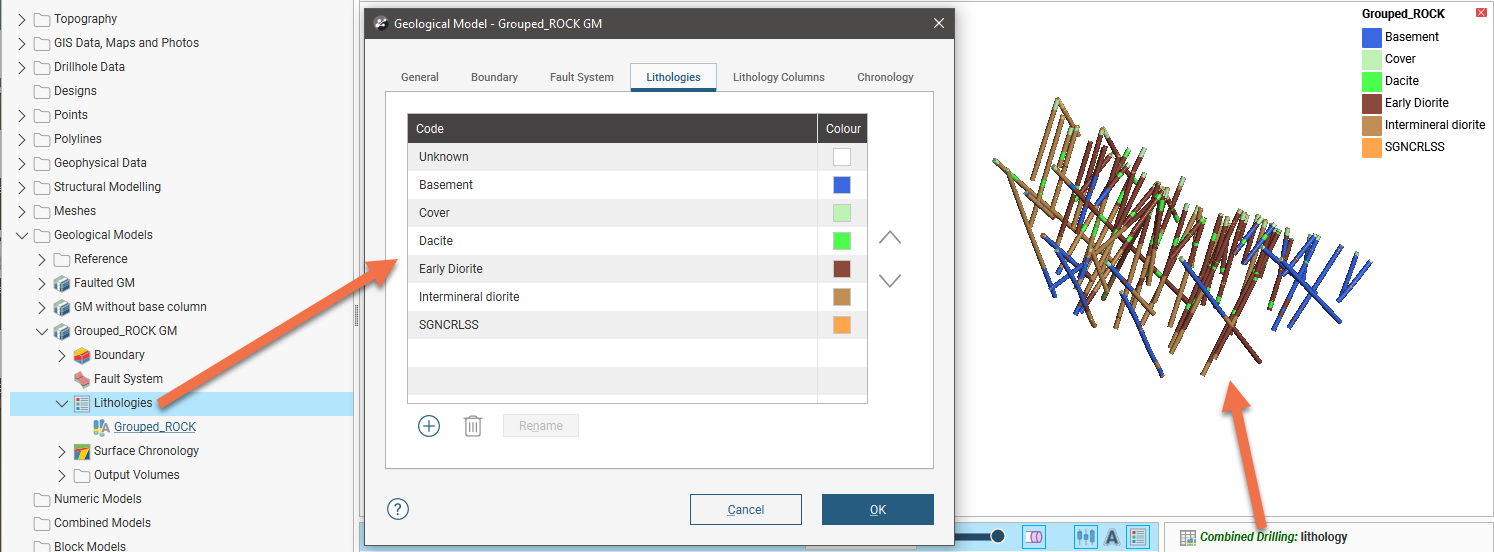
Lithology codes from the base lithology column and any linked lithology columns use the colours defined for the source data. For example, here we can see that the lithology codes and their colours match the Grouped_ROCK column’s lithologies, which are displayed in the scene:
The link goes both ways, and when you make changes to the colours used for geological model codes derived from lithology data, those changes will be made in the source data:
- If the colours used are changed in the geological model, the changes will also be made in the drilling data.
- If the colours used are changed in the source data, the changes will be reflected in the geological model.
Be careful in making changes to the colours used for codes that have been derived from drilling data, as you can inadvertently change colours that are used elsewhere in the project.
Renaming Manually Defined Codes
You cannot rename codes derived from the base lithology column or from linked lithology columns, but you can rename manually defined codes. When you rename a code that is used in surfaces built for the geological model, the name will be updated where that code is used.
To rename a manually defined code, double-click on the code in the Lithologies tab or click on it, then on the Rename button. Enter the new name, then click the OK button to close the Geological Model window and process the change.
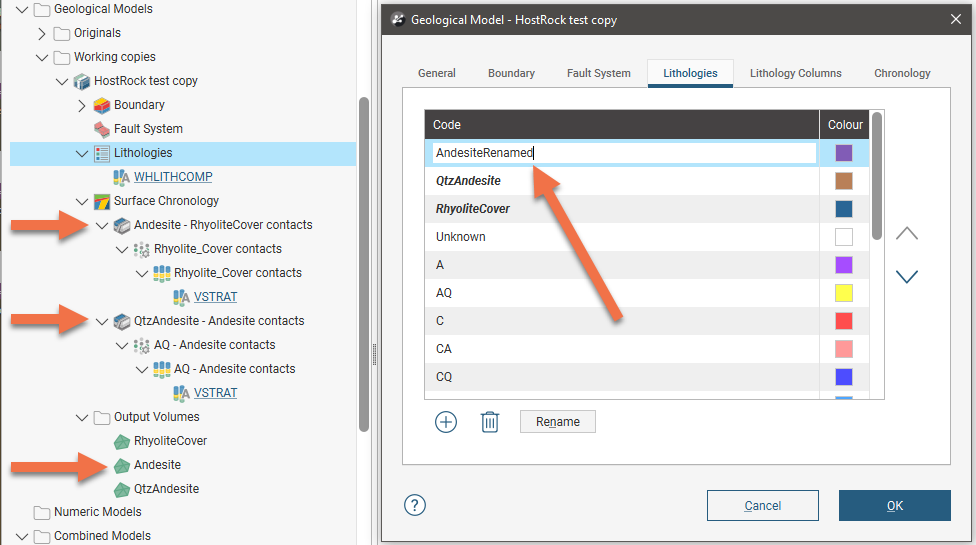
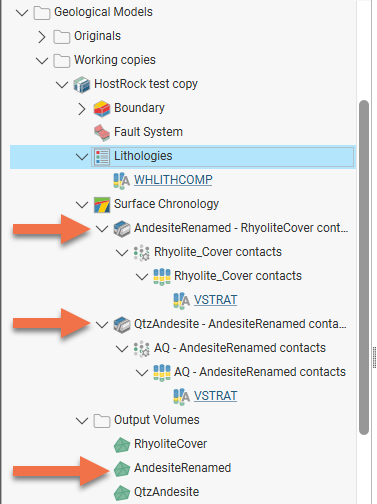
In this example, the manually defined code Andesite has been used in defining two contact surfaces and so is reflected in one of the output volumes:
Clicking OK updates the model, and the name change for the code results in the contact surfaces and the output volume also being updated:
Deleting Manually Defined Codes
You cannot delete codes derived from the base lithology column or from linked lithology columns without removing those columns from the geological model, but you can delete manually defined codes.
To delete a manually defined code, click on it in the Lithologies tab, then click on the Delete button (). If the code is not used in surfaces built for the geological model, the code will be deleted when you click on the Delete button; you will not be asked to confirm your choice.
When you delete a code that is used in surfaces built for the geological model, a warning will be displayed:
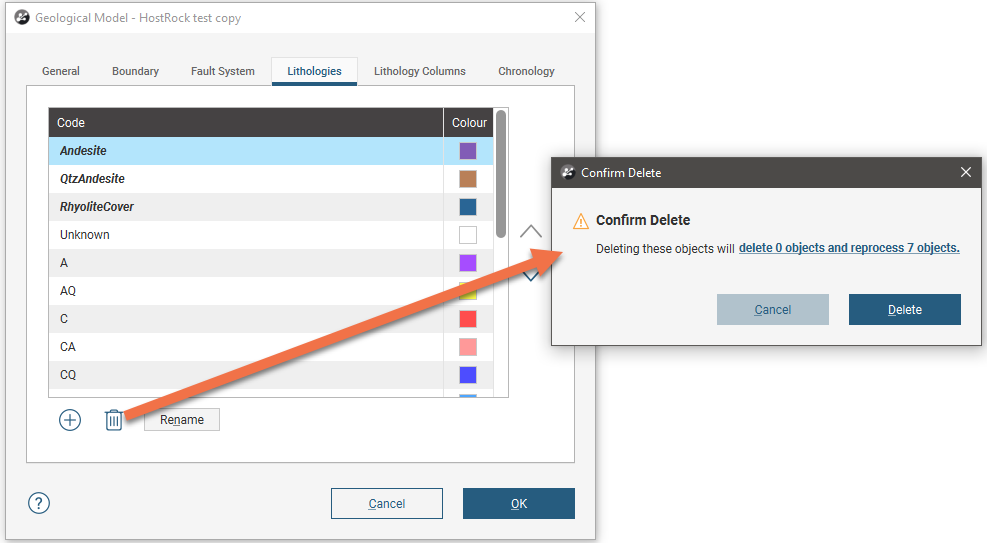
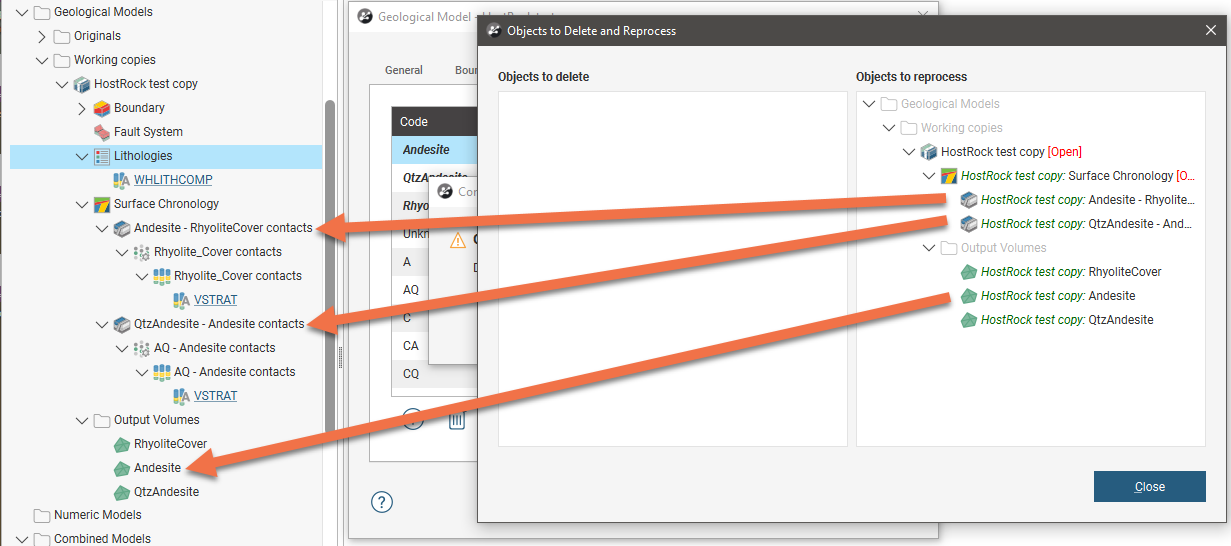
Click on the link to see what objects are affected by the change and decide how to manage those changes before clicking Delete, then OK in the Geological Model window.
In this example, two contact surfaces use the Andesite code, which then flows through to the Andesite output volume:
By double-clicking on each contact surface, we can see where the Andesite code is used:
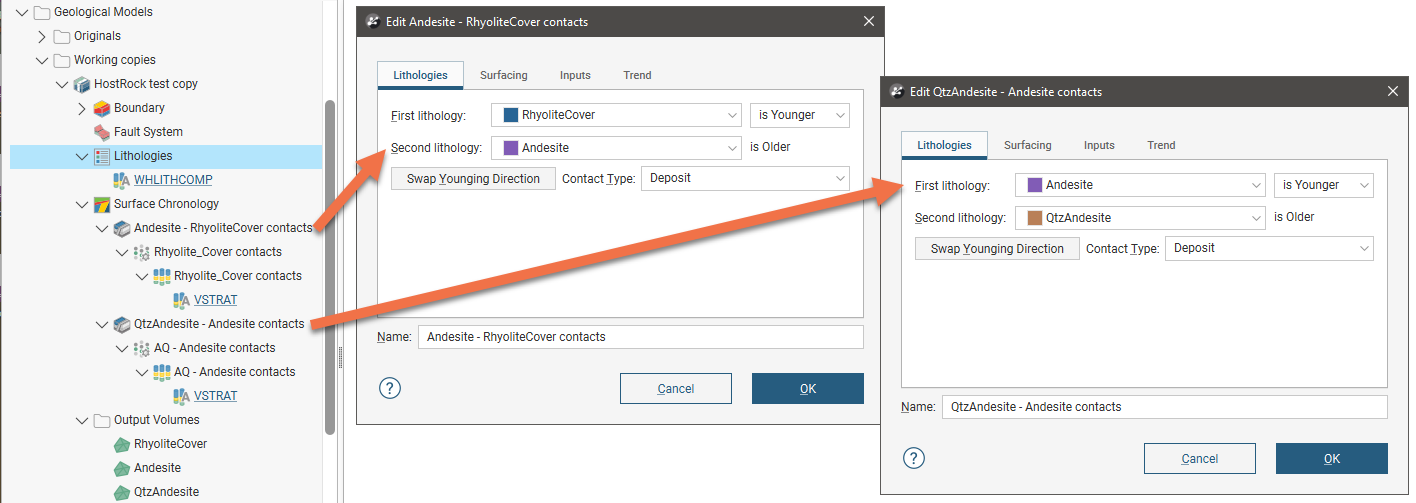
Deleting the Andesite code from the Lithologies tab will result in the code being replaced by the code set as the Background lithology (in the Surface Chronology tab). In this case, the background lithology is Unknown, which is substituted for the deleted code in the contact surface windows:
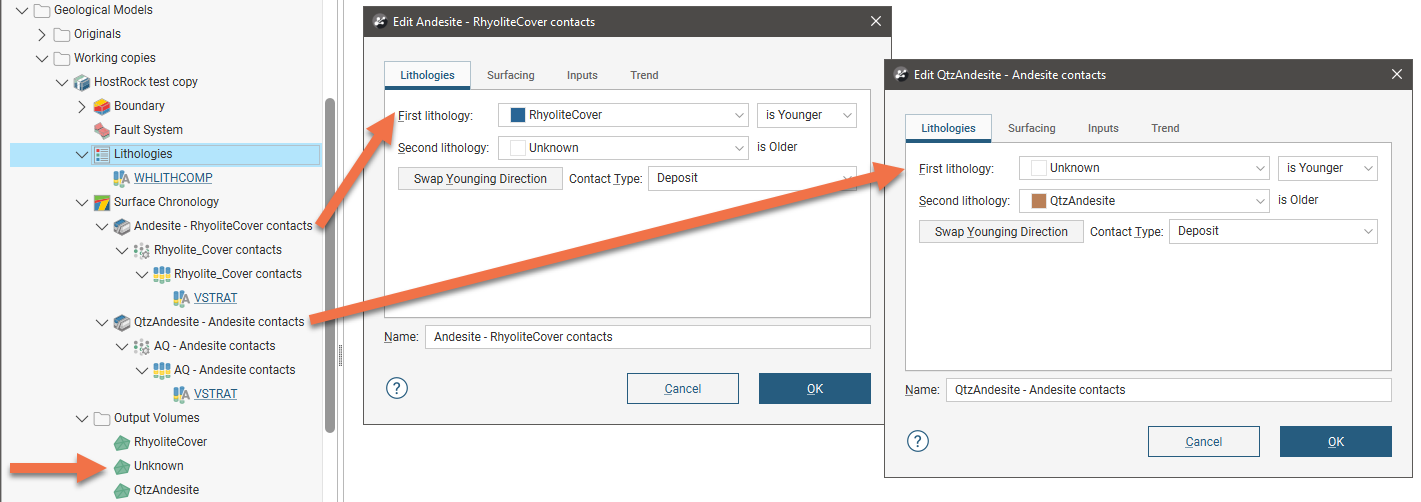
Note also that there is now an Unknown volume in the Output Volumes folder.
See the Changing a Geological Model’s Base Lithology Column topic for an example of how deleting a manually defined lithology code could be part of the workflow for using a different lithology column for a geological model.
Organising the Geological Model’s Legend
The order of the codes in the Lithologies tab is the order used for the model’s legend when the model is displayed in the scene:
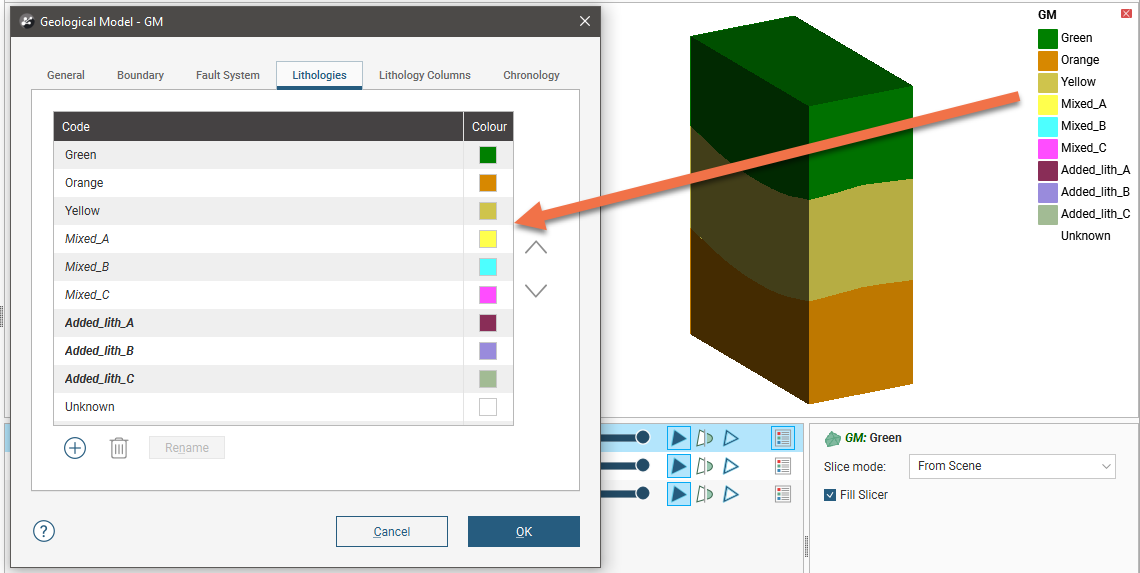
Note that the order of codes in the Lithologies tab does not reflect the priority associated with codes from different sources. The priority of codes is determined by their source and, in the case of linked columns, their order in the Lithology Columns tab. See Code Priority above for more information.
Click on a code in the list and use the arrow keys to reorder the list. Use the Shift or Ctrl keys to select multiple codes. This is useful for moving multiple codes up and down in the list.