Movies
Once you have a series of saved scenes (see Saved Scenes), you can use them to create a storyboard and export a movie.
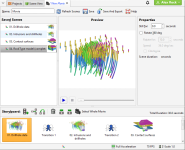
To create a new movie, right-click on the Saved Scenes and Movies folder and select New Movie. A tab will open in which you can create a storyboard and edit how each scene and transition is displayed. You can detach the tab from the main window and create scenes in the main window while working on scenes in the movie tab. Click the Refresh Scenes button to refresh the scenes in the movie tab when you have made changes.
Select the saved scenes you wish to add to the movie by clicking on them in the list, then click the Add To Storyboard button (![]() ). When subsequent scenes are added, transitions will be added to separate the scenes:
). When subsequent scenes are added, transitions will be added to separate the scenes:
Change properties for the selected scene or transition, then click the play button (![]() ) to preview the settings. To preview the whole movie, click the Select Whole Movie button (
) to preview the settings. To preview the whole movie, click the Select Whole Movie button (![]() ), then click play.
), then click play.
You can make changes to the included scenes without having to close and reopen the movie window. Simply update the scenes, then, in the movie editor, click the Refresh Scenes button.
Enter a name and description for the movie and click the Save button (![]() ). The movie will be saved in the Saved Scenes and Movies folder.
). The movie will be saved in the Saved Scenes and Movies folder.
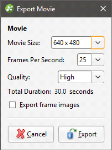
To export the movie, click the Save and Export button (![]() ). The Export Movie window will appear:
). The Export Movie window will appear:
If you tick Export frame images, individual frames will be saved as images, together with the movie file. Click Export. You will be prompted to select a filename and location. Click Save to export the movie. Leapfrog Works will then save the movie in the specified location, which may take some time.
Got a question? Visit the Seequent forums or Seequent support

