Importing Additional Tables
Once you have created a drilling data set in a project, you can add more tables to the data set. Types of tables you can add are:
- Additional interval tables. See Importing Additional Interval Tables.
- Downhole points. See Importing Downhole Points.
- LAS points. See Importing LAS Points.
- Downhole planar data. See Importing Downhole Planar Structural Data.
- Downhole lineations. See Importing Downhole Lineations.
- A screens table, if you did not import one when you first imported the drilling data set. See Importing a Screens Table.
Importing Additional Interval Tables
Interval tables that have not been imported during the drilling data import process can be added to the project at any time. To add an interval table, right-click on the drilling data set in the project tree and select from the options available:
- If the interval table is stored in a file on your computer or a network location, select Import From File > Interval Values. Leapfrog Energy will ask you to specify the file location, and then will display the data in the file in the Import Interval window.
- If the interval table is stored in an ODBC database, select Import From ODBC > Interval Values. You will be prompted to select the data source. See Connecting to an ODBC Data Source in the Importing Drilling Data topic.
- If your drilling data is stored in an acQuire database, select Import From acQuire > Interval Values. See Connecting to an acQuire Database in the Importing Drilling Data topic.
Columns required are:
- A well identifier
- Start/from and end/to depths
- A column of measurements
Select the required columns and assign the data type for each column. Click Finish to import the file, which will appear as a table in the drilling data set.
Importing Downhole Points
To import a set of points on wells, right-click on the drilling data set and select Import From File > Point Values or Import From ODBC > Point Values.
When importing from a file, Leapfrog Energy will ask you to specify the file location and then will display the data in the file in the Import Depth Points window.
When importing from ODBC, you will first be prompted to select the data source. See Connecting to an ODBC Data Source in the Importing Drilling Data.
Columns required are:
- A well identifier
- Depth
Select the required columns and assign the data type for each column. Click Finish to import the file, which will appear as a table in the drilling data set.
Importing LAS Points
LAS points need to be imported separately from other drilling data.
Leapfrog Energy imports LAS points down wells in LAS 1.2 and LAS 2.0 formats. An imported set of LAS files appears as one object with its associated data columns plus a LAS Wells folder that contains a filter for each well. Importing the data preserves the metadata from the LAS files, which can be viewed in the Properties window for the LAS points object and in the Properties window for each well.
To import LAS points down wells, right-click on the drilling data set and select Import From File > LAS Data. Select the files you wish to import and click Open.
Next, the Import LAS Data window will appear. The data displayed in this window is combined from the selected files, with blank and invalid values indicated by “nan”. For example, if a well file does not contain columns that are included in other well files, those missing columns will be marked as “nan”.
Leapfrog Energy expects well ID and Depth columns and will attempt to match the data in the files with the expected format. Select the columns to import, then click Finish. The files will be added to the project tree as part of the drilling data set, as described above.
To view LAS points, add the LAS points object to the scene. You can also display individual wells by adding their filters to the scene.
LAS File Mapping
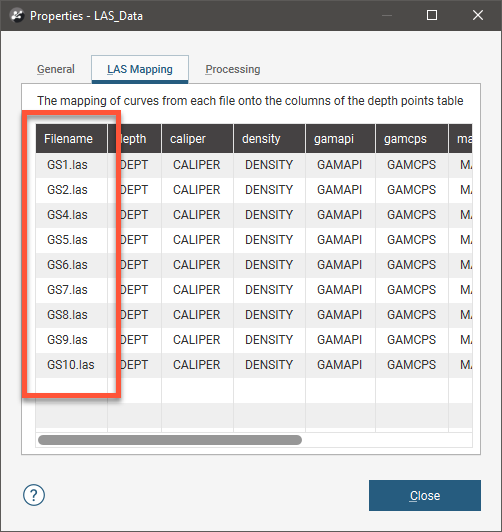
The Properties window for LAS Wells includes a LAS Mapping tab that shows what data files have been used for the selected well:

This is useful when data for a well originates in different files.
LAS File Inconsistencies
When importing LAS files, inconsistencies in the files are handled as follows:
- If there are two files with the same curve values at the same depth, the duplicate values will be added to the existing column and flagged as overlapping segments. See Correcting Data Errors in Leapfrog Energy for more information about correcting drilling data errors.
- If there are more than two files with the same curve values at the same depth, Leapfrog Energy will not be able to import the files. Note the conflicting files shown in the error message and reimport the files, leaving the conflicting files out.
- If there are multiple logs of the same name in the files, Leapfrog Energy will not be able to import the data. Edit the LAS file header outside of Leapfrog Energy to change the names.
Importing Downhole Planar Structural Data
Leapfrog Energy supports structural measurements in .csv or text formats. Structural data tables that include location information can also be imported to the Structural Modelling folder. See Importing Planar Structural Data in the Structural Data topic.
Downhole structural data needs to be imported separately from other drilling data. To import downhole structural data, right-click on the drilling data set in the project tree and select Import From File > Planar Structural Data or Import From ODBC > Planar Structural Data.
- When importing from a file, Leapfrog Energy will ask you to specify the file location and then will display the data in the file in the Import Planar Structural Data window.
- When importing from ODBC, you will first be prompted to select the data source. See Connecting to an ODBC Data Source in the Importing Drilling Data topic.
Leapfrog Energy expects columns describing the well identifier, the depth and the structural orientation. Structural orientation can be specified using either dip and dip azimuth or alpha and beta.
Match the values in the file to the required column headers, then click Finish to import the file. The table will appear in the drilling data set.
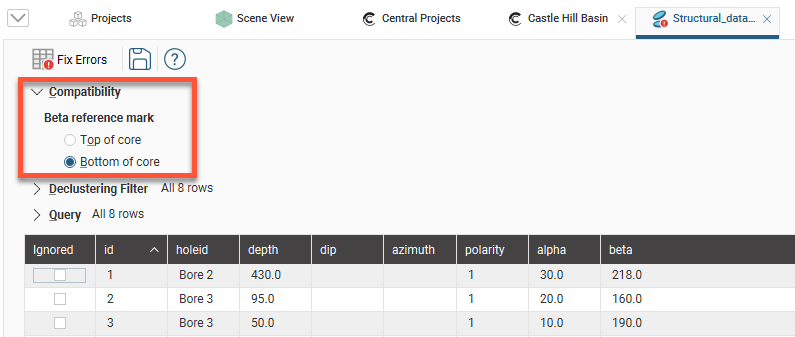
If the structural orientation is specified using alpha and beta, the reference line from which the beta is measured can be the bottom or top of the well. When the table is imported, the default setting is Bottom of core. To change this, double-click on the structural data table in the project tree. Next, click on Compatibility to change the Beta reference mark setting to Top of core:

Importing Downhole Lineations
Leapfrog Energy supports lineations in .csv or text formats. Structural data tables that include location information can also be imported to the Structural Modelling folder. See Importing Lineations in the Structural Data topic.
Downhole lineations need to be imported separately from other drilling data. To import downhole lineations, right-click on the drilling data set in the project tree and select Import From File > Lineations or Import From ODBC > Lineations.
- When importing from a file, Leapfrog Energy will ask you to specify the file location and then will display the data in the file in the Import Planar Structural Data window.
- When importing from ODBC, you will first be prompted to select the data source. See Connecting to an ODBC Data Source in the Importing Drilling Data topic.
Leapfrog Energy expects columns describing the well identifier, the depth and the lineation measurements. Both plunge/trend and alpha/beta/gamma measurements are supported.
Match the values in the file to the required column headers, then click Finish to import the file. The table will appear in the drilling data set.
Importing a Screens Table
Screens that have not been imported during the drilling data import process can be added to the project at any time. To do this, right-click on the drilling data set in the project tree and select Import From File > Screens or Import From ODBC > Screens.
- When importing from a file, Leapfrog Energy will ask you to specify the file location, and then will display the data in the file in the Import Screen window.
- When importing from ODBC, you will first be prompted to select the data source. See Connecting to an ODBC Data Source in the Importing Drilling Data topic.
Columns required are:
- A well identifier
- Start/from and end/to depths
- A value column
Select the required columns and assign the data type for each column. Click Finish to import the file, which will appear as a table in the drilling data set.
A drilling data set can have only one screens table.
