
Economic Composites
Economic compositing classifies assay data into “ore” and “waste” categories, taking into account grade thresholds, mining dimensions and allowable internal dilution. The result is an interval table with a column of ore/waste category data and a column of composited interval values, plus some additional columns showing the length, linear grade, included dilution length, included dilution grade and the percentage of the composite that is based on missing (and then filled) interval data.
Economic compositing is primarily an input into the modelling of geometry rather than the modelling of grade. Whereas numeric compositing transforms variable length assay intervals into consistent intervals with a common support length, economic composite intervals can be of any length, with the composited lengths always coinciding with the end of an assay interval. One common use for economic compositing is to generate a reasonable mineralised envelope from “ore” intervals, which has the benefit of being built on both mineability parameters and cut-off grade.
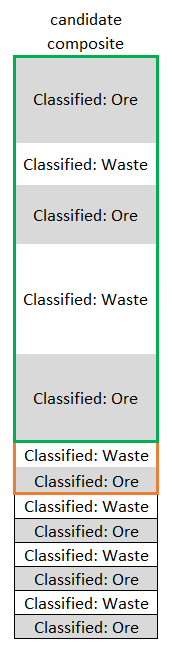
Economic compositing is based on a set cut-off grade, such that values that are greater than or equal to the cut-off value are considered “Ore” and values below are considered “Waste”. Adjacent intervals on the same side of the cut-off grade are concatenated, producing a series of alternating ore and waste segments. The alternating waste and ore segments are then composited, with the segments being considered for incremental addition to an ore composite sequentially down each drillhole. Although the compositing process produces both ore and waste composites, it only attempts to build ore composites. Waste composites are produced when a composite fails to meet the constraints required for an ore composite, or as initial or final segments.
The rest of this topic describes creating and working with economic composites. It is divided into:
- Creating an Economic Composite
- Selecting Values
- Handling Missing Intervals and High Grades
- Selecting a Dilution Rule
- Setting the Cut-Off Grade
- Compositing Direction
- Two-Pass Compositing
- Using True Thickness
- The Compositing Process and Parameters
- Viewing Compositing Results
Creating an Economic Composite
To create an economic composite, right-click on the Drillholes > Composites folder and select New Economic Composite. The New Economic Composite window will appear:
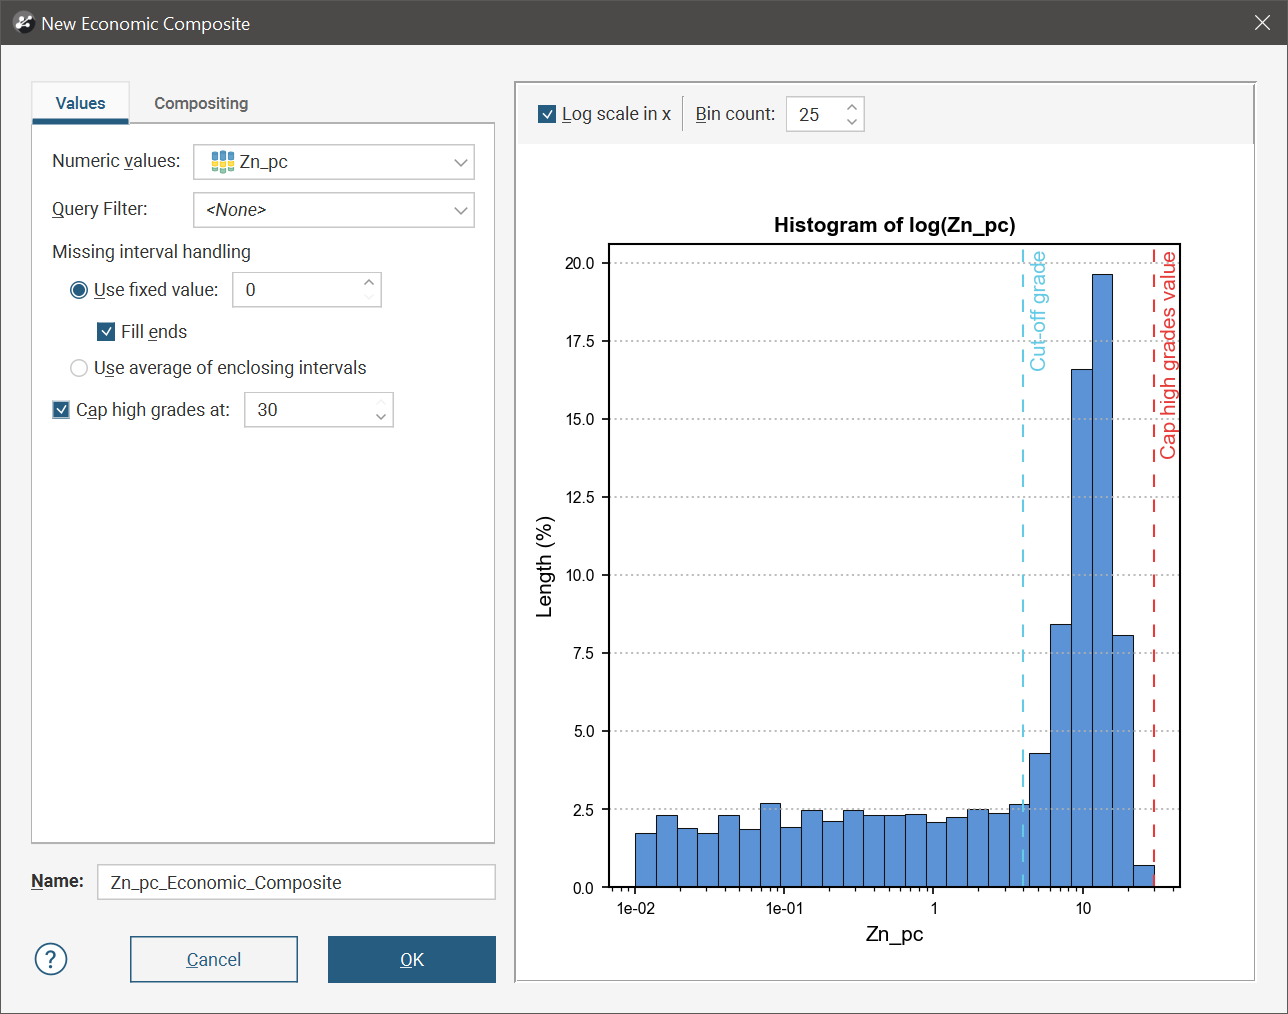
This window has three parts: a Values tab, a Compositing tab and a histogram of the raw uncomposited data. When adjusting the histogram:
- Log scale in x changes the x-axis scale between a linear and log scale
- Bin count adjusts the number of histogram bins
Once an economic composite has been created, you can change any setting, except for the Numeric values setting in the Values tab. Click OK to save the composite. You can edit the economic composite by right-clicking on it in the project tree and selecting Edit Economic Composited Table.
If you have created an interval selection from an economic composite, the selection could be deleted if you edit the compositing parameters, along with any dependent objects, such as vein models.
Selecting Values
In the Values tab, first select a numeric data column from the Numeric values list. A Query filter can also be applied.
Handling Missing Intervals and High Grades
The other settings in the Values tab determine how missing intervals and high grades are handled.
In economic compositing, drillholes need to be fully informed for all intervals. There are two options to deal with missing intervals: either use a supplied value or an average of the enclosing intervals. Missing interval handling offers the options Use fixed value and Use average of enclosing intervals. Raw assay data should be carefully reviewed and the reasons for the missing data understood before deciding which option to adopt. The most conservative route is to treat missing assays as having a zero grade.
The Fill Ends option changes the behaviour when using a fixed value for missing intervals. This is important when wedge holes are present in the drillhole data. Fill Ends is enabled by default, because of the requirement that economic composites are fully informed for all intervals. If fixed values are being used for missing intervals, Fill Ends being enabled will ensure that missing intervals between the collar and the first logged data are handled using the fixed value rule. However when wedge holes have been drilled, this can result in conflicting information, where data is logged for the main drillhole but there is no corresponding data at those depths on any wedge holes. Enabling Fill Ends in this situation will result in the fixed value being assumed for the intervals in the wedge holes, effectively resulting in different information for the same physical locations.

In this situation, turning Fill Ends off will ensure that all intervals between the top and bottom logged intervals in a drillhole are fully informed, using the supplied fixed value for any missing interval. However, missing intervals above the highest logged interval or lowest logged interval will not be informed using the fixed value. For the purposes of economic compositing, it will be as if the drillhole exists only between the first and last logged interval. For wedge holes, this means that the holes without logged data for certain intervals will not conflict with the holes that contain data for those locations.

You may choose to Cap high grades at a specific value so that anomalously high values do not bias the data. You can also drag the dotted vertical red line on the histogram to adjust this value.
Selecting a Dilution Rule
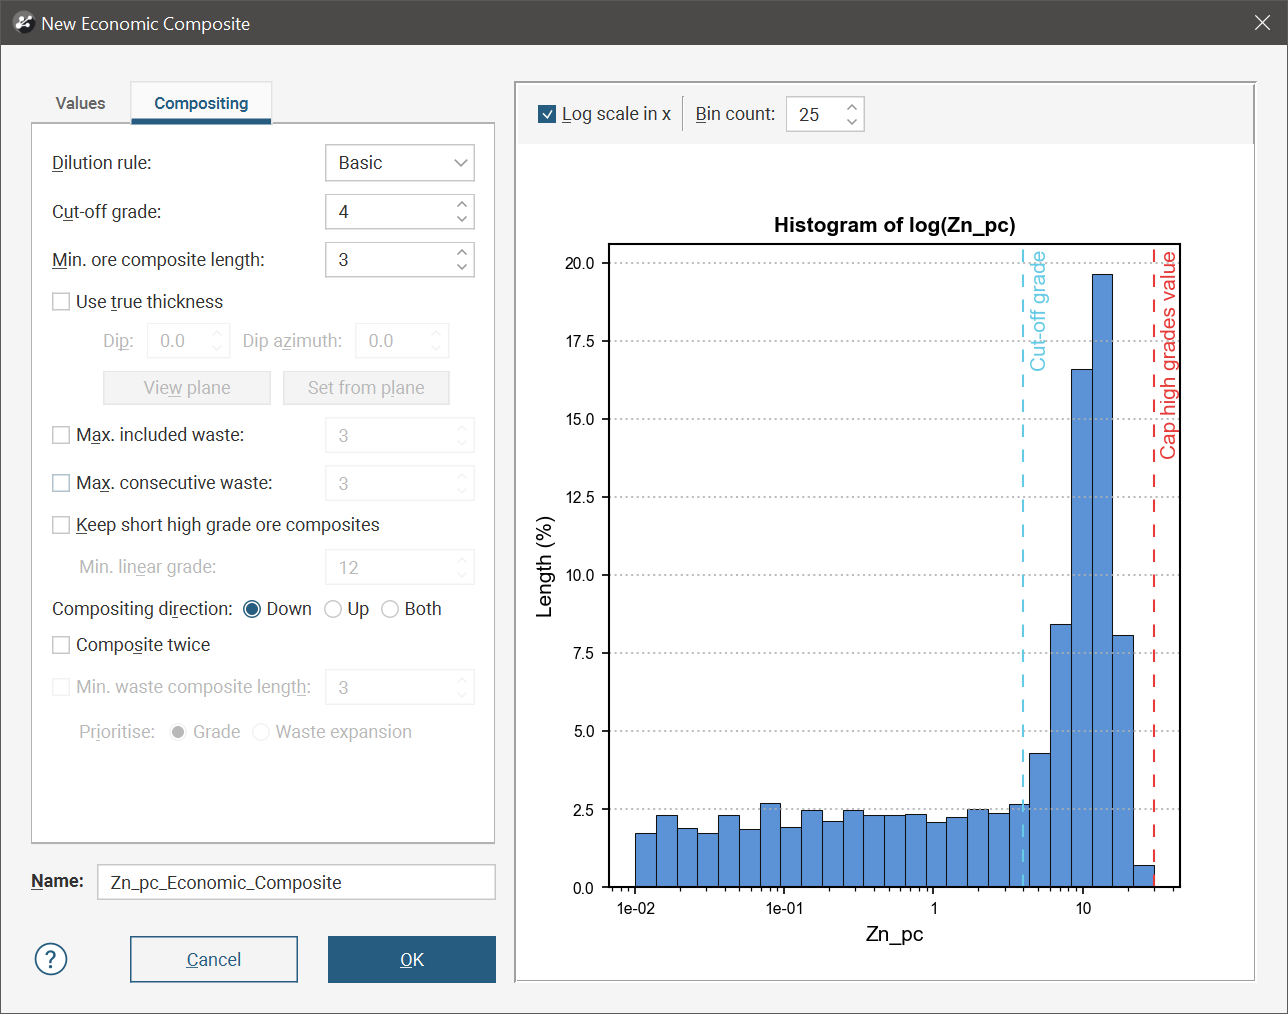
The Dilution rule is set in the Compositing tab, and the option you choose will affect which of the other settings in the Compositing tab are available and which are mandatory.
The Dilution rule selected changes the logic for creating the ore composites. There are three options: Basic, Advanced and Advanced+.
Basic uses a simple length-weighted average of the composite and the candidate waste-ore section and will tend to produce longer waste and ore composites. Advanced and Advanced+ are generally more conservative in that they provide greater control over waste dilution of ore. Both Advanced and Advanced+ will tend to produce more discrete ore composites. With Advanced+, an additional rule checks to ensure that adding a waste-ore section does not create internal sections comprising waste-ore-waste segments that are below the cut-off grade.
Note that the compositing algorithm applies the parameters in the Compositing tab in the order in which they are presented in the tab.
Setting the Cut-Off Grade
The histogram can be used to identify a reasonable Cut-off grade setting. If you have positively skewed data, tick Log scale in x to get a logarithmic scale to aid in identifying an appropriate cut-off grade.
You can specify the Cut-off grade as a number, or you can drag the dotted vertical blue line on the histogram to adjust this value. You will need to adjust this value, as the default is intentionally set high, at the 99th percentile of the data.
Select the Cut-off grade only once you have determined how missing values will be handled, in the Values tab. See Handling Missing Intervals and High Grades above.
Compositing Direction
There are three options for the Compositing direction:
- For Down, compositing starts at the top of the hole and works downward. This is the default setting when the Dilution rule is Basic.
- For Up, compositing starts at the bottom of the hole and works upward.
- For Both, compositing is carried out in both directions and the highest linear grade is selected, on a per-hole basis. This is the default setting when the Dilution rule is Advanced or Advanced+.
Two-Pass Compositing
Enable Composite twice for a two-pass composite operation, using the same parameters a second time and the waste and ore classification results of the first pass as the input to the second pass. This will tend to consolidate some of the ore composites into longer composites.
Using True Thickness
The Use true thickness setting requires the compositing algorithm to composite using true thickness measured perpendicular to a specified reference plane. Dip and Dip azimuth specify the orientation of this reference plane, which may be used to approximate the ore body orientation or some other preferred alignment. In more laminar deposits, such as a vein model, enabling Use true thickness will force the length-weighted composite to take into account the true thickness of the vein and weigh the interval based on that thickness rather than the thickness implied from the drillhole. Use true thickness can be useful in cases where the drillhole is oblique to the trend of the vein and has recorded a thickness much larger than the actual vein thickness.
The Compositing Process and Parameters
Once you have selected a Dilution rule and set the Cut-off grade, the other parameters in the Compositing tab can be used to further refine the compositing behaviour.
This illustrates a short drillhole with a cut-off grade set to 0.01:

The alternating waste and ore segments are then composited, with the segments being considered for incremental addition to an ore composite sequentially down each drillhole. Although the compositing process produces both ore and waste composites, it only attempts to build ore composites. Waste composites are produced when a composite fails to meet the constraints required for an ore composite, or as initial or final segments.
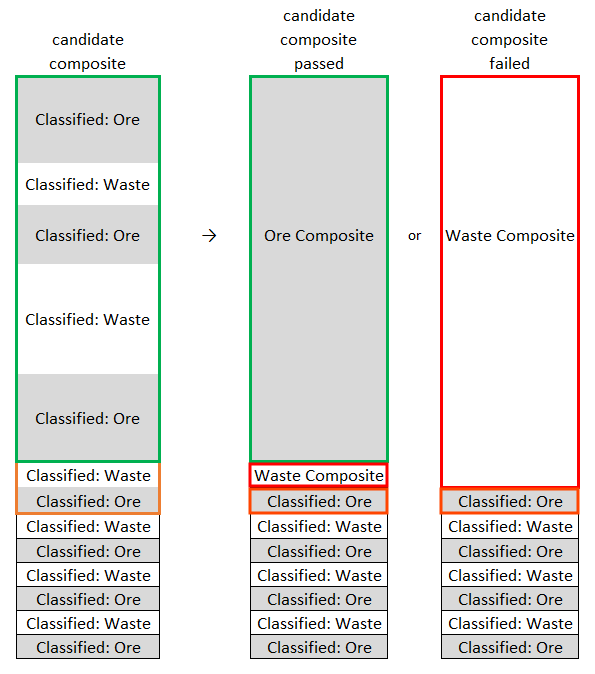
Within an ore composite, the amount of waste that is allowed to dilute the ore is constrained by the remaining options. Because an ore composite must start in a segment classified as ore and must also end in ore, building an ore composite candidate starts with the next ore segment in the drillhole. An attempt is made to extend the ore composite candidate by adding segments, and because an ore composite must end in ore, not only is the next waste segment added but also the ore segment after that.
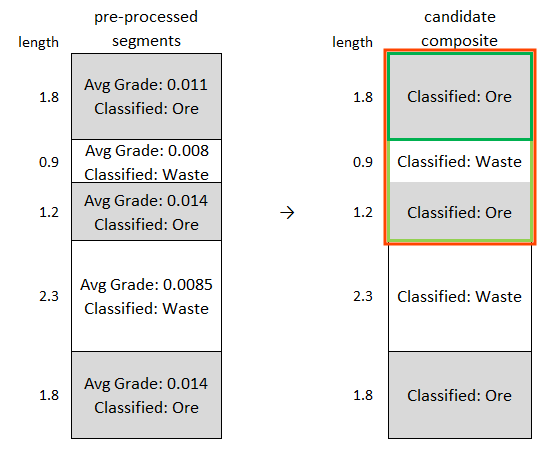
Min. ore composite length specifies the minimum length for an ore composite. If a composited length of ore does not meet this threshold, it will be added to the previous waste composite. This is often intended to reflect a minimum mineable interval. In the above example, the Min. ore composite length would need to be at least 3.9, the sum of the 1.8, 0.9 and 1.2 length sections, for the candidate ore composite to be accepted.
Before extending the candidate ore composite with the next waste-ore pair of segments, this combination needs to be tested against any active constraints, the Max. included waste and Max. consecutive waste. In this illustration, the candidate ore composite has already been extended to include the first three segments and now the addition of the next waste-ore pair of segments is being tested.
Max. included waste is an optional threshold that constrains the total length of waste that can be accumulated within an ore composite. Increasing this value will permit greater dilution of ore with waste before the candidate ore section will be rejected. If the Max. included waste is more than 3.2, the sum of the 0.9 and 2.3 length waste segments, the extension will be permitted. On the other hand, if Max. included waste was less than 3.2, the previously accumulated ore candidate would be composited as ore without the addition of the current waste-ore pair of segments.
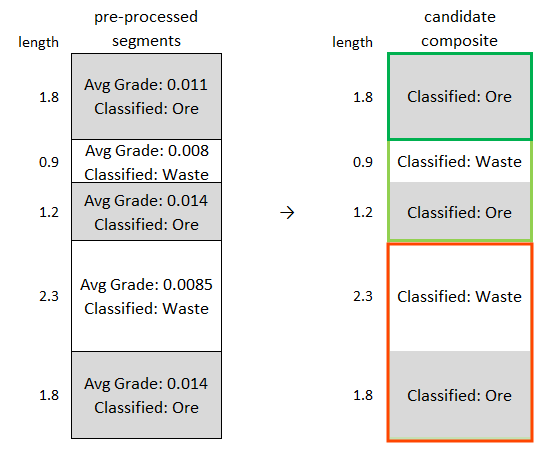
Max. consecutive waste is an optional threshold for Basic and Advanced dilution rules, but is required for Advanced+. It constrains the length of consecutive intervals classified as waste that can be considered for addition to an ore composite. Increasing this value will permit a longer consecutive waste segment to dilute a candidate ore section before the candidate is rejected as waste. Again using the illustration above, Max. consecutive waste would have to be more than 2.3, the longest of the waste segments in the ore composite candidate, to permit the extension of the new waste-ore pair of segments. If Max. consecutive waste was less than 2.3, the previously accumulated ore candidate would be composited as ore without the addition of the current waste-ore pair of segments.
If these optional tests pass, the candidate ore composite and the waste-ore section being added to it are also tested against the other dilution rules. If the dilution rules permit the waste-ore section to be added to the candidate ore composite, the section is concatenated to the candidate ore composite. Then the next waste-ore pair of segments is considered to see if the candidate ore composite can be extended further.
If the new waste-ore section fails the threshold tests or the dilution rule, the current candidate ore composite without the addition of the waste-ore section is tested against additional thresholds: is its length over the Min. ore composite length, or otherwise is the composite able to be kept because it meets the Min. linear grade threshold to Keep short high grade ore composites? Keep short high grade ore composites is an option that allows ore composites shorter than the Min. ore composite length, provided the Min. linear grade is exceeded. Linear grade is the length * grade. This allows a short length of high economic value material to be classified as ore and identified. If the current candidate ore composite can meet one of these thresholds, the ore composite is added to the composite table, the waste segment of the current waste-ore segment is considered a candidate waste composite, and the ore segment is used to start a new candidate ore composite. If any of these requirements for keeping the candidate ore composite are not met, the candidate ore composite fails, so the whole candidate composite is considered a waste composite instead of ore, and is added to any preceding candidate waste composite, along with the next waste segment in the drillhole. Compositing resumes with the next ore segment in the drillhole.
Min. waste composite length does not apply to the Basic dilution rule, but is an option for Advanced and Advanced+. It specifies the preferred minimum length of waste composite. This is applied after initial compositing to any waste composite that is bounded on both sides by ore. Waste composites are expanded into the surrounding ore composites, and the Prioritise option controls which other ore requirements are prioritised during this process. If Prioritise Grade is selected, waste composites are expanded into the surrounding ore composites by reclassifying adjacent waste-ore intervals as waste until the Min waste composite length is satisfied, in such a way that loss from the ore composites is minimised. Candidate waste expansion windows are created and the candidate with the lowest total ore linear grade is selected. If candidate windows have duplicate total ore linear grades, the one that is more centred over the original waste composite is selected. The expansion of the waste composited is not applied if it would affect other configured ore requirements as Min. ore composite length. Because this prioritises ore composite length, waste composite expansion is constrained by the length of the surrounding ore composites and the Min. ore composite length, therefore some waste composites may not be fully expanded. If Prioritise Waste expansion is selected, short waste composites are expanded into either the upper or lower ore composite until the Min. waste composite length is satisfied, even if this means that ore composites will be removed. The total number of composites is not guaranteed to be the same after expansion. Candidate segments are selected from each surrounding ore composite and the candidate with the lowest linear grade is chosen to be merged into the waste composite.
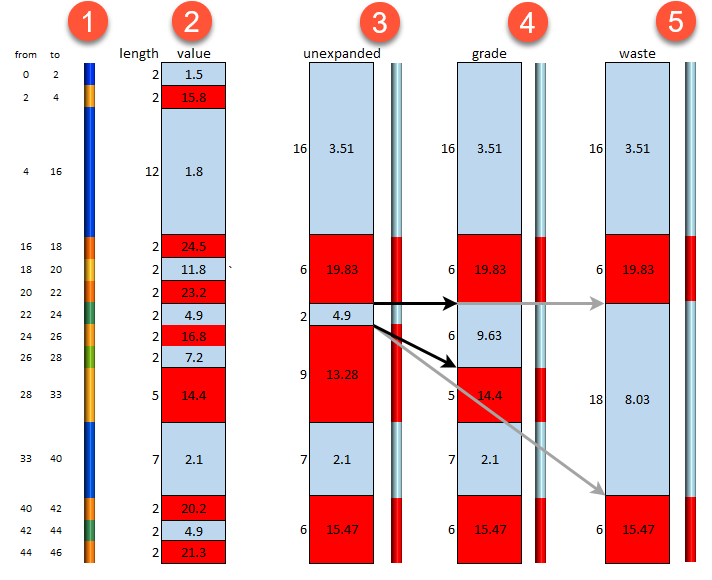
The illustration below provides some insight into the economic compositing and waster expansion steps. In column 1, a drillhole is depicted with the ‘from’ and ‘to’ depth measurements alongside.
In column 2, adjacent intervals designated ore and waste are combined and an average grade value for each interval is determined. The samples are coloured blue for waste and red for ore, according to whether or not the Cut-off grade is less than 12.
In column 3, Advanced is selected as the Dilution Rule, with a Min. ore composite length of 5. No Min. waste composite length is set. This is the result of the economic composite without waste expansion.
In column 4, Min. waste composite length is set to 7 and Prioritise Grade is specified. Note that the 22-to-24m-deep waste interval that was only length 2 (and therefore less than the Min. waste composite length of 7) has been expanded up to add the waste-ore segment below. It is still only length 6, less than the Min. waste composite length, but it cannot be fully expanded because it is constrained by the Min. ore composite length. Note that the waste was expanded downward to consume the ore-waste interval pair below, because the cost of the expansion was cheaper.
In column 5, an alternative result is shown with Min. waste composite length set to 7 and Prioritise Waste expansion specified. This time, the 22-to-24m-deep waste interval that was only length 2 has been expanded down to add the ore composite below to the waste composite. The lower ore composite was added to the waste composite rather than the one above because the one above would have resulted in a higher linear grade.
Viewing Compositing Results
To view the composited data, double-click on the table in the project tree. The table includes the status category column and true_length, linear_grade, dilution_true_length, dilution_linear_grade and pct_missing numeric columns.
Click the Edit button (![]() ) to open the Edit Economic Composite window. You can also customise a Query to filter what the table displays.
) to open the Edit Economic Composite window. You can also customise a Query to filter what the table displays.
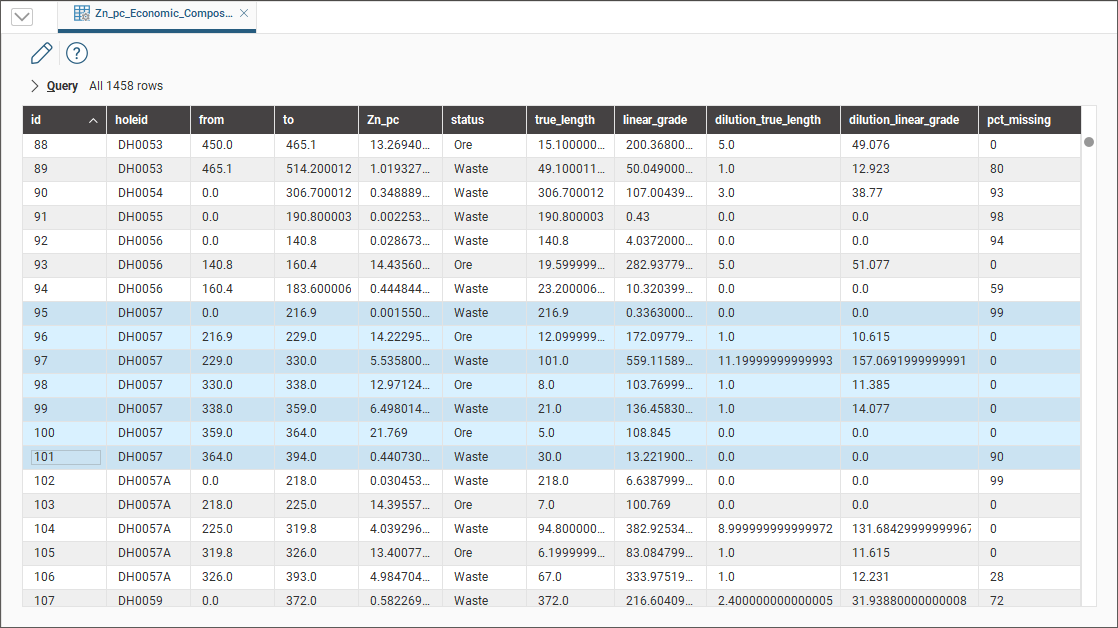
The true_length is the total length of the interval. If Use true thickness was enabled, that calculated value will be used here instead of the drillhole interval length. The linear_grade is the grade * length of the material of interest excluding any dilution material.
The dilution_true_length is the total length of diluting intervals for the composite interval. The dilution_linear_grade is the linear grade * length of all the diluting material in a composite interval. For composite intervals graded as ore, these are the length and linear grade of the waste that dilutes the ore in the interval. For a waste composite interval, the dilution true length and dilution linear grade are the length and linear grade of the ore that dilutes the waste.
The pct_missing value shows the percentage of the composite that is based on missing (and then filled) interval data.
It is useful to use the drillhole correlation tool to visualise the resulting composited data. Here a new drillhole correlation has been created with a single selected collar (highlighted in the table above), with the source numeric column dragged in from the assay folder, along with the data columns from the economic composite.
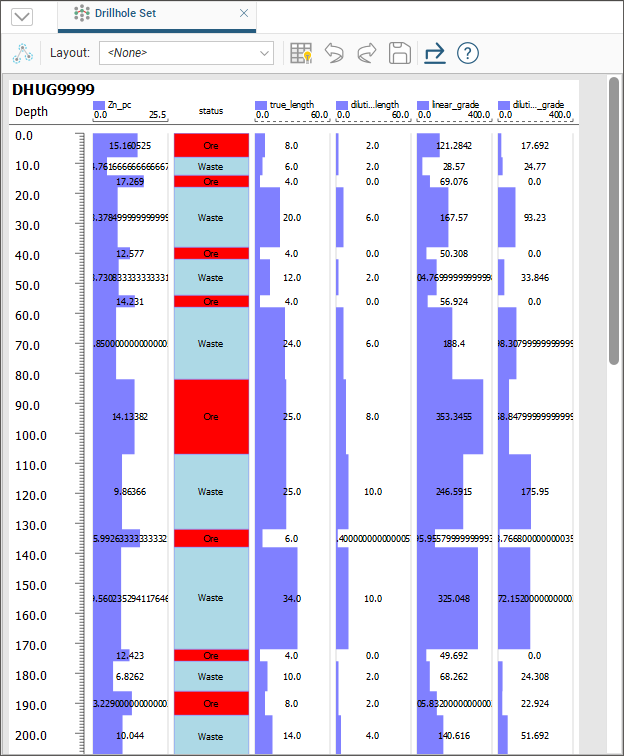
To learn more about how to use the drillhole correlation tool, see Drillhole Correlation Tool.
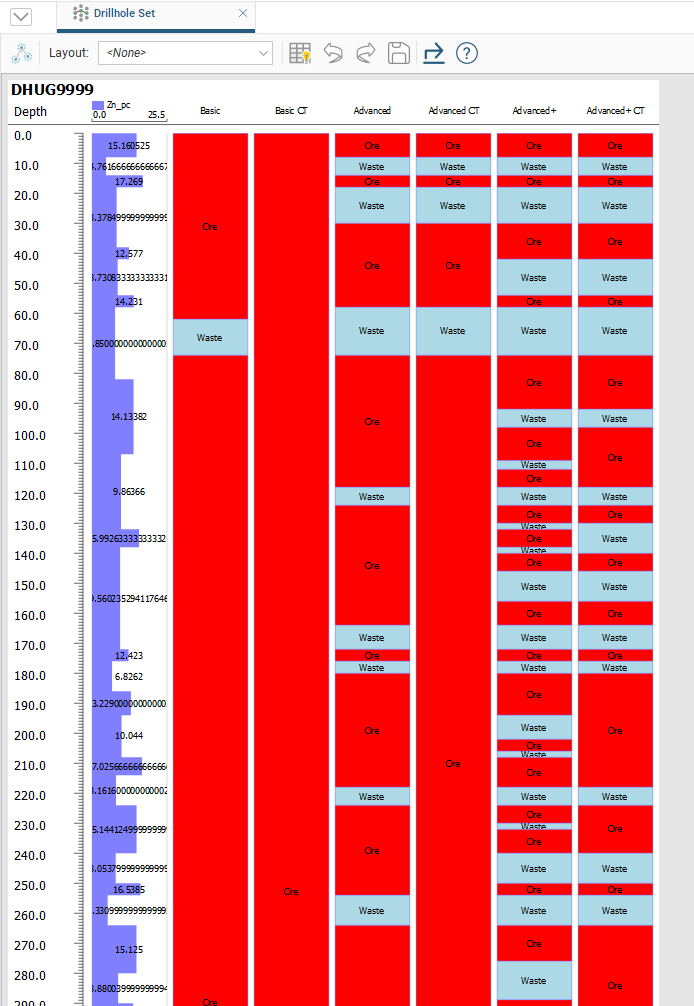
The drillhole correlation tool can also be useful for observing and comparing the differences between different economic compositing options. In the following example, the effects of the Basic, Advanced, and Advanced+ dilution rules on a data set are being compared, as well as the effect of the Composite twice option on each rule.
Got a question? Visit the Seequent forums or Seequent support
© 2023 Seequent, The Bentley Subsurface Company