
Building Surfaces Using the Surface Chronology
The Surface Chronology object (![]() ) is used to define the internal structure of a geological model. This is achieved by:
) is used to define the internal structure of a geological model. This is achieved by:
- Generating initial contact surfaces that correspond to the boundaries between lithological units
- Refining the contact surfaces by changing settings and/or adding other data in the project to them, if suitable data is available
- Arranging the surfaces in chronological order
- Using the surfaces and the chronological order to divide the geological model into units
Factors that influence the interaction of contact surfaces with the volumes of the geological model are:
- The orientation of the older and younger sides of the surface
- The order of the contact surfaces in the Surface Chronology
- The type of contact surface
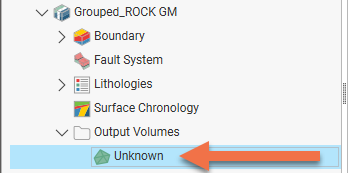
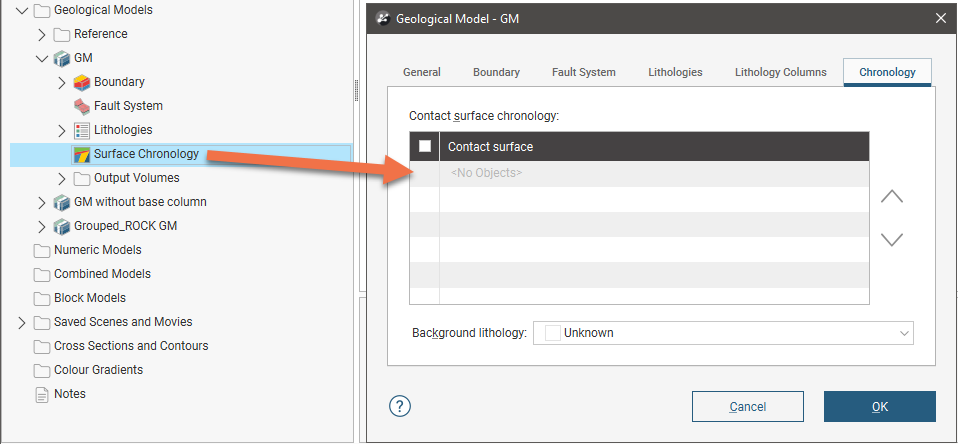
When a geological model is first created, there are no surfaces in the Surface Chronology and the Output Volumes folder contains a single output volume assigned the “Unknown” lithology:
Later, once contact surfaces have been defined and enabled, they are used to divide the initial volume. For example, here the contact surfaces shown on the left result in the output volumes on the right:

This topic describes how the Surface Chronology and contact surfaces are used to define the internal structure of a geological model. It is divided into:
- Contact Surface Basics
- Copying Contact Surfaces
- Younging Direction
- Ordering and Enabling Surfaces in the Surface Chronology
- Changing the Background Lithology
- Surface Chronologies for Faulted Models
- The Four Core Surface Types and Their Interactions
Contact Surface Basics
Right-clicking on the Surface Chronology in the project tree shows the types of contact surfaces you can build:
Deposit, Erosion, Intrusion and Vein are core surface types that result in shapes and interactions as follows:
- Deposit. Deposit contact surfaces are useful for modelling sheet-like contact surfaces. The primary lithology is on the young side and the contacting/avoided lithologies are on the older side. Deposits do not cut older volumes and so a volume defined by a deposit contact surface will, therefore, appear conformably on top of older volumes.
- Erosion. Erosion contact surfaces are similar to deposit surfaces, but cut away other contact surfaces on the older side of the erosion contact surface.
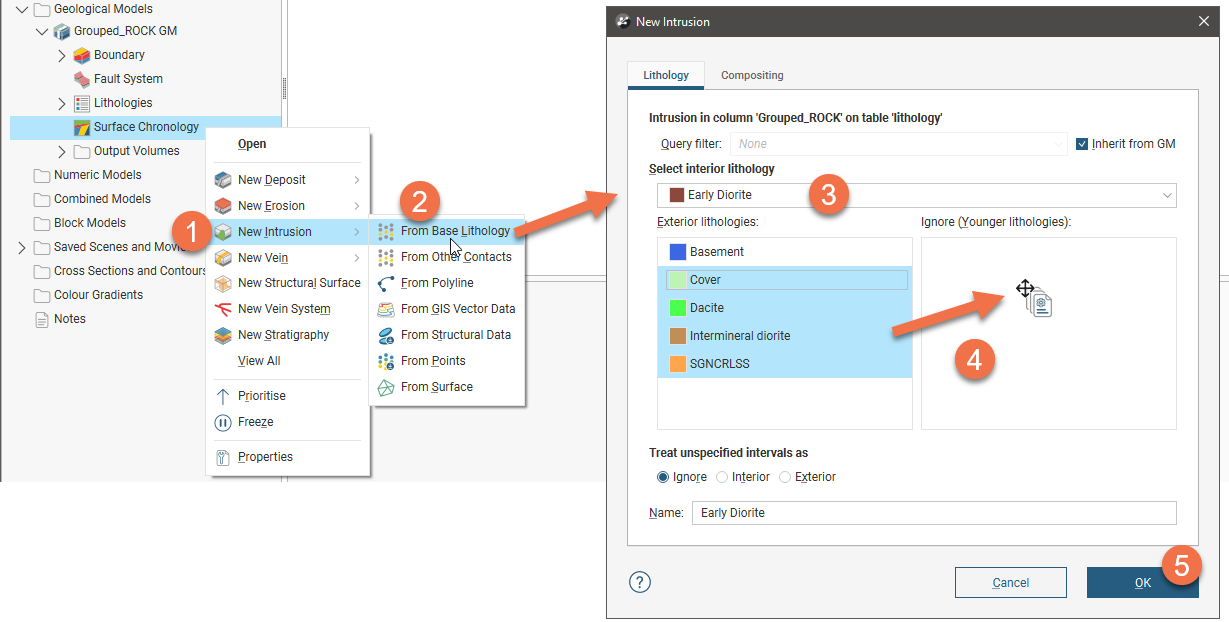
- Intrusion. Intrusion contact surfaces are useful for modelling units that are rounder in shape, with an interior lithology that represents the intrusion lithology. The intrusion removes existing lithologies and replaces them with the intrusive lithology on the younger side of the contact surface. Often, the older side of an intrusion contact surface is labelled Unknown as typically intrusions displace multiple older lithologies.
- Vein. Vein contact surfaces are useful for modelling any narrow, laterally continuous volumes, including veins, dykes, coal seams and fault zones. For a vein contact surface, hangingwall and footwall surfaces are created from contact points and the vein lithology fills the space between the hangingwall and footwall surfaces.
These terms are indicative of the resulting shape and cutting behaviour of a surface rather than of the geological formations that can be modelled. In fact, it might make sense to model something like basement granite as a deposit rather than as an intrusion when it forms the lowest layer in the geological model. If there are no older layers for an intrusion-type contact surface to remove and it is apparent from the drilling data that the lithology simply fills the lowermost parts of the model, then it makes sense to model it as a deposit.
See The Four Core Surface Types and Their Interactions at the end of this topic for a description of how these core surface types interact.
The process for defining each of the core contact surface types is to:

|
Right-click on the Surface Chronology and select the type of surface you wish to define. |

|
In the sub-menu, select the type of data you wish to use in building the surface. |

|
In the window that appears, select the lithology for the surface you are defining. |

|
Make any other settings changes, which will depend on the type of surface you are defining. |

|
Click OK to generate the surface. |

|
Check the surface in the scene against the data used to create the surface, which is shown in the project tree as part of the surface. How the surface is organised in the project tree depends on what type of surface it is and what data has been used to create it. |

When you create a contact surface, it appears in the project tree under the Surface Chronology object, but it is marked as inactive and, therefore, does not affect the geological model volumes. This means you can work on the surface without having to reprocess the model whenever you make a change to the surface. In Leapfrog Geo, you can easily define, enable and remove contact surfaces from a model, and you can experiment with modelling lithologies using different techniques in order to arrive at a geologically reasonable model.
Right-click on the surface in the project tree to see what options are available for further refining it:

See the following topics for more information on building these core surface types:
The Structural Surface, Vein System and Stratigraphy options are for more specialised applications:
- Structural Surface. Structural surfaces use contact data and non-contact structural data. A structural surface can interact with other volumes in the model in the same manner as deposit, erosion or intrusion contact surfaces. The shape of the structural surface is suggested by the non-contact structural data used. See the Structural Surfaces topic.
- Vein System. A vein system is an alternative is using individual vein contact surfaces. A vein system provides additional benefits in being able to treat the veins individually as well as a whole collection with associated relationships. In a vein system, veins are grouped into a vein system object (
 ) that defines the vein structures as a unified object. See the Vein Systems topic.
 - Stratigraphy. A stratigraphy is useful for modelling a sequence of layers that are roughly uniform in thickness and that have a consistent stacking order. See the Stratigraphic Sequences topic.
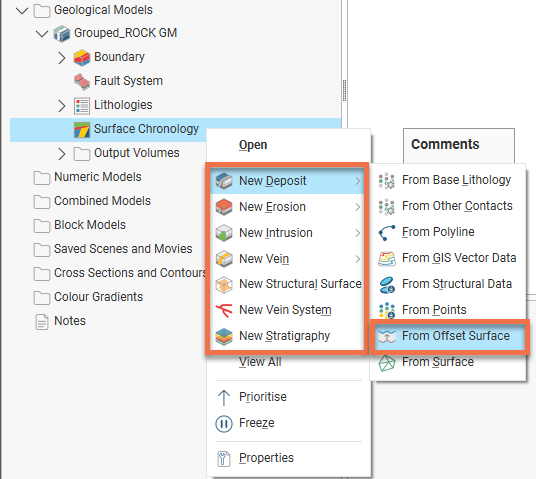
There is also another specialised option available for creating deposit and erosion contact surfaces. This Offset Surface option is useful for creating a series of deposit or erosion contact surfaces from a reference mesh. The surface can be offset from the reference mesh by points or by a fixed distance, and additional options for offsetting to points can be adjusted once the surface has been created. See the Offset Surfaces topic.
Copying Contact Surfaces
Once you have created a particular type of contact surface, you can easily make a copy of it to experiment with the effects of different settings. Copying surfaces is also useful in ensuring the consistency of settings in a geological model.
Contact surfaces can only be copied within a geological model; they cannot be copied to other models.
To make a copy of a contact surface, right-click on it in the project tree and select Copy.

Stratigraphic sequences and contact surfaces in stratigraphic sequences cannot be copied.
Enter an name for the copy, then click OK. Copied surfaces are set to inactive in the Surface Chronology, so making a copy of a surface results in no processing changes to a geological model.
With veins, you can also copy veins into and out of vein systems. See Copying Veins in the Veins topic for more information.
Younging Direction
An important factor in determining how surfaces interact is the polarity of each surface, which, in relation to geological model surfaces, is called the “younging direction”.
See the Polarity in Leapfrog Geo topic for more information on polarity and its effect on surfaces.
Each contact surface has a younger side and an older side. For deposit and erosion contact surfaces, Leapfrog Geo will, by default, put the younger side up, since this is geologically reasonable in most situations. If, for example, you know that the geology is overturned, you can change the younging direction once the surface has been created. For intrusion contact surfaces, the younger side of the surface is the inside, although this can be swapped if Leapfrog Geo has assigned it incorrectly, as may be the case with flatter intrusion surfaces.
When contact surfaces are displayed in the scene, you can choose whether to display the surfaces using the lithology or the younging direction:

When a contact surface is displayed using the younging direction, Leapfrog Geo by default colours the younger side green and the older side brown. Here both a deposit and an intrusion surface are shown using their younging direction. Note how the upward facing surface of the deposit is the younger side (green) and the intrusion is older (brown) on the outside and younger (green) on the inside:

Displaying surfaces using their younging direction can be useful if the shape of the surface is not what you expected from the input data.
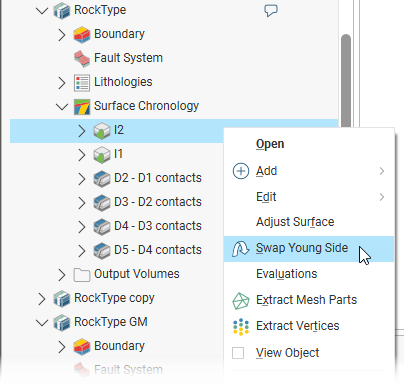
To change a surface’s younging direction, right-click on it in the project tree and select Swap Young Side.
Ordering and Enabling Surfaces in the Surface Chronology
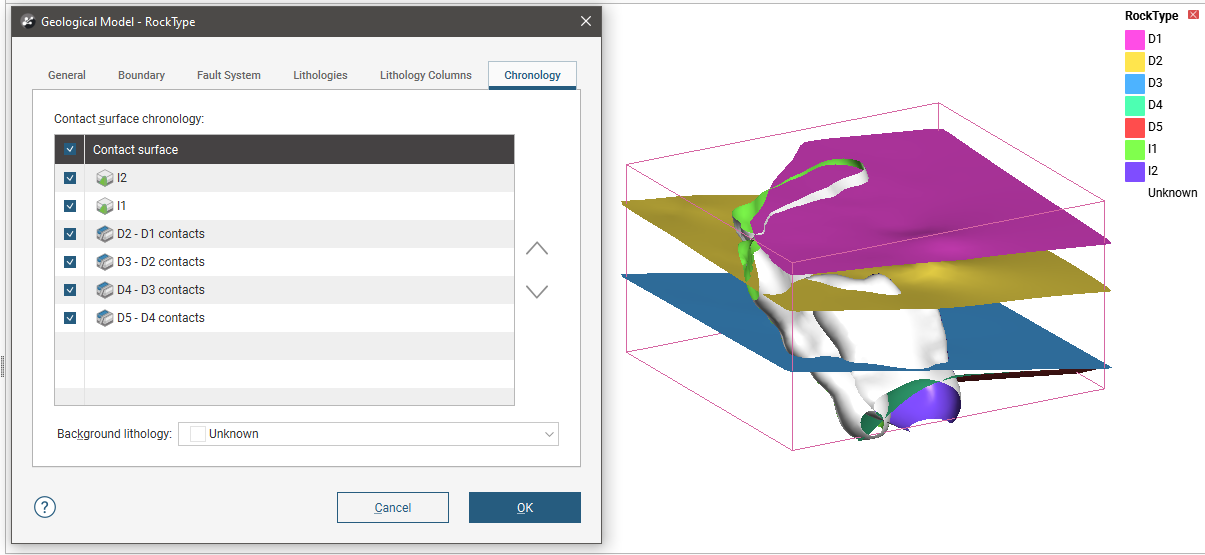
Double-clicking on the Surface Chronology in the project tree opens the Geological Model window with the Chronology tab selected. When you first create a model, the Chronology tab will be empty:
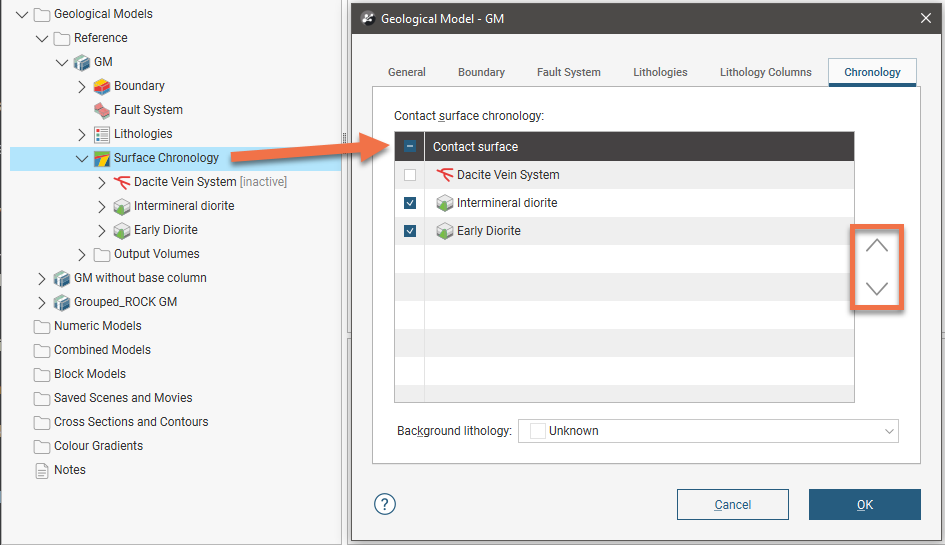
Once surfaces have been defined, they are saved in the project tree under the Surface Chronology, in order from youngest (at the top) to oldest. This is the same order shown in the Chronology tab, where you can reorder surfaces using the arrows alongside the list:
If you build your models from the bottom up, you will find that often the contact surfaces are in the correct chronological order as you build them.
Note that in the Chronology tab shown above, one surface, the Dacite Vein System, is marked as inactive, which means it is not used in determining how the geological model is divided up into its output volumes.
When you create a contact surface, it appears in the project tree under the Surface Chronology object, but it is marked as inactive and, therefore, does not affect the geological model volumes. This means you can work on the surface without having to reprocess the model whenever you make a change to the surface. In Leapfrog Geo, you can easily define, enable and remove contact surfaces from a model, and you can experiment with modelling lithologies using different techniques in order to arrive at a geologically reasonable model.
Tick the boxes for surfaces you wish to include in the model. When you click OK, the included surfaces will be used to subdivide the geological model into lithological volumes. The volumes that are generated will be saved in the Output Volumes folder:
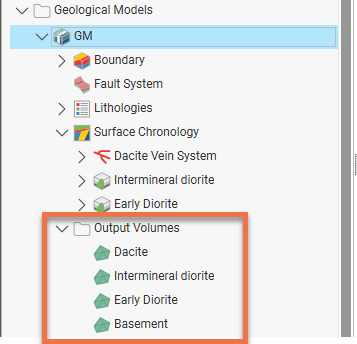
Output volumes are named according to the lithologies assigned to each side of the contact surfaces that bound each volume. If the lithology assigned to an output volume cannot be determined, it will be assigned the Background lithology, which is, by default the lithology called Unknown.
Changing the Background Lithology
Geological models in Leapfrog Geo have a “background lithology” that is assigned to surfaces and output volumes when the lithology for that surface or volume cannot be determined. The lithology code Unknown is automatically defined for all geological models, and it is this code that is, by default, used as the background lithology. When a geological model is first created and no contact surfaces have been defined, the output volume’s lithology cannot be determined and so the Unknown lithology code is used for the output volume. That is the case here, with a new geological model in which no contact surfaces have been defined:
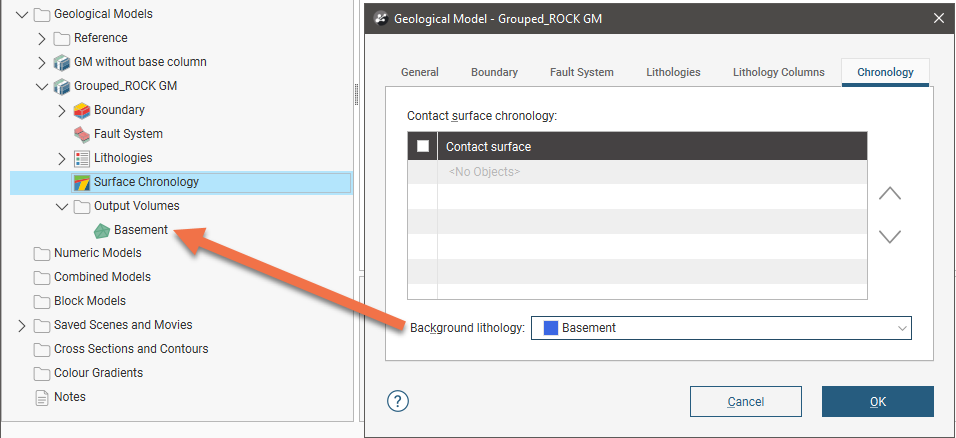
In the Chronology tab, you can select one of the other lithologies as the background lithology. Here Basement has been selected, which results in the model’s single output volume being labelled Basement instead of Unknown:
When you set the background lithology for a geological model and then enable the fault system, the background lithology will be copied to each fault block.
Surface Chronologies for Faulted Models
There is no top-level Surface Chronology for the geological model once the Fault System has been activated. Instead, each fault block has its own surface chronology:

Because each fault block is isolated from adjacent fault blocks, a fault block’s surface chronology can be modified without affecting other fault blocks in the geological model.
For more information on working with faulted models, see the Building Faulted Models topic.
If you have defined the surface chronology for one fault block, you can copy it to other empty fault blocks. To do this, right-click on the Surface Chronology for which you have defined surfaces and select Copy Chronology To.
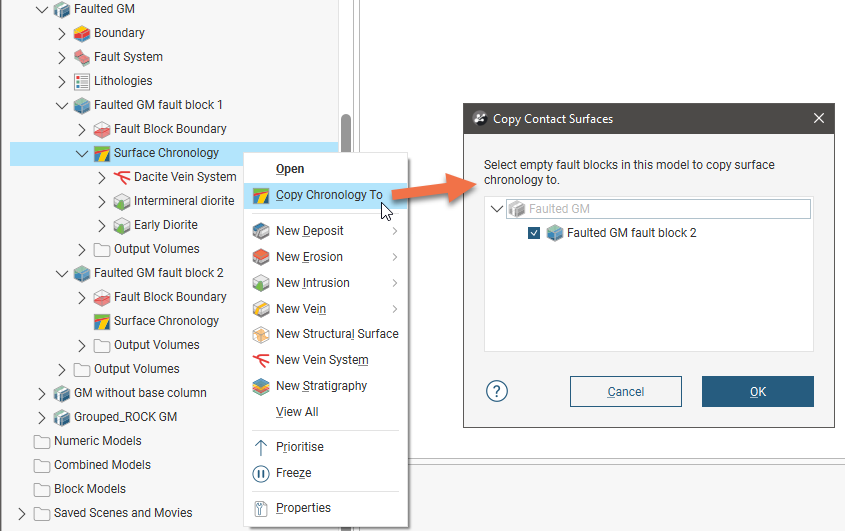
In the window that appears, select the fault blocks you want to copy contact surfaces to and click OK. The surfaces will be copied and you can modify them without affecting the surfaces in the other fault blocks.
The Four Core Surface Types and Their Interactions
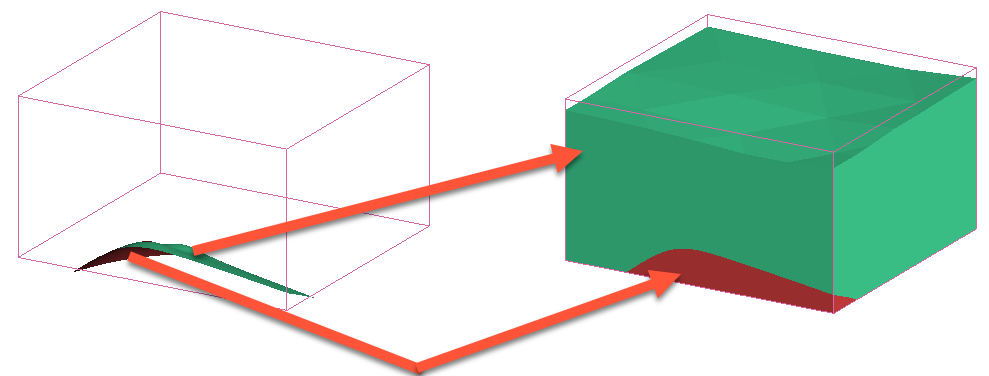
Once surfaces have been created, their type and order in the Surface Chronology determine how the initial “Unknown” volume is divided into known lithological units. The scene below shows the Surface Chronology for four deposit contact surfaces and two intrusion contact surfaces, bounded by the geological model extents (pink). The two intrusion contacts are labelled as Unknown on the outside (white) and the intrusion lithology on the inside. The Surface Chronology is open, showing the contact surfaces in chronological order, with the youngest at the top of the list.
For the model shown above, the first contact surface to cut the geological model volume is the oldest surface, D5 - D4 contacts. The volume is divided into D5 (red) below and D4 (green) above:
When the next contact surface (D4 - D3 contacts) is enabled in the model, the volume above the contact surface is labelled with the lithology assigned to the surface’s younger side (blue):
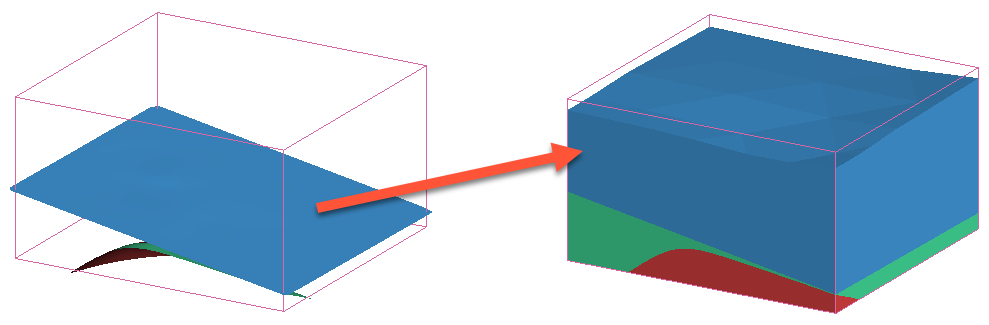
Therefore, any volume in a geological model is labelled with the lithology assigned to the youngest side of the surface that last cut the volume.
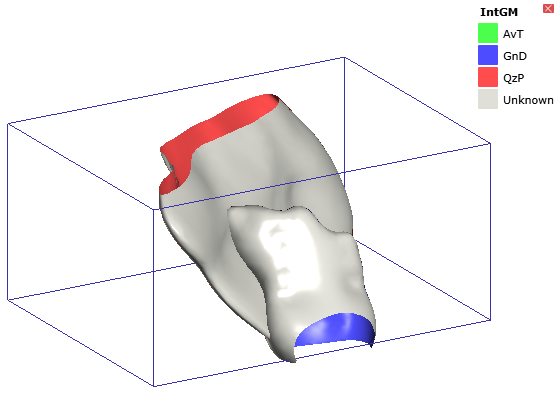
With a simple deposit geological model, as long as each side of each contact surface is assigned a lithology, all volumes will be labelled with known lithologies. Intrusive contact surfaces, however, are often of unknown lithology on the outside, as they contact multiple lithologies. When the two intrusive surfaces in the model above are enabled but all deposit surfaces are disabled, the unknown lithology is replaced with each intrusive lithology on the inner sides of each contact surface, but outside each intrusive contact surface the lithology is not known:

If the outside of the older contact surface (green) is assigned a lithology (red), the volume outside each intrusion is known and, therefore, the surrounding volume can be labelled:

If, however, the outside of the younger intrusion is known but the outside of the older intrusion is unknown, it is not possible to determine the lithology of the surrounding volume as the lithology on the outer side of the surface making the first cut is not known:

Deposit and Erosion Contact Surfaces
Deposits and erosions are both roughly flat surfaces. The difference between the two is that deposits appear conformably on top of underlying older volumes and do not occur in regions defined by older deposits, while erosions remove existing lithologies on the older side of the erosion. This difference is illustrated here, using a model made up of three deposits, A, B and C:
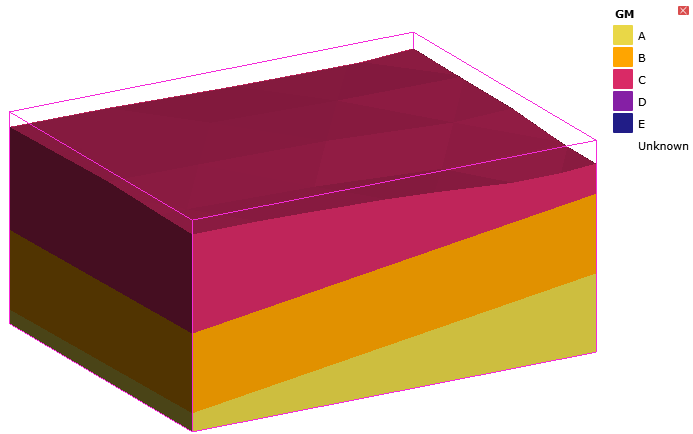
The contact surfaces that define the three output volumes are the B-C contacts surface (pink) toward the top of the model extents and the A-B contacts surface (gold) lower down:

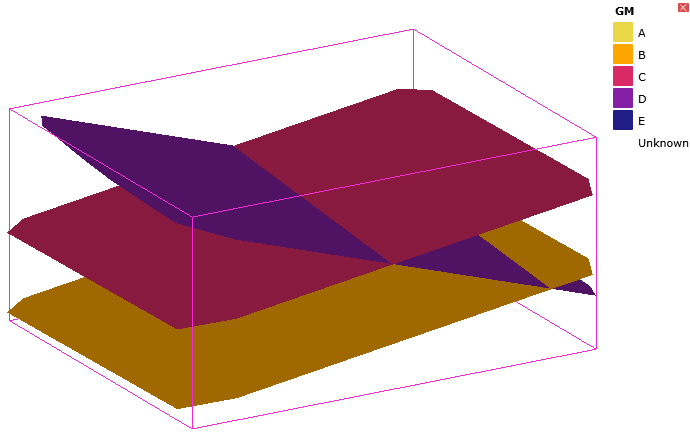
An erosion contact surface (C-D contacts) added to the model cuts across the A-B and B-C contacts. The younger (purple) side of the C-D contact surface faces up:
Once the model is recalculated, the erosion (D) has cut away the deposits on the older side of the erosion:
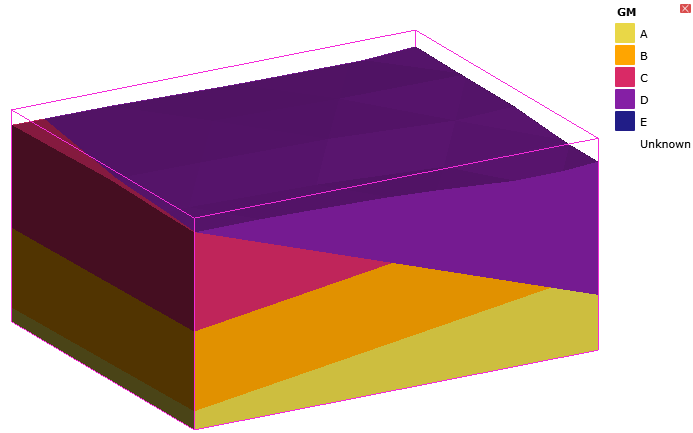
However, if the C-D contact surface is changed to be a deposit surface, D only occurs on the younger side of the C-D contact surface and does not cut away the A, B and C volumes:

Intrusion Contact Surfaces
An intrusion is a type of contact surface that removes existing lithologies and replaces them with the intrusive lithology. Intrusions are rounder in shape than deposits and erosions, with an interior lithology that represents the intrusion lithology on the inside of the shape.
Adding an intrusion (E) surface added to the example model above as the youngest surface cuts away the other lithologies on the inside of the surface:

Note that the intrusion contacts multiple units. This is typical of intrusion contact surfaces as an intrusion will usually displace multiple older lithologies. Although the outside of the intrusion is not labelled with a lithology, the lithology of each volume the intrusion comes into contact with can be known from the lithologies assigned to the deposit contact surfaces.
However, when all contact surfaces are intrusions, the lithology of the surrounding volume cannot be known, which results in intrusion volumes surrounded by an Unknown volume:
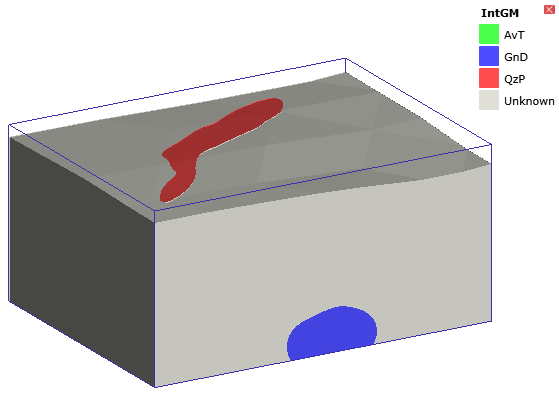
In this instance, the contact surfaces each have a known side and an unknown side:
Adding the drilling to the scene helps in understanding what lithology the outside of each intrusion should be:
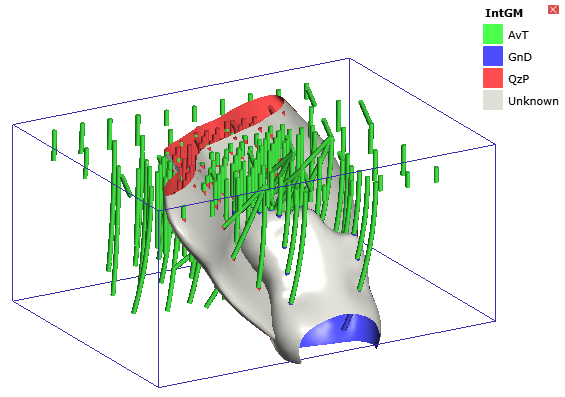
In this case, opening the Surface Chronology and assigning AvT as the background lithology results in a model for which all volumes are labelled with a known lithology:

Vein Contact Surfaces
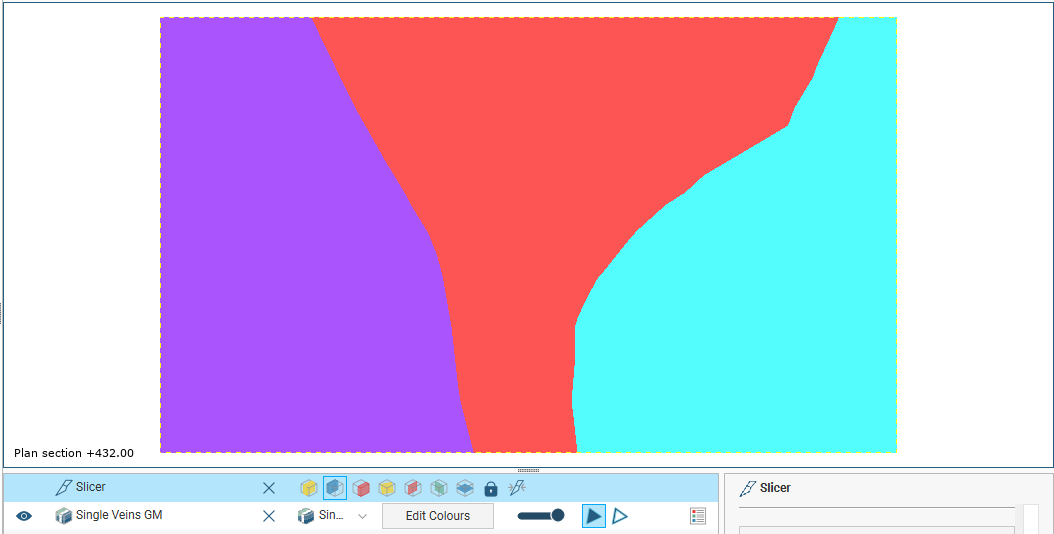
Veins remove existing lithologies and replace them with the vein lithology within the boundaries defined by hangingwall and footwall surfaces and points and a reference surface. Here, a slice has been made horizontally through a model made up of three deposits:
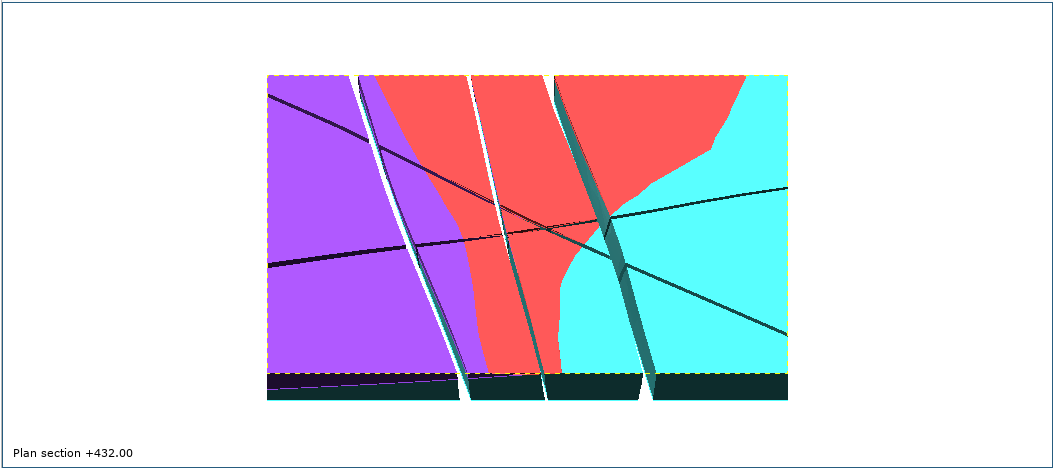
Adding five dykes modelled as veins and enabling them in the model results in the veins cutting away each deposit at the point of contact:

Here the sliced deposits are displayed but the veins are hidden in order to show how they cut away the deposits:
Got a question? Visit the Seequent forums or Seequent support
© 2023 Seequent, The Bentley Subsurface Company