
Veins
A vein is a type of contact surface that removes existing lithologies and replaces them with the vein lithology within the boundaries defined by hangingwall and footwall surfaces constructed from selected input data, a reference surface and a boundary. Creating veins from drilling data provides the most flexibility in refining the vein surface, but veins can also be created from points data, GIS vector data and polylines.
Modelling veins is an iterative process that may involve creating and refining a vein surface using different techniques before arriving at a surface that most accurately reflects sub-surfaces structures. Furthermore, the vein modelling tools available in Leapfrog Geo can be used for modelling other thin, planar geometries.
The way vein contact surfaces are organised in the project tree is intended to help you in working with the data available, so it is a good idea to have an understanding of this organisation so you can decide how to work with the different objects that contribute to the final vein surface. Veins are created and stored as part of a geological model’s Surface Chronology. Here, the hangingwall and footwall surfaces (with triangles shown) and points are displayed in the scene for a vein created from drilling data. The reference surface (grey) and the vein segments (red and blue cylinders) used to create the vein are also shown:
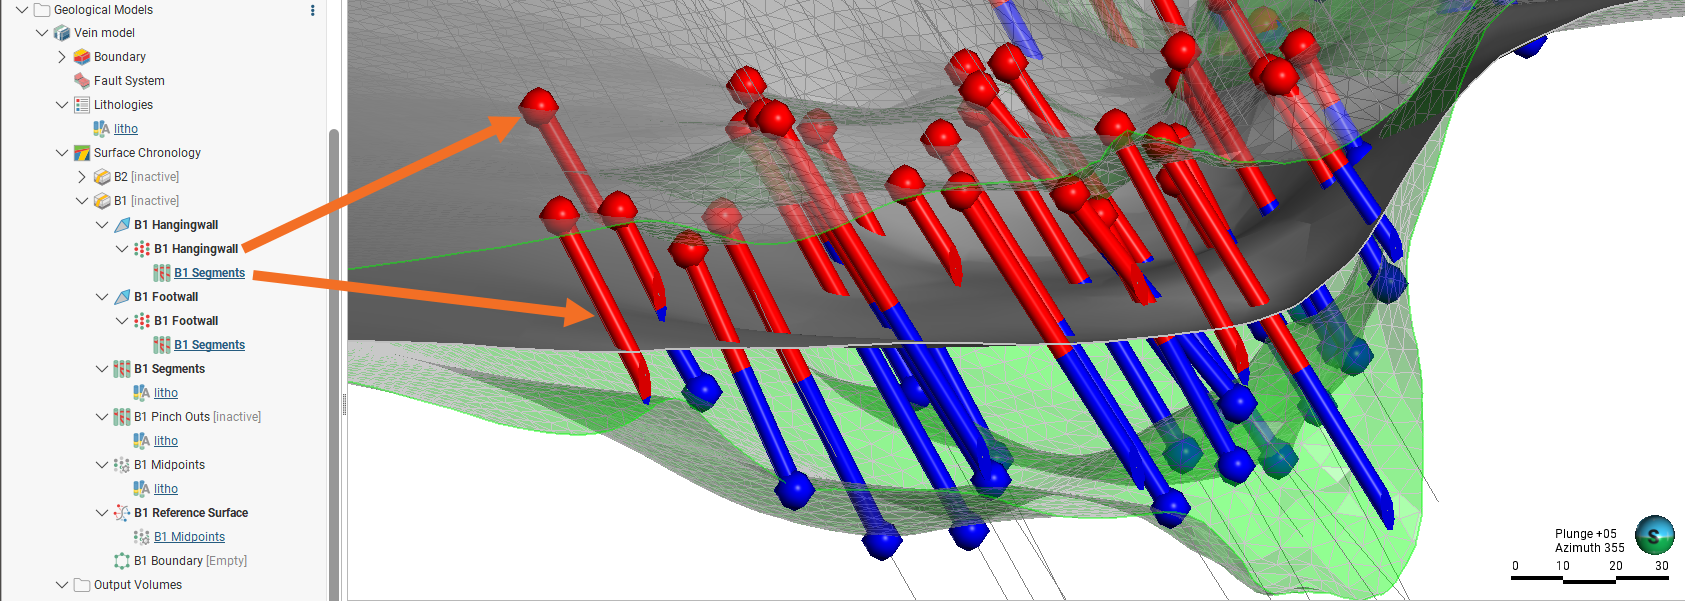
The vein ( ) is made up of:
- Hangingwall and footwall surfaces. When these surfaces are expanded in the project tree, we can see the hangingwall and footwall points (
 ) that are linked to the vein segments.
- Segments. Vein segments are extracted from the drilling data and categorised into hangingwall, footwall and excluded segments. In some circumstances, internal segments are also supported.
- The endpoints of the hangingwall and footwall segments are used to create the initial hangingwall and footwall surfaces.
- Excluded segments are those that are completely enclosed within the vein lithology and so do not have hangingwall or footwall contact points. They have no influence on the vein geometry.
- Internal segments force the hangingwall and footwall surfaces away from these segments. Internal segments arise from adding other contacts to the vein or from manually categorising segments.
- Pinch outs. Pinch outs are only included when the Pinch out option has been enabled.
- Midpoints. Midpoints are used to create a first-pass reference surface.
- Reference surface. The reference surface represents the trend or form of the vein. When a vein is created from drilling data, the initial reference surface is calculated as the best fit surface using the midpoints and the hangingwall and footwall surfaces. For veins created from data other than drilling data, the initial reference surface will be a planar reference surface.
- Boundary. The boundary is empty when a vein is first created.
Vein segments, pinch-outs and midpoints can be manually edited. In the project tree, objects with edits are indicated using the edit icon ( ):
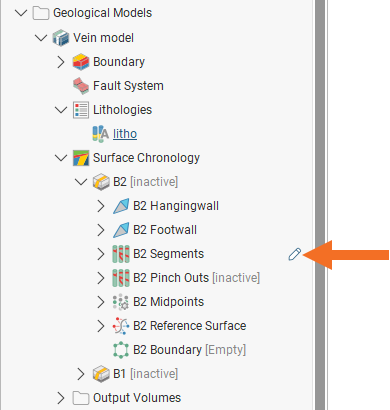
Manual edits can be exported for use in other veins and models in the current project or in other projects. See the Exporting and Importing Vein Edits topic.
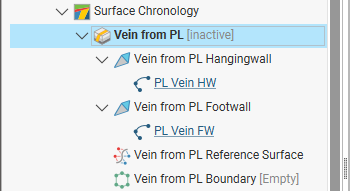
Veins created from data other than drilling data will not have vein segments, pinch out segments or midpoints. They will contain only the hangingwall and footwall surfaces, linked to the data used to create the vein, along with a reference surface and boundary. For example, this vein was created from polylines, and there are no vein segments, pinch out segments or midpoints to work with.
Vein contact surfaces can also be created as part of a vein system ( ), in which case, each vein () is linked to the vein system via a “terminated vein” (
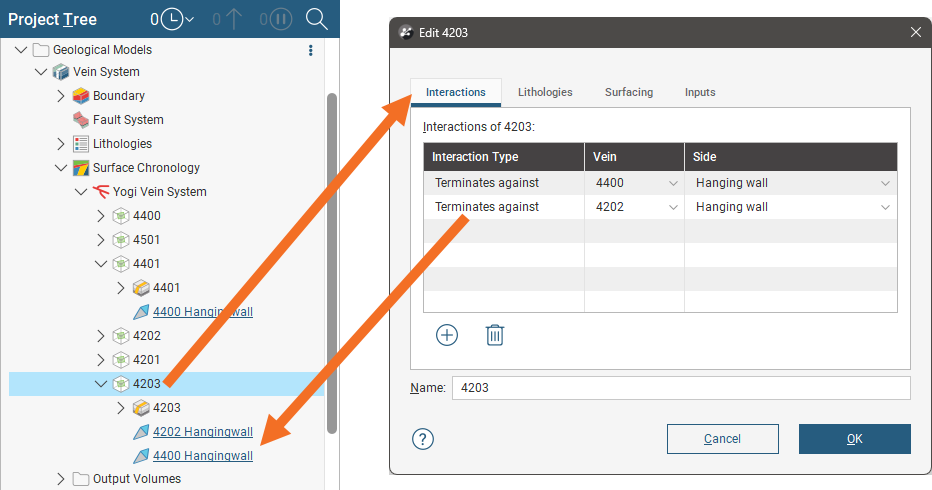
 ) that takes into account the vein’s relationship to other veins in the vein system. For example, in this vein system, a series of terminated veins make up the system. Expanding a terminated vein shows the vein surface () and any interactions with other veins in the vein system. Here vein 4401 interacts with vein 4400 on its hangingwall side, and so vein 4401’s hangingwall side is hyperlinked to vein 4400.
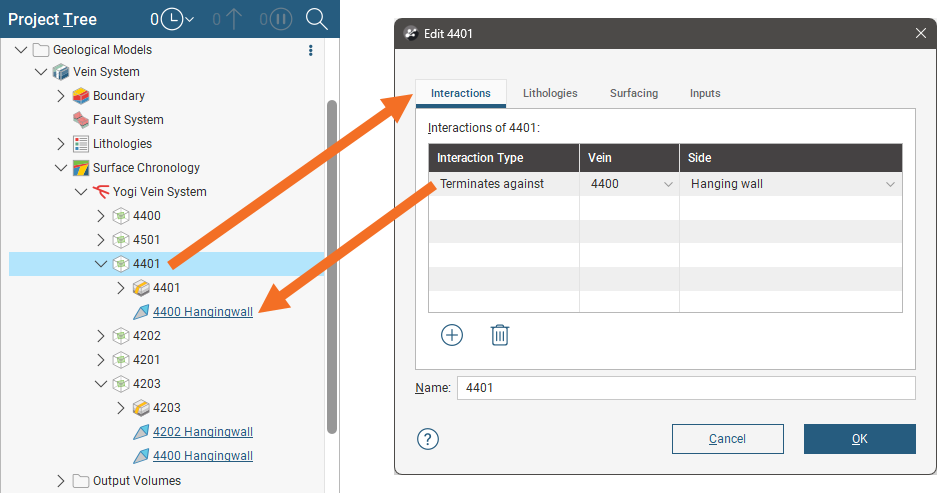
Vein 4203 interacts with two other veins, 4400 and 4202, and so contains hyperlinks to those veins:
Working with vein systems is described in the Vein Systems topic.
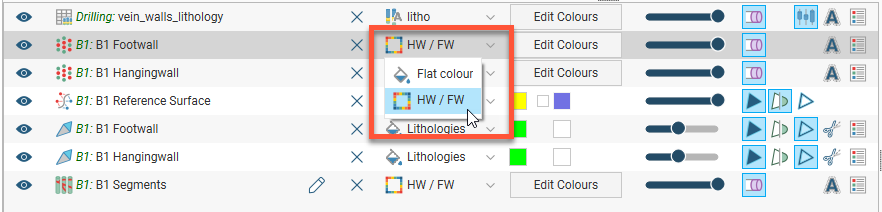
Displaying the different objects that make up the vein can help you in making decisions on how to edit the vein. There are some settings specific to veins, such as the option for displaying different vein components by their hangingwall/footwall assignments:
The rest of this topic describes how to create and work with veins. It is divided into:
Separate topics describe:
- Enabling and Editing Vein Pinch Outs
- Editing Vein Segments
- Editing Vein Midpoints
- Editing the Vein Reference Surface
- Editing the Vein Boundary
- Exporting and Importing Vein Edits
For a general introduction to how veins interact with other contact surfaces, see Vein Contact Surfaces in the Building Surfaces Using the Surface Chronology topic.
Creating Veins
Options for creating veins are:
- From the geological model’s base lithology data. See New Vein From Base Lithology below.
- From other lithology contacts available in the project, including those from other drilling datasets. See New Vein From Other Contacts below.
- From GIS vector data, point data and polylines. See Veins From Other Data below.
- Creating a vein system. This results in a single lithology that represents all the veins in a model. Veins and their interactions are defined within the vein system. See Vein Systems.
When veins have been created from drilling data, additional contacts can be added to the veins, which is described in the separate Adding Other Contacts to Veins topic.
New Vein From Base Lithology
To create a new vein from base lithology contacts, right-click on the Surface Chronology object and select New Vein > From Base Lithology. In the New Vein window, select the Vein lithology.
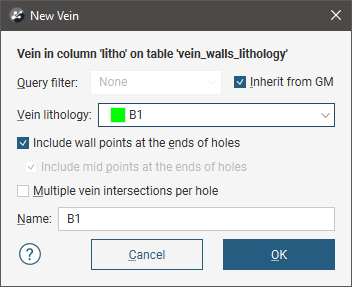
The options available are only those lithology codes in the base lithology column; codes manually added to Lithologies in the geological model are not available.
You can choose to use the query filtering already selected for the geological model by ticking the Inherit from GM box, or untick it and select from the available options in Query filter.
The last three settings in this window determine how intervals at the ends of drillholes are handled when generating vein segments and midpoints and whether the vein boundary intersects any given drillhole multiple times.
- The Include wall points at the ends of holes setting determines whether or not hangingwall and footwall contact points are generated for segments at the ends of drillholes. If this setting is disabled, a contact point will not be created when a drillhole ends in the vein lithology.
- The Include mid points at the ends of holes setting determines whether or not midpoints are generated for segments at the ends of drillholes. Such midpoints could be distant from the centre of the vein structure and would, therefore, result in localised distortion of the reference plane.
- The Multiple vein intersections per hole setting is useful situations where drillholes might pass in and out of the same vein unit multiple times.
Each of these settings is discussed in more detail in the separate Editing Vein Segments topic.
Click OK to create the vein, which will be added to the project tree as part of the Surface Chronology object.
New Vein From Other Contacts
Adding contacts for another drilling dataset to an existing vein is the subject of a separate topic, Adding Other Contacts to Veins.
When a vein is to be created using a lithology column other than the geological model’s base lithology column, right-click on the Surface Chronology object and select New Vein > From Other Contacts.
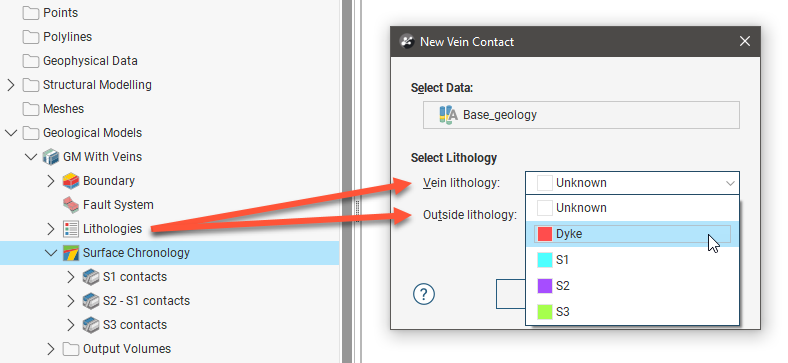
In the New Vein Contact window under Select Data, click the Select button and choose the column containing the needed lithology information.
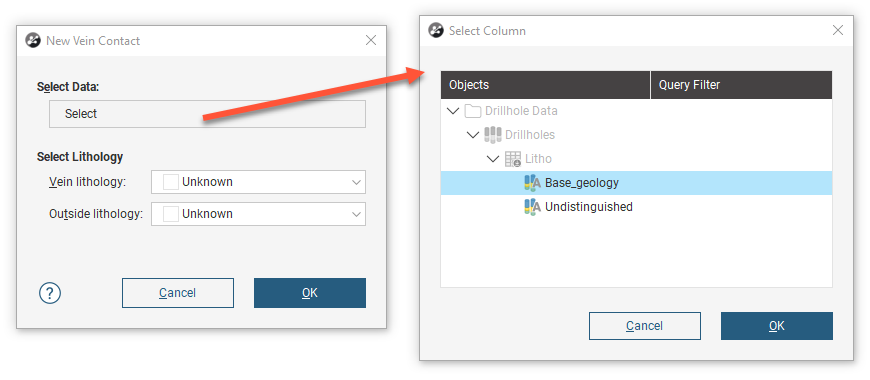
Once a data column has been selected, the rest of the New Vein Contact window can be completed. Note that both the Vein lithology and Outside lithology fields draw their options from the geological model’s Lithologies codes, not the codes from the column just selected. Selection of the lithology data to be used in construction of the vein happens in the next step. Here the Vein lithology field is asking which of the Lithologies in the geological model will be used to represent the data being introduced from the other contacts. If no code in Lithologies is appropriate, manually add a new code, as described in Geological Model Lithologies.
If the vein contacts only one lithology, set the Outside lithology. Otherwise, leave Outside lithology set to Unknown.
After you click OK in the New Vein Contact window, the New Vein window will appear. The Vein lithology option in this window is used to specify the lithology code from the selected column that will be used to construct and model the vein. In this illustrated example, a geological model has been constructed from the Undistinguished column, and a new vein is being defined using other contacts contained in the Base_geology column. Therefore, the options showing in this Vein lithology are the codes from the Base_geology column, not the Undistinguished column nor the geological model’s Lithologies.
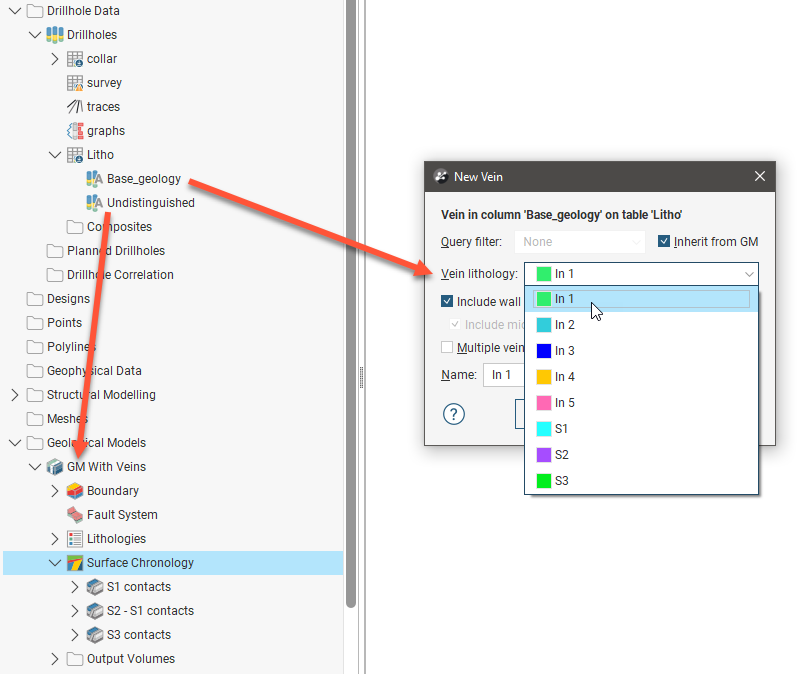
The other fields in the New Vein window are as described in New Vein From Base Lithology.
Veins From Other Data
If suitable lithology data is not available, veins can be created from other data in the project, either GIS vector data, points or polylines. The steps for creating veins from other data are similar, regardless of the data used to create the surface:
- Right-click on the Surface Chronology, select New Vein, then select one of:
- From Polylines
- From GIS Vector Data
- From Points
- Select the data objects for the Hangingwall and Footwall. These objects must already be in the project.
- Select the Vein lithology and the Outside lithology. The lithologies you can choose from are those defined for the geological model in the Lithologies object (see Geological Model Lithologies).
Here, a points table is being used to create a vein:
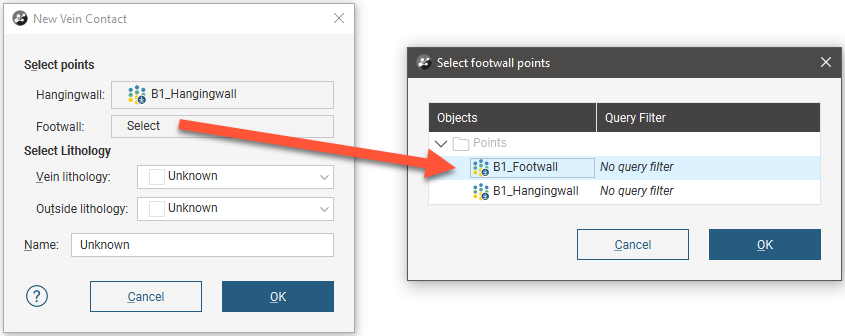
Select data objects for both the Hangingwall and Footwall, then select lithologies. The Vein lithology and Outside lithology fields draw their options from the geological model’s Lithologies codes.
- The Vein lithology field is asking which of the Lithologies in the geological model will be used to represent the data being introduced from the polylines, GIS data, or points. If no code in Lithologies is appropriate, manually add a new code, as described in Geological Model Lithologies.
- If the vein contacts only one lithology, set the Outside lithology. Otherwise, leave Outside lithology set to Unknown.
Click OK to create the new vein. The new contact surface will appear in the project tree under the Surface Chronology. Expand the vein in the project tree to see how it was made.
Copying Veins
As described in Copying Contact Surfaces in the Building Surfaces Using the Surface Chronology topic, you can copy veins and vein systems, which is useful in experimenting with the effects of different settings and in ensuring the consistency of settings across surfaces.
It is also possible to copy individual veins into and out of vein systems.
To copy a single vein into a vein system, right-click on a vein system and select Copy Vein from Chronology. Select from the available veins:
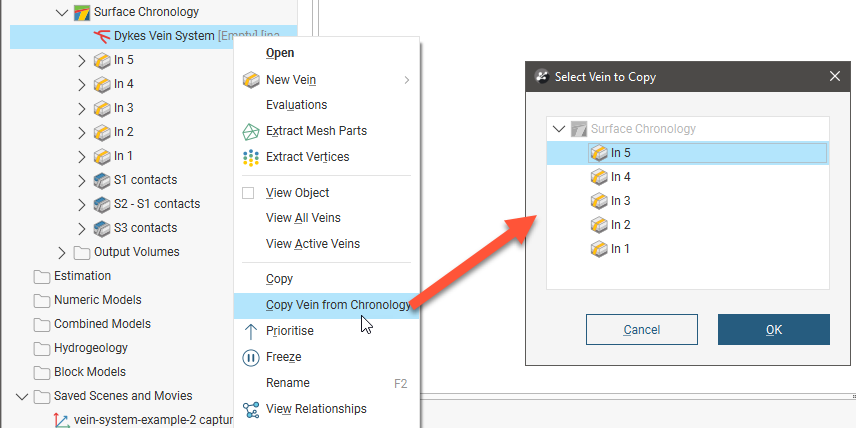
You can also drag a vein into a vein system. Here the vein In1 is being dragged into to the Dykes Vein System:
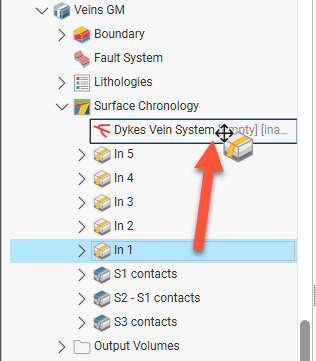
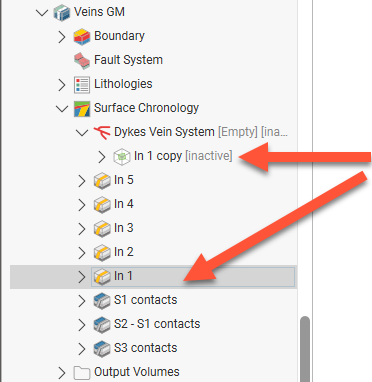
When you drop a vein into a vein system, a duplicate copy of the vein will be made and added to the vein system, while the original single vein remains:
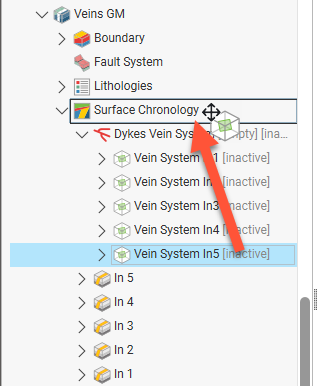
To move a vein out of a vein system, drag it onto the surface chronology:
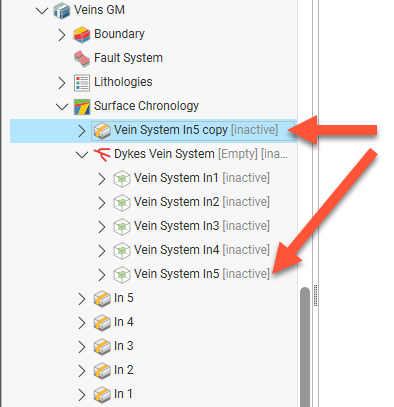
A copy will be made in the top level of the surface chronology, while the original vein remains in the vein system:
Vein Surfacing Settings
Double-click on a vein in the project tree to edit its lithologies and various surfacing settings.
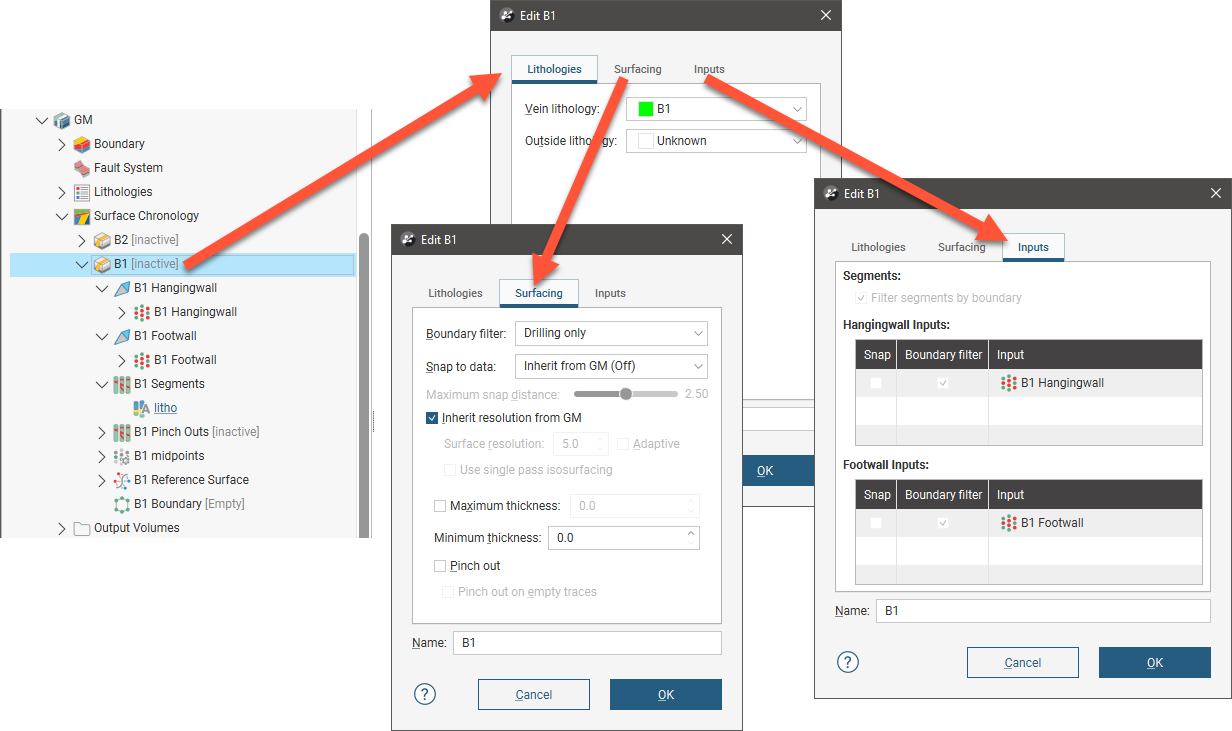
- The only settings you can change in the Lithologies tab are the Vein lithology and the Outside lithology.
- The options in the Surfacing tab are discussed below.
- The Inputs tab contains additional settings related to the boundary filtering and snap settings in the Surfacing tab.
Settings such as surface resolution, boundary filtering and snapping can be set for the model as a whole but these can also be set on a surface-by-surface basis.
See the Creating and Editing a Geological Model topic for information on these settings for the overall geological model.
Each contact surface in a model has a Surfacing tab in which you can customise its surface resolution, boundary filtering and snapping settings. There are additional settings related to boundary filtering and snapping to data in the Inputs tab.
Boundary Filtering
When data objects are added to a surface, there are two ways to handle the data that lies outside the surface’s boundary:
- Filter the data. The surface is only influenced by the data that falls inside the surface’s boundary.
- Leave the data unfiltered. The surface is influenced by the data both inside and outside the surface’s boundary.
The boundary of a vein can be the geological model boundary or a fault block boundary.
The Boundary filter setting determines how data used to define the surface is filtered:
- Inherit from GM. The setting for the geological model as a whole is used. This is the default setting.
- Off. Data is not filtered.
- All data. All data is filtered.
- Drilling only. Only drilling data and data objects derived from drilling data are filtered.
- Custom. Only the data objects specified in the Inputs tab are filtered.
The Filter segments by boundary setting in the Inputs tab is enabled by default when the Boundary filter setting in the Surfacing tab is All data or Drilling only. When Filter segments by boundary is enabled, the vein surface will only be influenced by the segments that falls inside the vein boundary.
Snapping to Data
Often, surfaces should honour drilling data and treat data objects such as polylines and GIS data as interpretations. See Honouring Surface Contacts in the Modifying Surfaces topic.
There is a Snap to data setting for a geological model as a whole that is set in the Geological Model > General tab (see Creating and Editing a Geological Model). Snap to data can also be set on a surface-by-surface basis by double-clicking on the surface in the project tree and then clicking on the Surfacing tab.
For individual contact surfaces, the options are:
- Inherit from GM. The setting for the geological model as a whole is used. This is the default setting.
- Off. Surfaces do not snap to the data used to create them.
- All data. Surfaces snap to all data within the Maximum snap distance, which includes drilling data and any data added to the surfaces.
- Drilling only. Surfaces snap to drilling data and data objects derived from drilling data within the Maximum snap distance but not to other data used to modify the surfaces.
- Custom. Surfaces snap to the data objects indicated in the Inputs tab for each surface.
Take care in enabling snapping and in selecting what data the surface will snap to, as the more data you include, e.g. by setting a large Maximum snap distance or selecting All data for Snap to data, the greater the possibility that errors in the data or assumptions inherent in interpretations (e.g. polylines) will cause distortions in the meshes. If you do enable snapping, it is best to snap only to drilling data. See Honouring Surface Contacts in the Modifying Surfaces topic for more information on these settings.
If you need a surface to honour drilling data but treat other data objects as interpretations, select Drilling only. To honour some data objects while treating others as interpretations, select Custom, then click on the Inputs tab to enable snapping for individual objects.
Surface Resolution
See Surface Resolution for a Geological Model for information about the surface resolution settings for veins.
Adaptive surfacing for veins was introduced in Leapfrog Geo 2021.1. When existing geological models with veins are upgraded in Leapfrog Geo 2021.1 or later, the Adaptive setting will be disabled. If the vein is set to inherit its resolution from the geological model and the geological model has been set to use adaptive resolution, the Inherit resolution from GM setting will be disabled so that the vein’s previous settings are preserved.
Vein Thickness
Veins have two thickness settings that force the vein to maintain a minimum or maximum thickness. If footwall and hangingwall points are in pairs, it is not usually necessary to set the Minimum thickness or Maximum thickness.
- If the vein intersects itself, set the Minimum thickness to a value that is less than the minimum distance between any two contact points.
- If the vein widens out toward the edges of the geological model set the Maximum thickness to a value that limits the effects of long segments.
If the Pinch out option is enabled, you will not be able to set the Minimum thickness.
If you set the Maximum thickness and Pinch out, the Pinch out setting is applied before the Maximum thickness.
Note that if Snap to data is enabled, snapping occurs after the vein thickness has been calculated. If it appears that the vein surface is not honouring the thickness setting, check what data the surface is snapping to.