Contact Surfaces
Defining the internal structure of a geological model involves generating contact surfaces that correspond to the boundaries between lithological units, refining the contact surfaces, arranging them in chronological order and then using the surfaces and the chronological order to divide the geological model into units. The Surface Chronology object represents the collection of contact surfaces and defines how they interact to produce the volumes of the geological model. Factors that influence the interaction of contact surfaces with the volumes of the geological model are:
- The order of the contact surfaces in the Surface Chronology. See Contact Surfaces in the Surface Chronology.
- The type of contact surface. See Contact Surfaces Types for more information.
- The orientation of the older and younger sides of the surface. See Younging Direction.
The remainder of this topic describes how the different types of contact surface interact and will help you in deciding how to model different units. For specific information on creating the different types of contact surfaces, see:
Contact Surfaces in the Surface Chronology
When a geological model is first created, it is simply a volume that is assigned the background lithology. This background lithology is initially “Unknown”, as although the model has lithologies defined, Leapfrog Geo cannot determine what lithology to use for the background lithology.
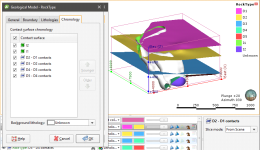
The contact surfaces and their order in the Surface Chronology determine how they divide this larger “Unknown” volume into known lithological units. The scene below shows the Surface Chronology for four deposit contact surfaces and two intrusion contact surfaces, bounded by the geological model extents (pink). The two intrusion contacts are labelled as Unknown on the outside and the intrusion lithology on the inside:
The Surface Chronology is open, showing the contact surfaces in chronological order, with the youngest at the top of the list. This is the order in which contact surfaces will be used to cut the “Unknown” volume of a newly created model. The different types of contact surfaces cut older volumes in different ways, which are described below in Contact Surfaces Types.
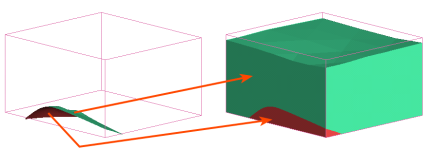
For the model shown above, the first contact surface to cut the geological model volume is the oldest surface, D5 - D4 contacts. The volume is divided into D5 (red) below and D4 (green) above:
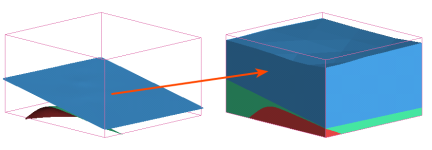
When the next contact surface (D4 - D3 contacts) is enabled in the model, the volume above the contact surface is labelled with the lithology assigned to the surface’s younger side (blue):
Therefore, any volume in a geological model is labelled with the lithology assigned to the youngest side of the surface that last cut the volume.
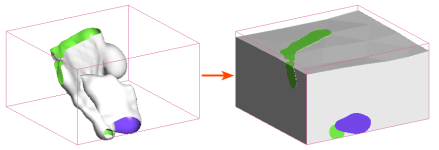
With a simple deposit geological model, as long as each side of each contact surface is assigned a lithology, all volumes will be labelled with known lithologies. Intrusive contact surfaces, however, are often of unknown lithology on the outside, as they contact multiple lithologies. When the two intrusive surfaces in the model above are enabled but all deposit surfaces are disabled, the unknown lithology is replaced with each intrusive lithology on the inner sides of each contact surface, but outside each intrusive contact surface the lithology is not known:
If the outside of the older contact surface (green) is assigned a lithology (red), the volume outside each intrusion is known and, therefore, the surrounding volume can be labelled:
If, however, the outside of the younger intrusion is known but the outside of the older intrusion is unknown, it is not possible to determine the lithology of the surrounding volume as the lithology on the outer side of the surface making the first cut is not known:
Contact Surfaces Types
The different types of contact surfaces result in different shapes and cut older volumes in different ways. The contact surface types are:
- Deposit. Deposit contact surfaces tend to be sheet-like, with the primary lithology on the young side and the contacting/avoided lithologies on the older side. Deposits do not cut older volumes. A volume defined by a deposit contact surface will, therefore, appear conformably on top of older volumes.
- Erosion. Erosion contact surfaces are similar to deposits, but cut away other contact surfaces on the older side of the erosion contact surface.
- Intrusion. Intrusion contact surfaces are rounder in shape, with an interior lithology that represents the intrusion lithology. The intrusion removes existing lithologies and replaces them with the intrusive lithology on the younger side of the contact surface. Often, the older side of an intrusion contact surface is labelled “Unknown” as typically intrusions displace multiple older lithologies.
- Vein. Vein contact surfaces remove existing lithologies and replace them with the vein lithology within the boundaries defined by hangingwall and footwall surfaces and points and a reference surface.
These terms are indicative of the resulting shape and cutting behaviour of a surface rather than of the geological formations that can be modelled. In fact, it might make sense to model something like basement granite as a deposit rather than as an intrusion when it forms the lowest layer in the geological model. If there are no older layers for an intrusion-type contact surface to remove and it is apparent from the drillhole data that the lithology simply fills the lowermost parts of the model, then it makes sense to model it as a deposit.
An important consideration in building contact surfaces is that they have an older side and a younger side. This is described in more detail in Younging Direction below, but it is sufficient to understand, at this point, that younging direction is one factor in determining how the different types of contact surfaces cut older surfaces.
Deposit and Erosion Contact Surfaces
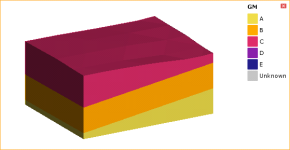
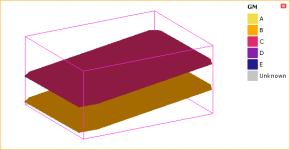
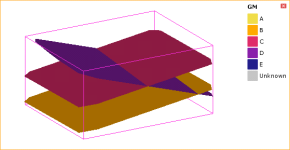
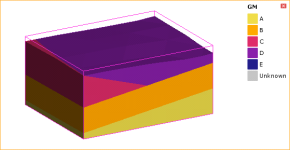
Deposits and erosions are both roughly flat surfaces. The difference between the two is that deposits appear conformably on top of underlying older volumes and do not occur in regions defined by older deposits, while erosions remove existing lithologies on the older side of the erosion. This difference is illustrated here, using a model made up of three deposits, A, B and C:
The contact surfaces that define the three output volumes are the B-C contacts surface (pink) toward the top of the model extents and the A-B contacts surface (gold) lower down:
An erosion contact surface (C-D contacts) added to the model cuts across the A-B and B-C contacts. The younger (purple) side of the C-D contact surface faces up:
Once the model is recalculated, the erosion (D) has cut away the deposits on the older side of the erosion:
However, if the C-D contact surface is changed to be a deposit surface, D only occurs on the younger side of the C-D contact surface and does not cut away the A, B and C volumes:
See Deposits and Erosions for information on techniques for creating deposits and erosions.
Intrusion Contact Surfaces
An intrusion is a type of contact surface that removes existing lithologies and replaces them with the intrusive lithology. Intrusions are rounder in shape than deposits and erosions, with an interior lithology that represents the intrusion lithology on the inside of the shape.
Adding an intrusion (E) surface added to the example model above as the youngest surface cuts away the other lithologies on the inside of the surface:
Note that the intrusion contacts multiple units. This is typical of intrusion contact surfaces as an intrusion will usually displace multiple older lithologies. Although the outside of the intrusion is not labelled with a lithology, the lithology of each volume the intrusion comes into contact with can be known from the lithologies assigned to the deposit contact surfaces.
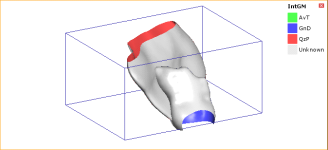
However, when all contact surfaces are intrusions, the lithology of the surrounding volume cannot be known, which results in intrusion volumes surrounded by an Unknown volume:
In this instance, the contact surfaces each have a known side and an unknown side:
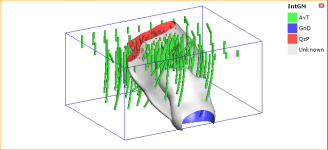
Adding the drillholes to the scene helps in understanding what lithology the outside of each intrusion should be:
In this case, opening the Surface Chronology and assigning AvT as the background lithology results in a model for which all volumes are labelled with a known lithology:
See Intrusions for information on techniques for creating intrusions.
Vein Contact Surfaces
Veins remove existing lithologies and replace them with the vein lithology within the boundaries defined by hangingwall and footwall surfaces and points and a reference surface. Here, a slice has been made horizontally through a model made up of three deposits:
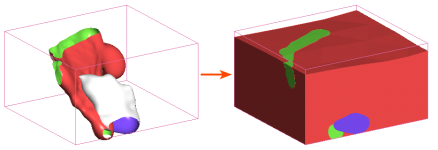
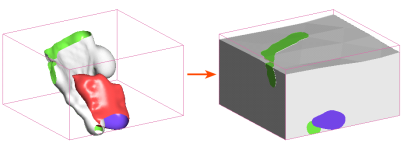
Adding five dykes modelled as veins and enabling them in the model results in the veins cutting away each deposit at the point of contact:
Here the sliced deposits are displayed but the veins are hidden in order to show how they cut away the deposits:
See Veins for information on techniques for creating veins.
Younging Direction
An important factor in determining how surfaces interact is the younging direction of each surface. Each contact surface has a younger side and an older side. For deposit and erosion contact surfaces, Leapfrog Geo will, by default, put the younger side up, since this is geologically reasonable in most situations. If, for example, you know that the geology is overturned, you can change the younging direction once the surface has been created.
For intrusion contact surfaces, the younger side of the surface is the inside, although this can be swapped if Leapfrog Geo has assigned it incorrectly, as may be the case with flatter intrusion surfaces.
When contact surfaces are displayed in the scene, you can choose whether to display the surfaces using the lithology or the younging direction. When the younging direction is displayed, the younger side is typically green and the older side is brown:
When a contact surface is displayed using the younging direction, Leapfrog Geo by default colours the younger side green and the older side brown.
Got a question? Visit the My Leapfrog forums at https://forum.leapfrog3d.com/c/open-forum or technical support at http://www.leapfrog3d.com/contact/support
