Geophysical Data
This topic describes the types of geophysical data Leapfrog Geothermal supports. It is divided into:
Geophysical Points Data
Leapfrog Geothermal supports the import of 3D geophysical points, ASEG_DFN files and 2D points.
3D Geophysical Points
3D geophysical points should be imported into the Geophysical Data folder rather than into the Points folder.
Leapfrog Geothermal imports 3D geophysical points in CSV format.
To import geophysical 3D points, right-click on the Geophysical Data folder and select Import Geophysical Points. Leapfrog Geothermal will ask you to specify the file location. Click Open to import the file. Leapfrog Geothermal will display the data and you can select which columns to import.
Leapfrog Geothermal expects East (X), North (Y) and Elev (Z) columns.
Click Finish to import the file, which will appear in the Geophysical Data folder.
Geophysical point data is not checked for duplicates.
You can visualise time-dependent 3D point data in the scene, which is described in Visualising Geophysical Point Data below.
ASEG_DFN Files
Leapfrog Geothermal imports ASEG_DFN points in *.dfn format. To import an ASEG_DFN file, right-click on the Geophysical Data folder and select Import ASEG_DFN. Leapfrog Geothermal will ask you to specify the file location. Click Open to import the file. In the window that appears, enter a name for the file, then click OK. Next set the X, Y and Z coordinates and click OK. If you select no column for the Z coordinates, all Z values will be set to zero.
The file will appear in the Geophysical Data folder.
2D Points
Leapfrog Geothermal imports the following formats:
- CSV files (*.csv)
- ASCII text files (*.asc)
- Plain Text Files (*.txt)
- Data Files (*.dat)
To import geophysical 2D points, right-click on the Geophysical Data folder and select Import 2D Points. Leapfrog Geothermal will ask you to specify the file location. Click Open to import the file. Leapfrog Geothermal will display the data and you can select which columns to import.
Leapfrog Geothermal expects East (X) and North (Y) columns.
Click Finish to import the file, which will appear in the Geophysical Data folder.
As for 2D grid data, the elevation of 2D geophysical points data can be set to a constant depth or draped on an existing mesh, as described in Setting Elevation for Points.
2D geophysical points data can be reloaded. See Reloading Points Data.
Visualising Geophysical Point Data
Geophysical 3D point data can be filtered in the scene by a time another numeric column, e.g. a time or date column. This enables micro-seismic data to be visualised over time. To do this, click on the points table in the shape list, then select a time or date column as the Value filter in the properties panel:
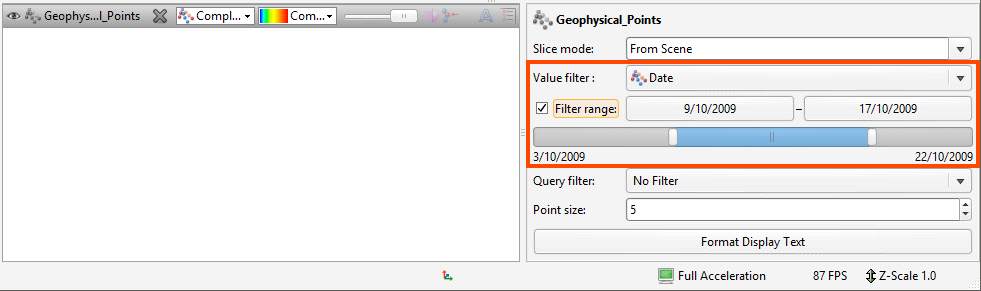
Next tick Filter range and either click the date buttons to set the upper and lower limits or use buttons on either end of the slider.
Options for the slider are:
- Drag the slider to see how the data changes over time.
- Double-click on the slider to see the full range of data. The slider will turn purple.
- Right double-click on the slider to return to the restricted range. The slider will be blue.
Geophysical Grids
Leapfrog Geothermal imports 2D grids, Gocad models, UBC grids and magnetotelluric resistivity (OUT) files.
2D Grids
Leapfrog Geothermal imports 2D grids in the following formats to both the Geophysical Data folder and the GIS Data, Maps and Photos folder:
- Arc/Info ASCII Grid (*.asc, *.txt)
- Arco/Info Binary Grid (*.adf)
- Digital Elevation Model (*.dem)
- Intergraph ERDAS ER Mapper 2D Grid (*.ers)
- ESRI .hdr Labelled Image (*.img, *.bil)
- SRTM .hgt (*.hgt)
- Surfer ASCII or Binary Grid (*.grd)
If you have geophysical grids in one of these formats, import them into the Geophysical Data folder;
See 2D Grids for more information on importing 2D grids.
Gocad Models
To import a Gocad model, right-click on the Geophysical Data folder and select Import Gocad Model. Leapfrog Geothermal will ask you to specify the file location. Click Open to import the file.
In the window that appears, set the Subsample Rate and enter a Name for the model. Click OK to import the model, which will appear under the Geophysical Data folder.
You can then evaluate geological models, interpolants and distance functions in the project on the model. In the case of geological models, you can also combine two or more models to evaluate on the model. To evaluate a model, right-click on the model object in the project tree and select Evaluations. See Evaluations for more information.
A Gocad model can be exported as points to a CSV file. This is described in Exporting Geophysical Grids to CSV below.
UBC Grids
Leapfrog Geothermal imports UBC grids in *.msh format, together with numeric values in properties files in *.gra, *.sus, *.mag and *.den formats. UBC grids can be evaluated against geological and numeric models, which can then be exported with the grid.
Importing a UBC Grid
To import a UBC grid, right-click on the Geophysical Data folder and select Import UBC Model. In the window that appears, click Browse to locate the file to be imported. Click Add to add any properties file, although these are not required.
For any properties file, click the Inactive Value field to mark cells as inactive. Doing so does not change the data but ensures that cells with the inactive value can be hidden when the grid is displayed in the scene. If you do not set this value when importing the grid, you can set it later by double-clicking on the grid in the project tree.
Click Import. The grid will appear in the Geophysical Data folder.
Evaluating UBC Grids
UBC grids can be evaluated against geological and numeric models as described in Evaluations. However, UBC grids cannot be evaluated against fault blocks and mutli-domained RBF interpolants, although they can be evaluated against the parent geological model and the parent numeric model.
Mapping Category Evaluations
When a UBC grid is exported with a category evaluation, category data is mapped to an editable numeric value. You can edit this by double-clicking on the grid in the project tree, then clicking on the Export Mappings tab:
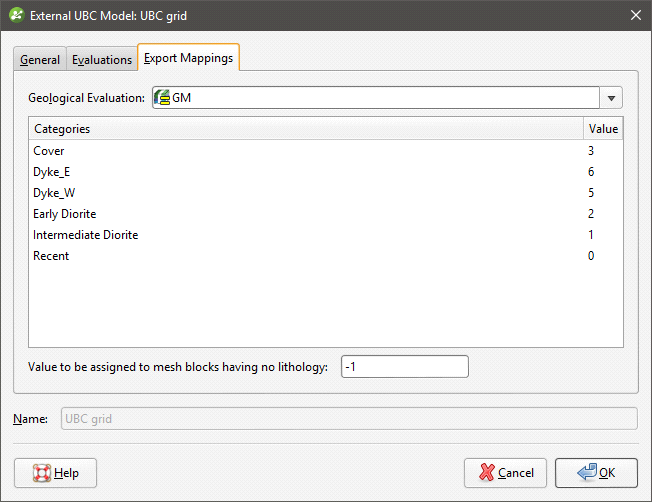
Change the numeric value assigned to each lithology, if required. You can also change the value assigned to blocks that have no lithology.
The Export Mappings tab does not appear for UBC grids that have no geological model evaluations.
Exporting a UBC Grid
To export a UBC grid, right-click on it in the project tree and select Export. Select the evaluations to export with the grid, then select a folder. Click OK to export the grid.
A UBC grid can also be exported as points to a CSV file. This is described in Exporting Geophysical Grids to CSV below.
Magnetotelluric Resistivity Files
Leapfrog Geothermal imports magnetotelluric resistivity (OUT) files in *.out, *.out.gz and *.mod formats. To import an OUT file, right-click on the Geophysical Data folder and select Import Magnetotelluric Resistivity Model. Leapfrog Geothermal will ask you to specify the file location. Click Open to import the file. In the window that appears, set the options required, then click OK to import the model. The model will appear under the Geophysical Data folder.
You can then evaluate any geological model, interpolant or distance function in the project on the model. In the case of geological models, you can also combine two or more models to evaluate on the model. To evaluate a geological model, interpolant or distance function, right-click on the model object in the project tree and select Evaluations. See Evaluations for more information.
A magnetotelluric resistivity grid can be exported as points to a CSV file. This is described in Exporting Geophysical Grids to CSV below.
Exporting Geophysical Grids to CSV
Geophysical grids in Gocad, UBC and magnetotelluric resistivity format can be exported as points to a CSV file. To do this, right-click on the grid and select Export as Points. You will then be prompted to select a file name and location. Once you have clicked Save, select the CSV export options for null values and numeric precision, then click OK.
The CSV file will contain:
- X, Y and Z columns, which represent the centre of each grid block
- I, J and K columns, which is the grid block index. I is in the range (1,NI), J is in the range (1,NJ) and K is in the range (1,NK), where NI,NJ,NK are the grid dimensions.
- One or more data columns
Got a question? Visit the My Leapfrog forums at https://forum.leapfrog3d.com/c/open-forum or technical support at http://www.leapfrog3d.com/contact/support