Create, Add, or Remove Map(s):
|
-
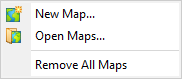
Select (highlight) the Maps icon in the Project Explorer, right click and select the desired option from the popup menu.
|
-
The New Map option displays the Data Range to Map dialog. Fill out the fields and create a new map.
-
The Open Maps option displays the Add New Map(s)
dialog. Select the map(s) to be added and click the Open button. The map(s) will be added to your current project.
-
The Remove All Maps option removes all maps from your current "Project" but
does not delete
the map files from the project directory.
|
Remove, Open File Location, Rename, Delete, or Pack and Send a Map:
|
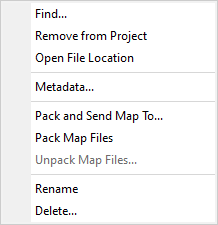
-
Select (highlight) the map name, right click and then select the desired option from the popup
menu.
|
-
The Find option is available when the source file of the selected map document is missing (the map appears in grey along with a warning icon  ). Use this option to open the browse dialog and locate the missing file. See Missing Data Files for more details on the Find functionality. ). Use this option to open the browse dialog and locate the missing file. See Missing Data Files for more details on the Find functionality.
-
The Remove from Project option will
remove the map from the "Project" but will not delete the map from your directory.
-
The Open File Location option will open the Windows File Explorer to the location of the map file selected.
-
The Metadata option will display the Metadata Viewer dialog. Click the Edit button on the Metadata Viewer to display the Metadata Editor. Click the OK button to accept your changes and close the dialogs.
-
The Pack Map Files option will pack the map and all of the associated files (e.g., grids, images, symbols, 3D Views, projection information) that are displayed on the map in a single Geosoft *.map file.
-
The Pack and Send Map To option will pack the map and all of the associated files that are displayed on the map into a single file and attach it to an email in one step.
-
The Unpack Map Files option will unpack all the files that are displayed on the map into your selected folder.
-
The Rename option renames the map in the project as well as on the disk. Any auxiliary files (e.g., .xml) will be renamed at the same time.
-
The Delete option deletes the map from the project as well as from the disk.
|