
Managing Projects in the Central Portal
This guide describes the tools Central Admins have available for managing projects in the Central Portal. It is divided into:
- Displaying the Projects List
- Active and Inactive Projects
- Deleting a Project
- Viewing Project Details
- Managing Project Users
- Managing Project Revisions
- Unlocking Locked Branches
- Viewing Project Events
- Removing Incomplete Events
- Removing Unused Branches
Projects, project branches and revisions are added to Central using Leapfrog. See New Central Projects in the Leapfrog Geo help for more information.
Displaying the Projects List
When you sign in to the Central Portal, the Projects list is displayed. If you are a Central Admin, all projects on the server are listed.
The projects on the server can be displayed in three ways: a list view, a grid view and a map view.
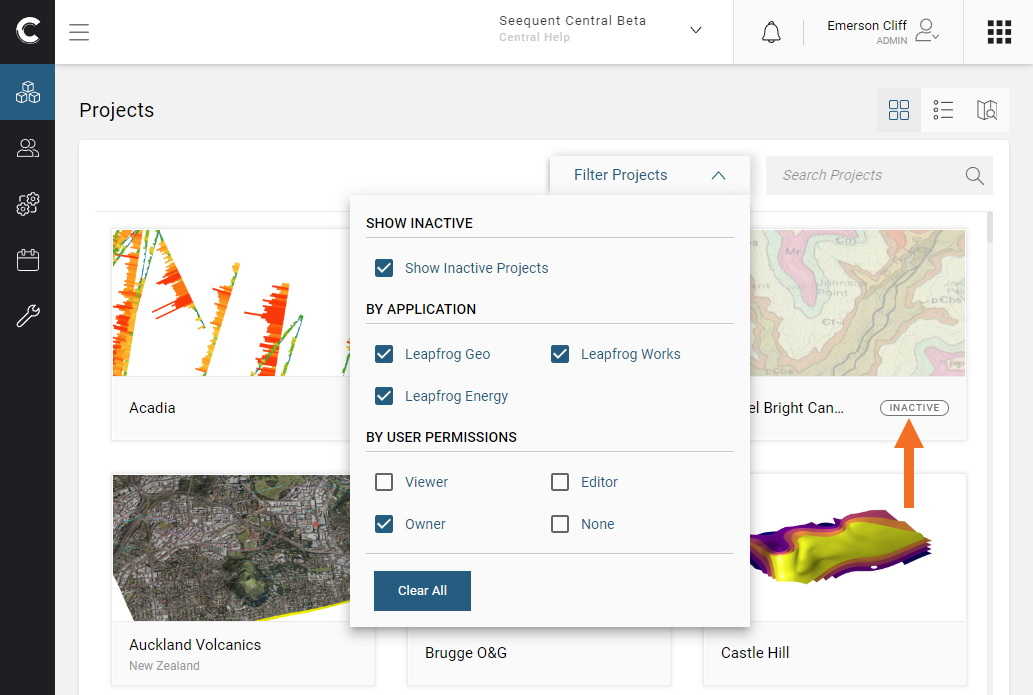
In each view, you can search for projects by simply typing a project’s name in the Search Projects box to start narrowing down the list of possibilities. You can also filter your projects list by whether projects are active or inactive, by application and by permissions:

Active and Inactive Projects
User access to projects is controlled in two ways. The first way is by giving users permission to access a project. The second way is by making projects active or inactive. You can manage what projects are currently active from the Projects list. Do this by clicking on Filter Projects, then enabling the Show Inactive Projects option. Inactive projects will be indicated using the INACTIVE label. In this example, the Angel Bright Canyon project is inactive:
To change a project’s status, click on the project in the Projects list. In the Overview tab, click the Status switch next to the Active or Inactive label:

Deleting a Project
To delete a project it, click on it in the Projects list. In its Overview tab, scroll down to the Delete Project button that is below the Details panel:

When you click Delete Project, you will be asked to confirm your choice by entering the project’s name:
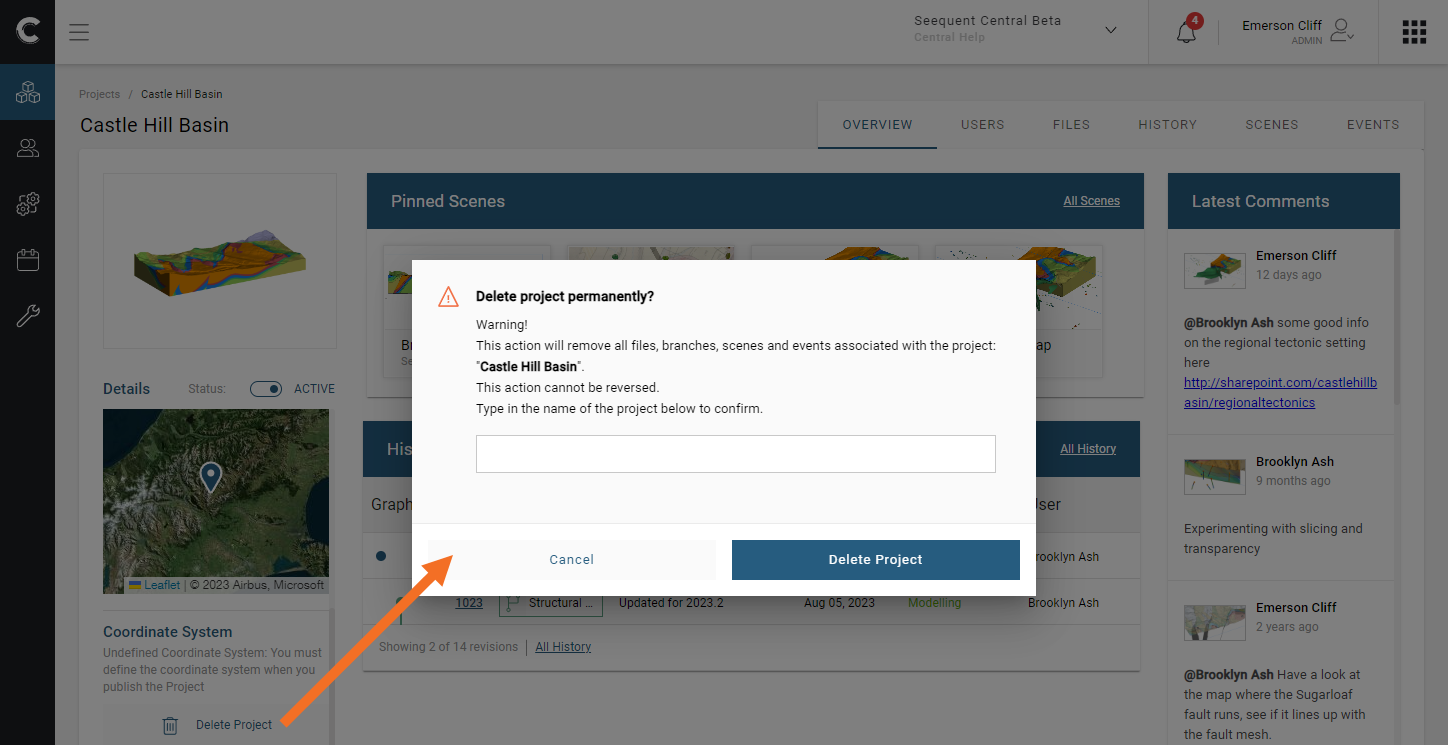
This ensures you do not accidentally delete the wrong project, as deleting a project cannot be reversed.
You can also delete projects from the Projects list. To do this, display the projects as a list. Next, click the delete button for the project you wish to delete:

You will be asked to confirm your choice by entering the project name.
Viewing Project Details
To view a project’s details, click on a project in the Projects list. An overview of the project is shown, along with a series of tabs that provide you with more control over the project:

To change the project’s name, click on it and start typing.
You can change the name of the Location as well as the specific Latitude and Longitude used to reference the location in the same way.
The Events list shows all events relating to the selected project. Click the All Events link, which will open the Events tab. See Viewing Project Events for more information.
Managing Project Users
There are four levels of project permissions in Central: Owner, Editor, Viewer+Export and Viewer.
An Owner can:
- Assign other users as the owner. A project can have more than one owner.
- Configure and add an integration to a project they own.
A user who uploads a new project to Central is automatically assigned as the project owner.
Editor access allows a user to work in a project in Leapfrog.
Viewer+Export and Viewer access allow a user to view scenes in the Central Portal, but they cannot edit scenes or add new ones.
To manage a project’s users, select a project, then click on its Users tab. All users who have permissions for the selected project are listed.

Assigning Users to a Project
There are two ways to give users project permissions:
- The first is by viewing a project’s details and assigning users via the project’s Users tab. This is useful when you want to assign multiple users to a single project. This is the process described below.
- The second is by viewing a user’s details and assigning them one or more projects. This is useful when you want to give a single user permission to access multiple projects.
To assign another user to a project, select a project, then click on its Users tab. Start typing the user’s name in the Enter Email Address box. The list of users defined in the system will be filtered to show those that match:
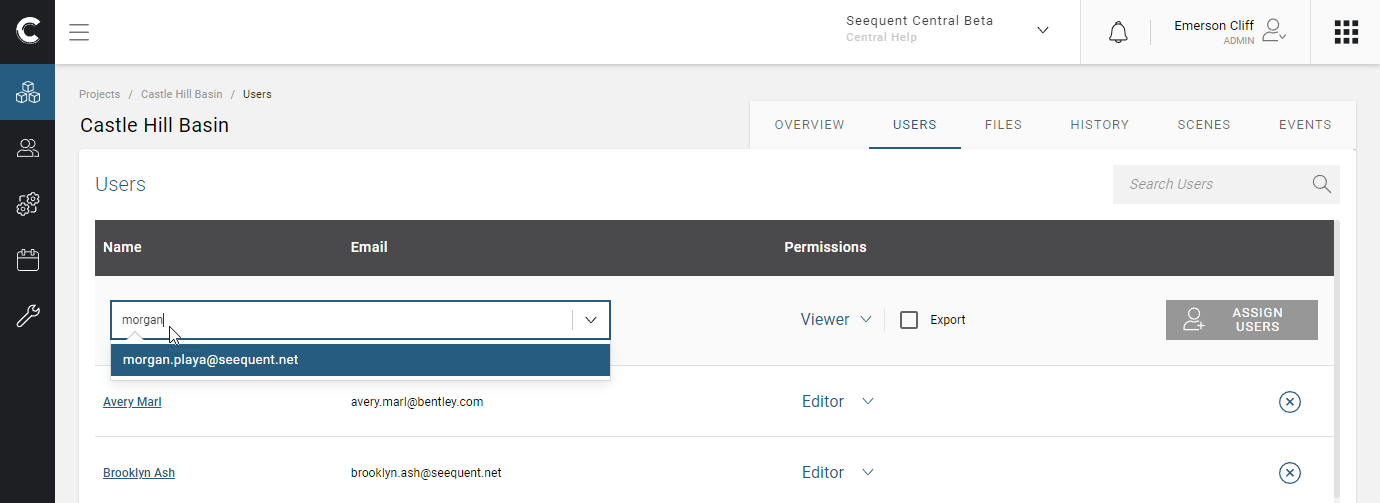
Select a user, then select their permissions from the dropdown list. Give the user Viewer+Export access by ticking the Export box next to Viewer.
Click the Assign Users button to add them to the project.
You can also change the user’s project permissions in this list. Simply select the option required from the dropdown list. Changes made to permissions are automatically saved as you make them.
Removing Users From a Project
There are two ways to revoke a user’s project permissions:
- The first is by viewing a project’s details and removing users via the project’s Users tab. This is useful when you want to remove multiple users from a project. This is the process described below.
- The second is by viewing a user’s details and removing projects from their Projects and Permissions list. This is useful when you want to change a single user’s project permissions.
To revoke a user’s project permissions, select a project, then click on its Users tab. Click on the delete button for the user you wish to remove.
Managing Project Revisions
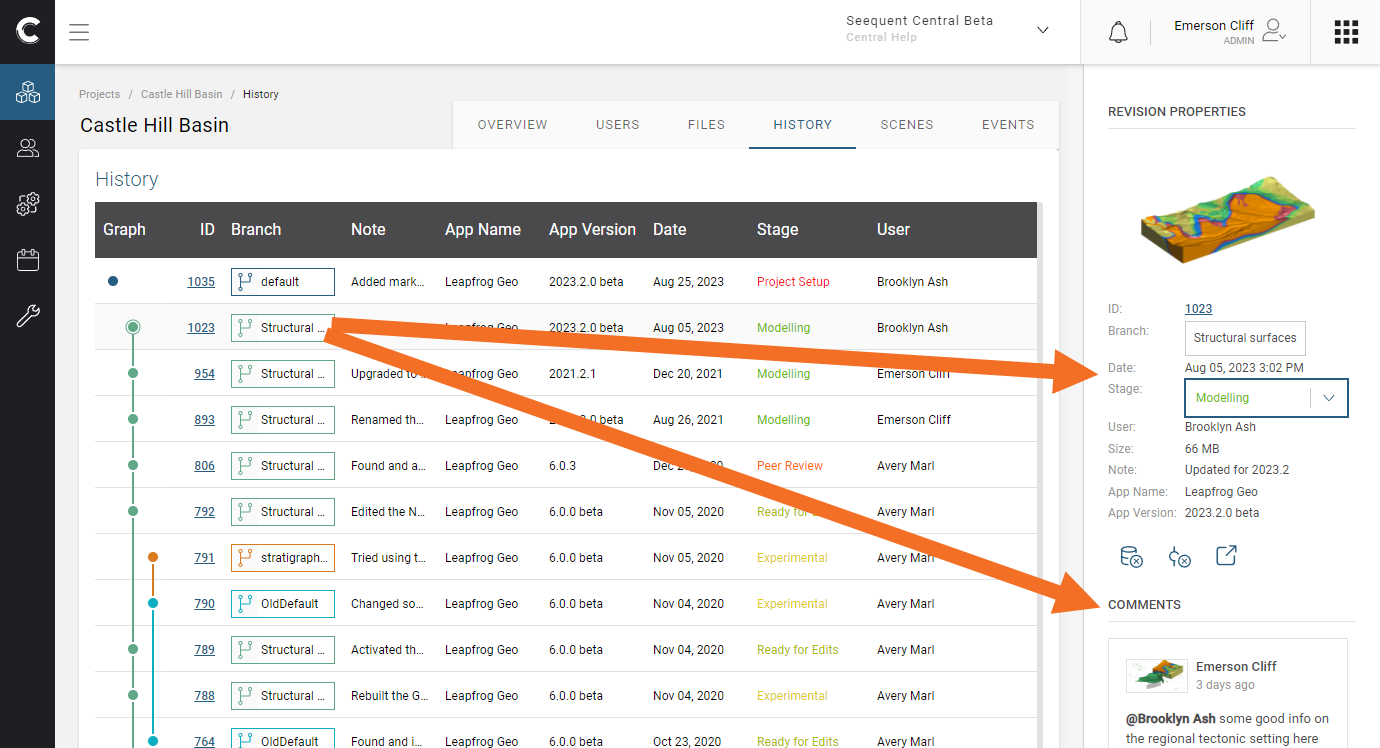
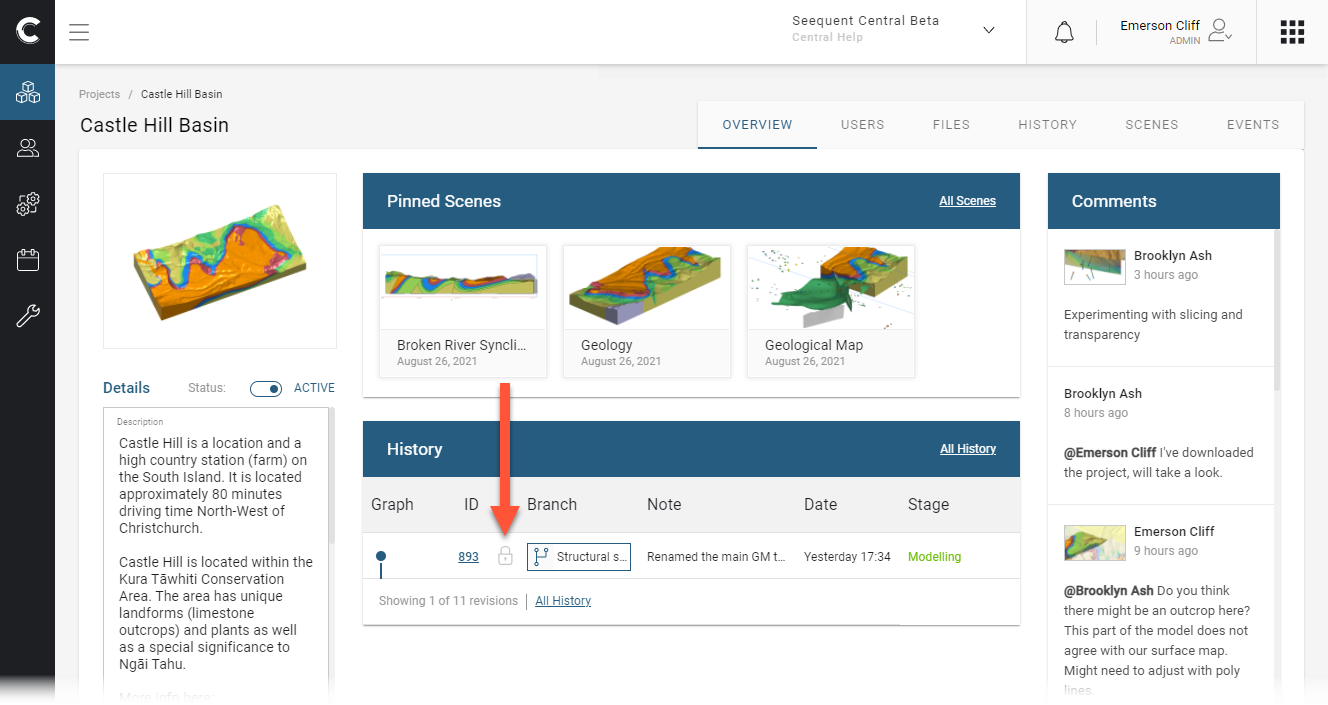
To manage a project’s revisions, select that project from the Projects list, then click on its History tab. The History list shows all revisions in a project, organised by branch.
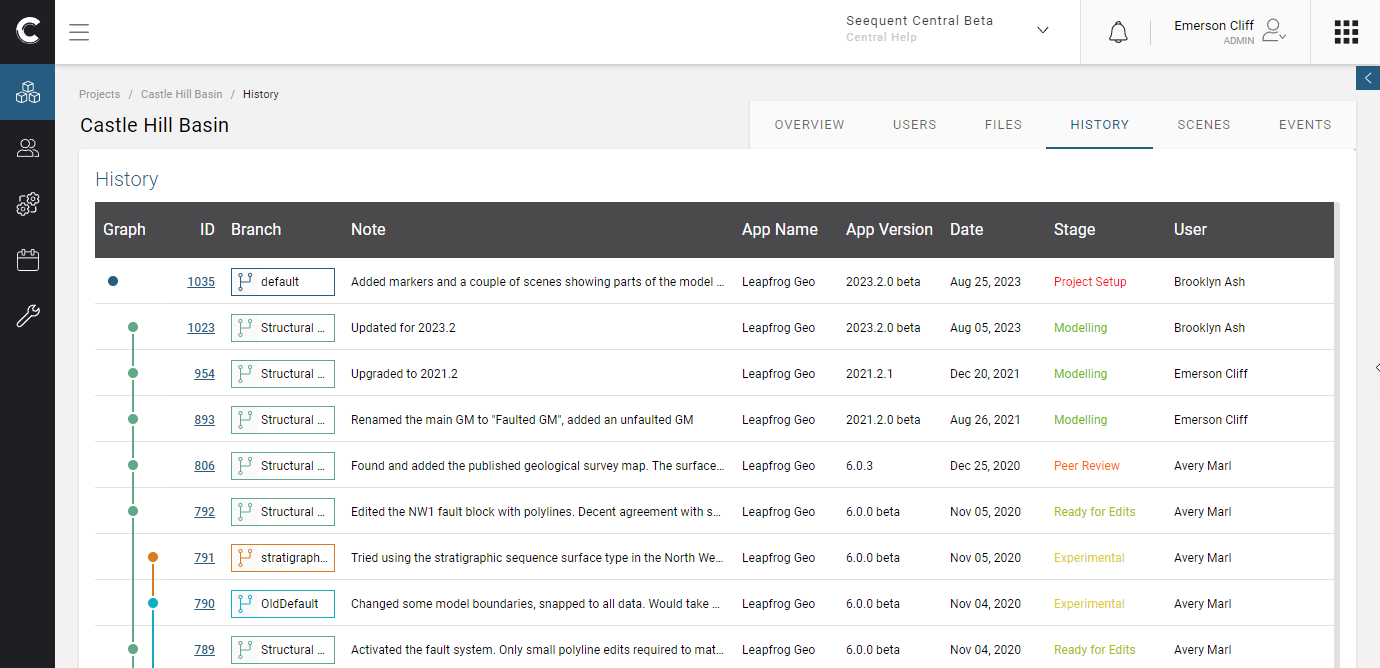
Click on a revision to view more information about it, including any comments made on that revision:
The buttons at the bottom of the Revision Properties panel are for deleting a revision, deleting Leapfrog data and viewing a revision. You can also view these options by holding your mouse cursor over a revision and then clicking on the overflow button ( ) that appears.

What options are available depends on whether or not the revision is the most recent on its branch and whether or not a Leapfrog project was published with the revision.
- The Delete Revision option is only available for the most recent revision on a branch. This option deletes both the revision data and its Leapfrog project, if one was published with the revision.
- The Delete Leapfrog data option deletes only the Leapfrog project, if one was published with the revision.
- The View revision option opens the revision in 3D. See Visualising Data in the Central Portal for more information.
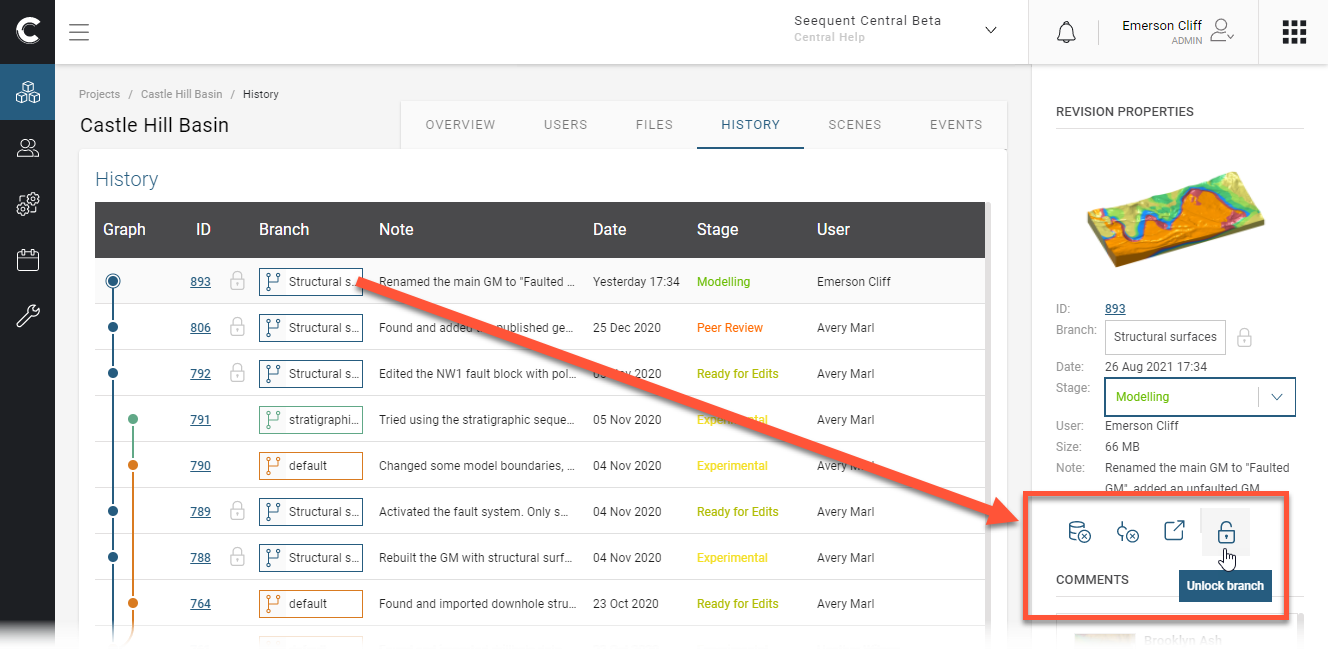
Unlocking Locked Branches
When a Leapfrog user locks a branch, it is automatically set to expire within a short period of time. If you need to unlock a locked branch before the lock expires, select that project from the Projects list. In the History tab, you can see branches that are locked:
You cannot unlock a branch from the Overview tab. To unlock the branch, click on the History tab, then select the revision that is locked. More information will be displayed, including the option to unlock the branch:
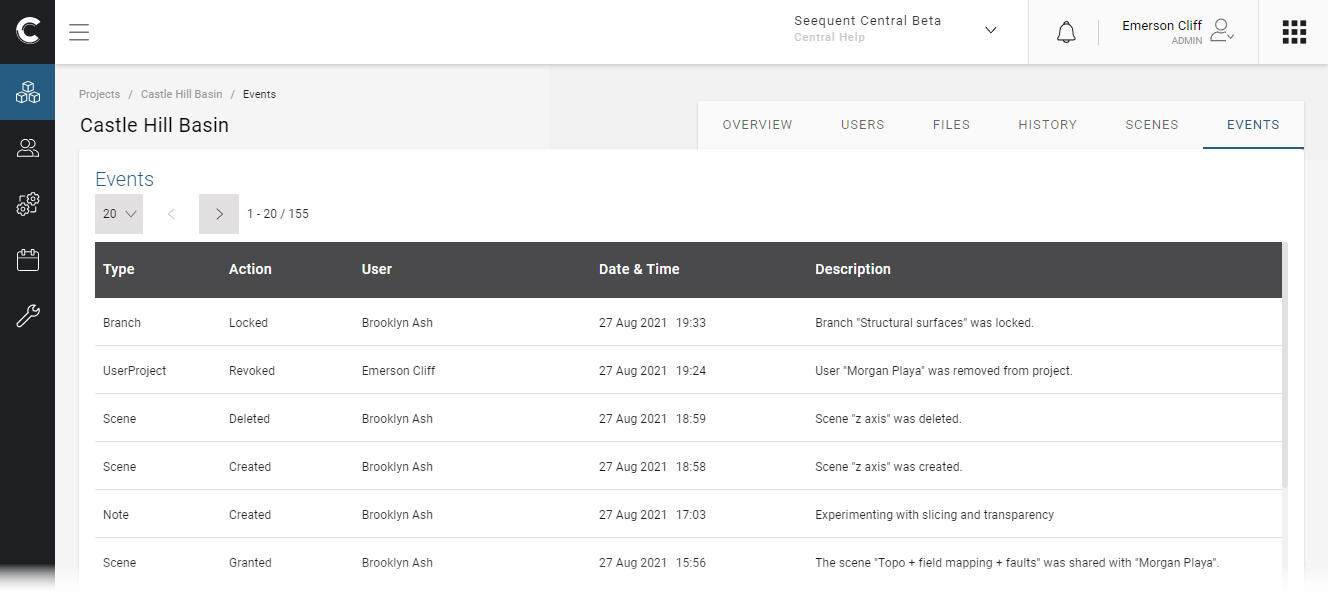
Viewing Project Events
To view a project’s events, select that project from the Projects list, then click on its Events tab. The Events list shows all events in a project:
Removing Incomplete Events
An incomplete event is one that experienced some problem while the event was being published to the Central Server. This may be due to a temporary network loss or similar disruption. If you are a Central Admin, you can manage these incomplete events in the Central Portal.
To view incomplete events, click on Maintenance in the sidebar, then on Incomplete Events. Click the Delete All Events button to remove them. You will have to confirm your selection.
Removing Unused Branches
An unused branch is one that has no revisions. If you are a Central Admin, you can delete these unused branches in the Central Portal.
To view unused branches, click on Maintenance in the sidebar, then on Unused Branches. Click the Delete All Branches button to remove any unused branches. You will have to confirm your selection.