
Calculated Columns
Creating calculations in columns is a powerful and versatile way for using data from other columns, tables or header fields to derive new values or to create rules and validations. The MX Deposit formula editor is simple and intuitive to use; you do not need to be an expert programmer to define even complex calculations.
This topic describes how to set up calculated columns in tables and use the formula editor. Other related topics discuss calculated column functionality in greater detail.
- The Catalogue of Operators, Functions and Inputs is a detailed list of all the options available in the formula editor.
- Understanding Errors describes how to troubleshoot errors while using the formula editor.
- The Formula Gallery contains examples of formulas that solve specific problems.
The rest of this topic is divided into:
- Creating a Calculation
- Using the Formula Editor
- Formula Building Basics
- Tips for Building a Calculation
- Editing an Existing Calculated Column
- Useful Keyboard Shortcuts
Creating a Calculation
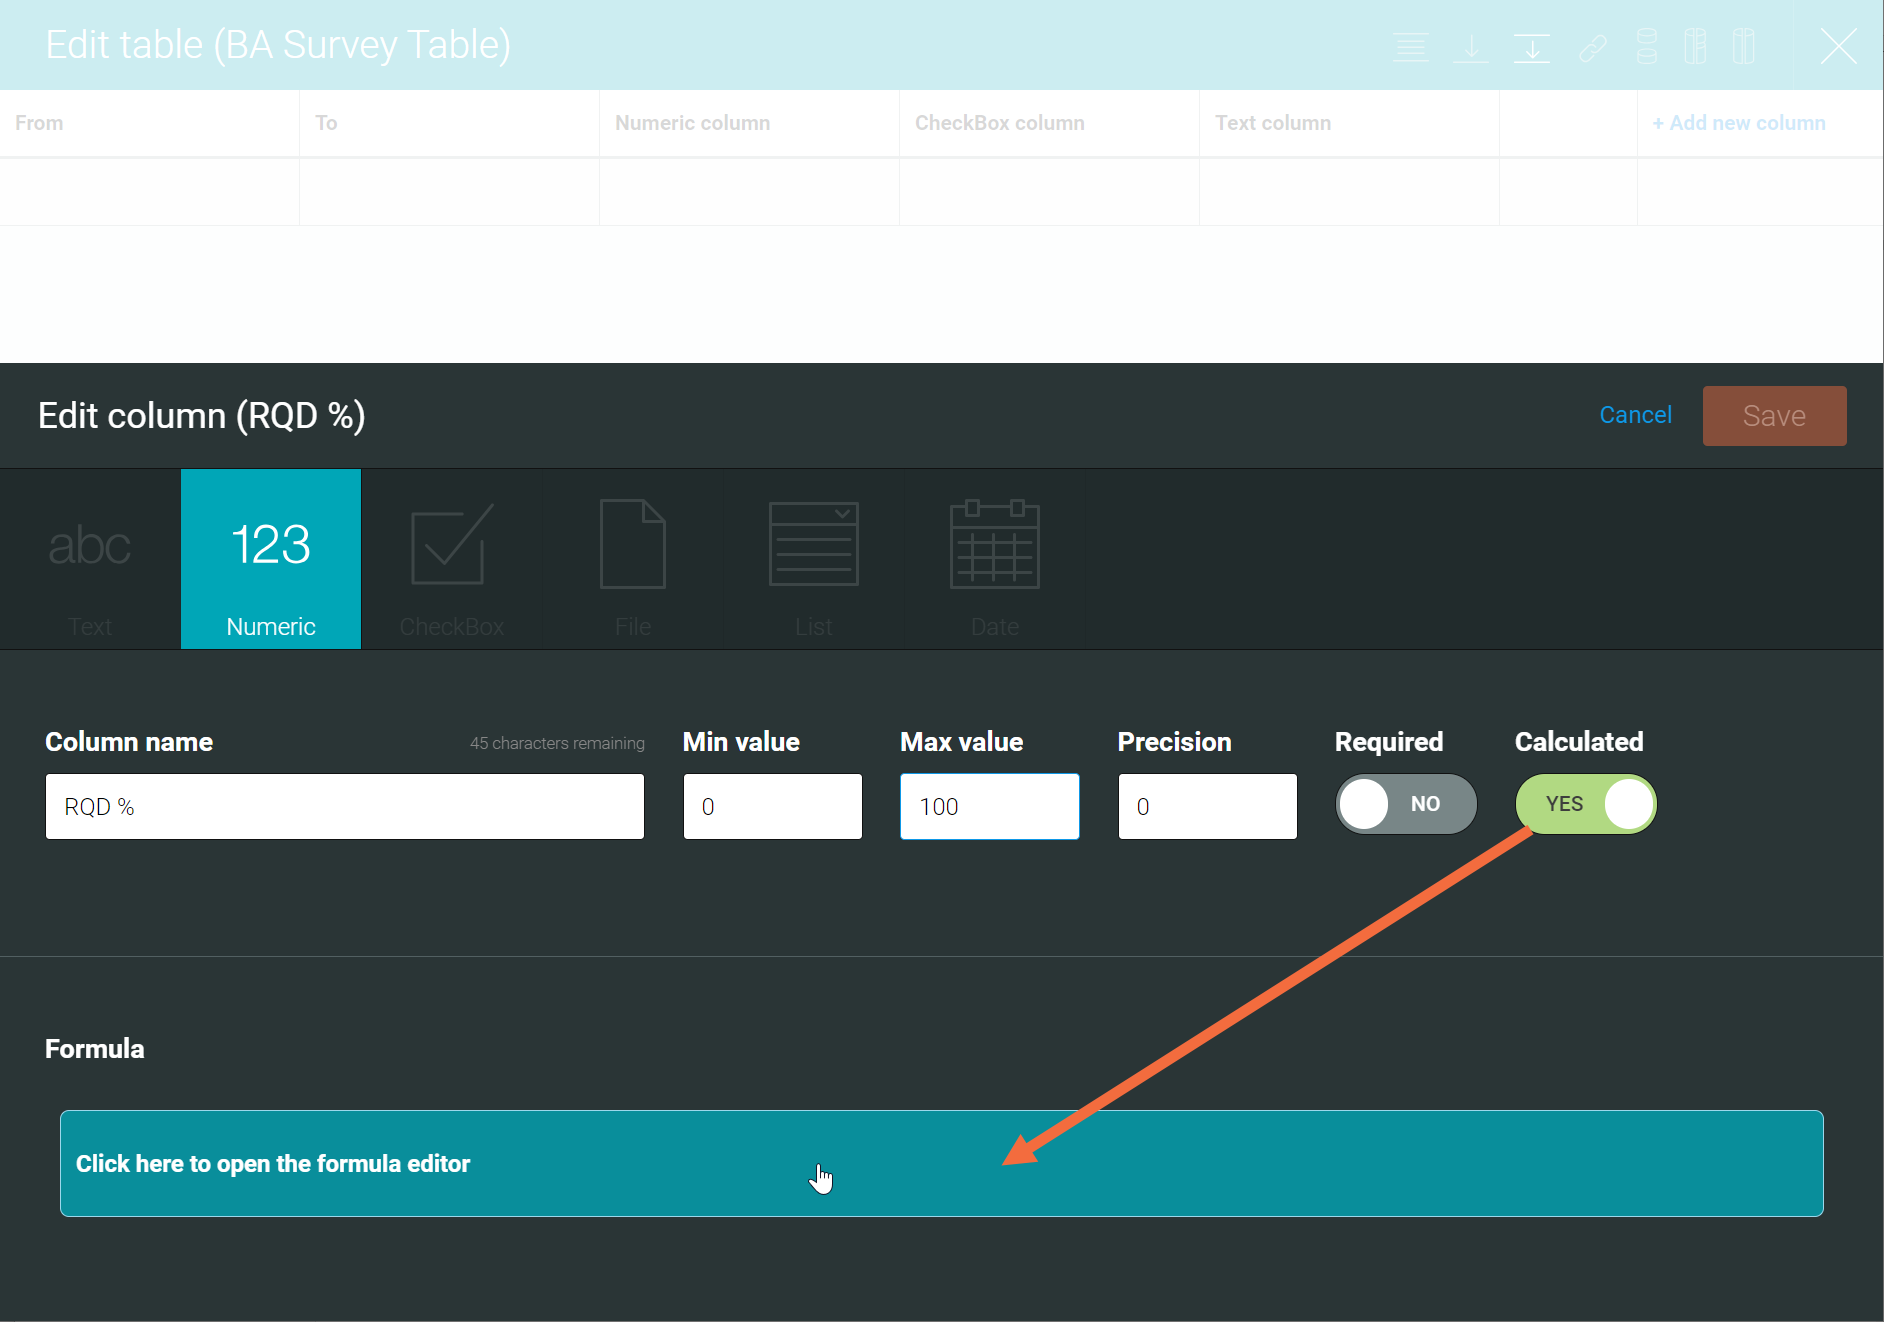
When you add a numeric, text or date column to a table, there is an option for making it a calculated column. Toggle the Calculated switch to Yes, then click in the Formula box to open the formula editor:
Using the Formula Editor
You can either type the formula expression directly or build it from the Inputs and Functions panel to the right of the formula expression.
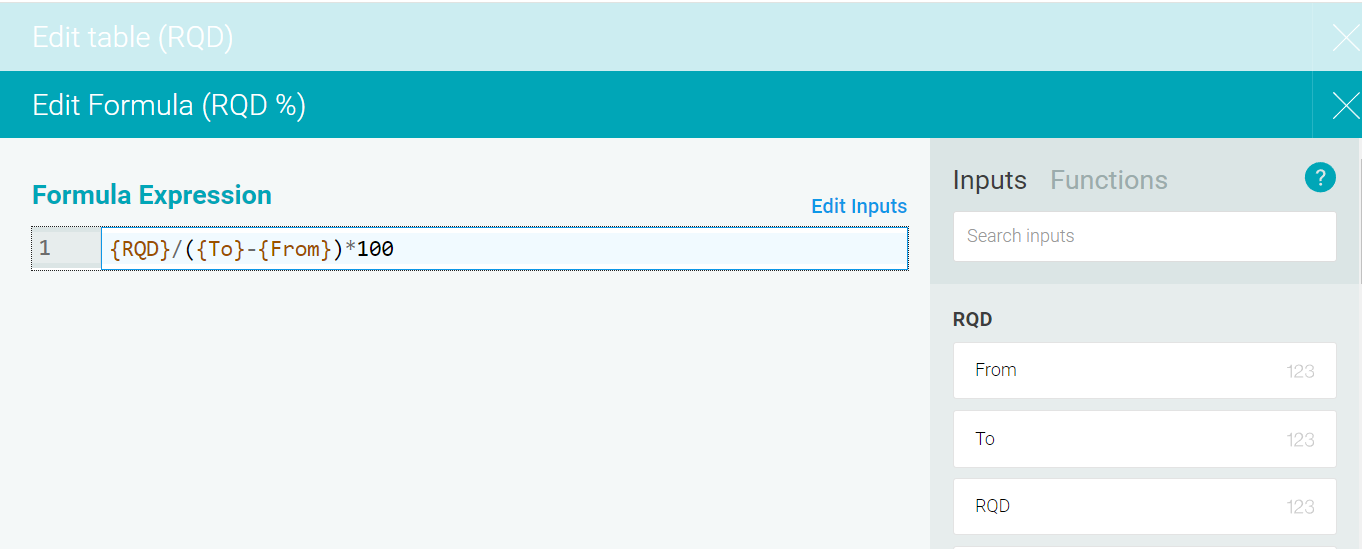
Inputs are items that are available for you to use. These can include:
- Internal inputs. These are columns within the table you are editing
- External inputs. These include referencing project and activity names, header fields, and columns from external tables other than the one you are editing.
The Functions list contains mathematical operators and other calculation elements that can be used.
Click Edit Inputs to see the columns being used in what you have already entered.
Formula Building Basics
- Use single quotes ' ' to identify text strings
- Functions and inputs are case sensitive
- Parentheses/round brackets ( ) are used as part of the BEDMAS standard order of operation
- Curly brackets { } are used to reference an input
- Square brackets [ ] are used as nested parentheses for the ifThen conditional function
Tips for Building a Calculation
You may find the following useful when building a calculation:
- Choosing the Column Type
- Precision Values for Numeric Columns
- Required Setting for Edit Column
- Required Setting for Edit Inputs
- Entering Names of Inputs and Functions
- Finding and Replacing in Calculations
- Using Header Fields
- Using External Column Inputs
- Scrolling and Line Breaks
Choosing the Column Type
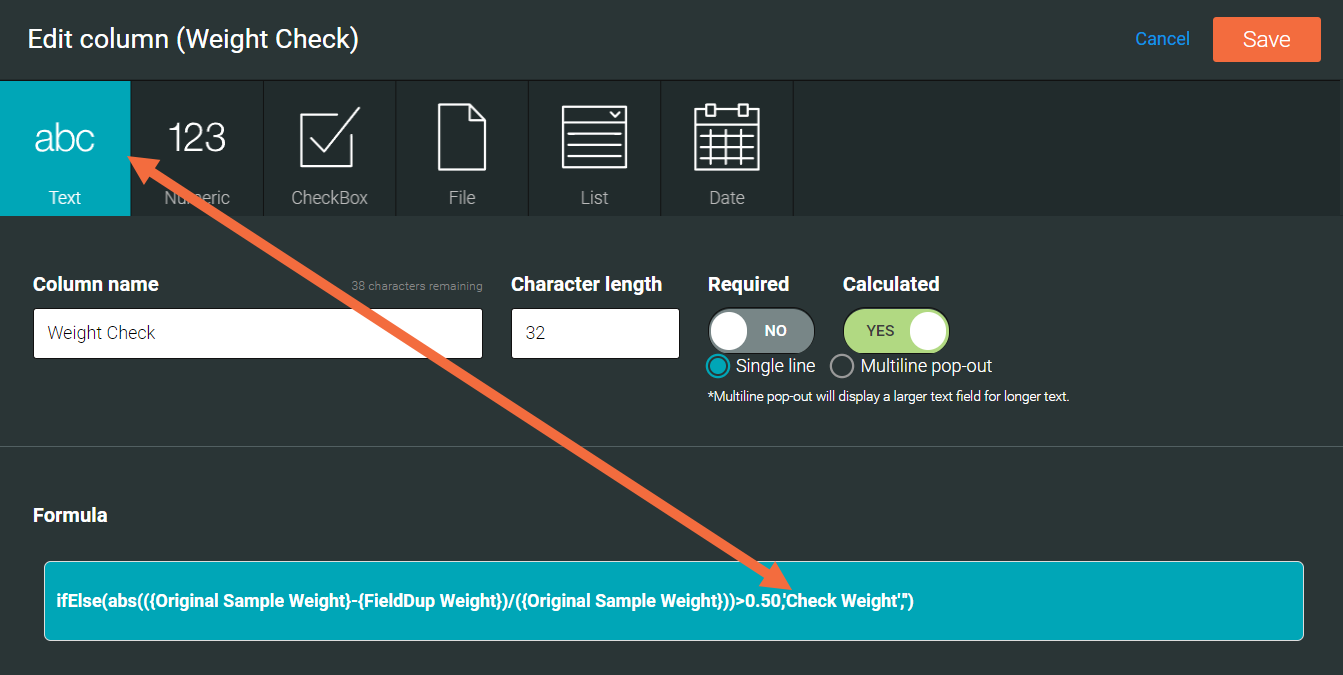
Consider the return output when selecting the column type for your calculated column: The column type you set should match the return output of the formula.
For example, here the return output of this validation formula is the text Check Weight and so a Text column type is selected:
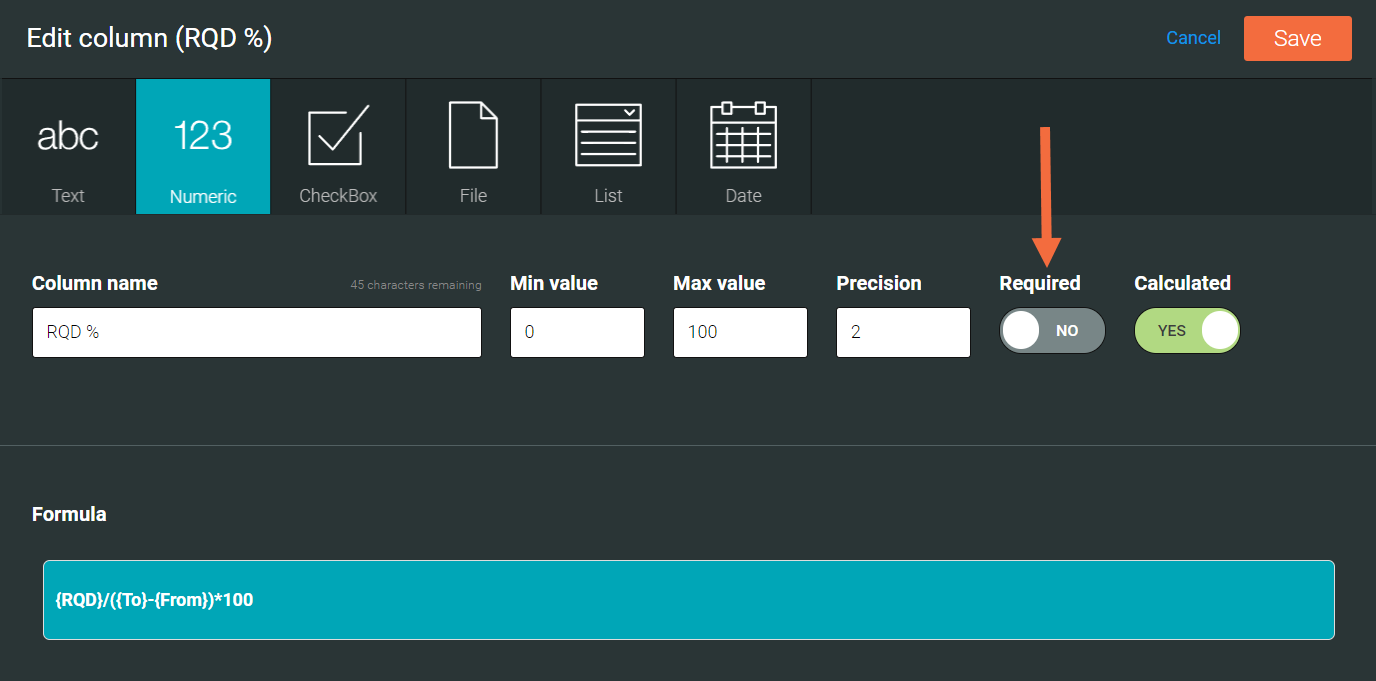
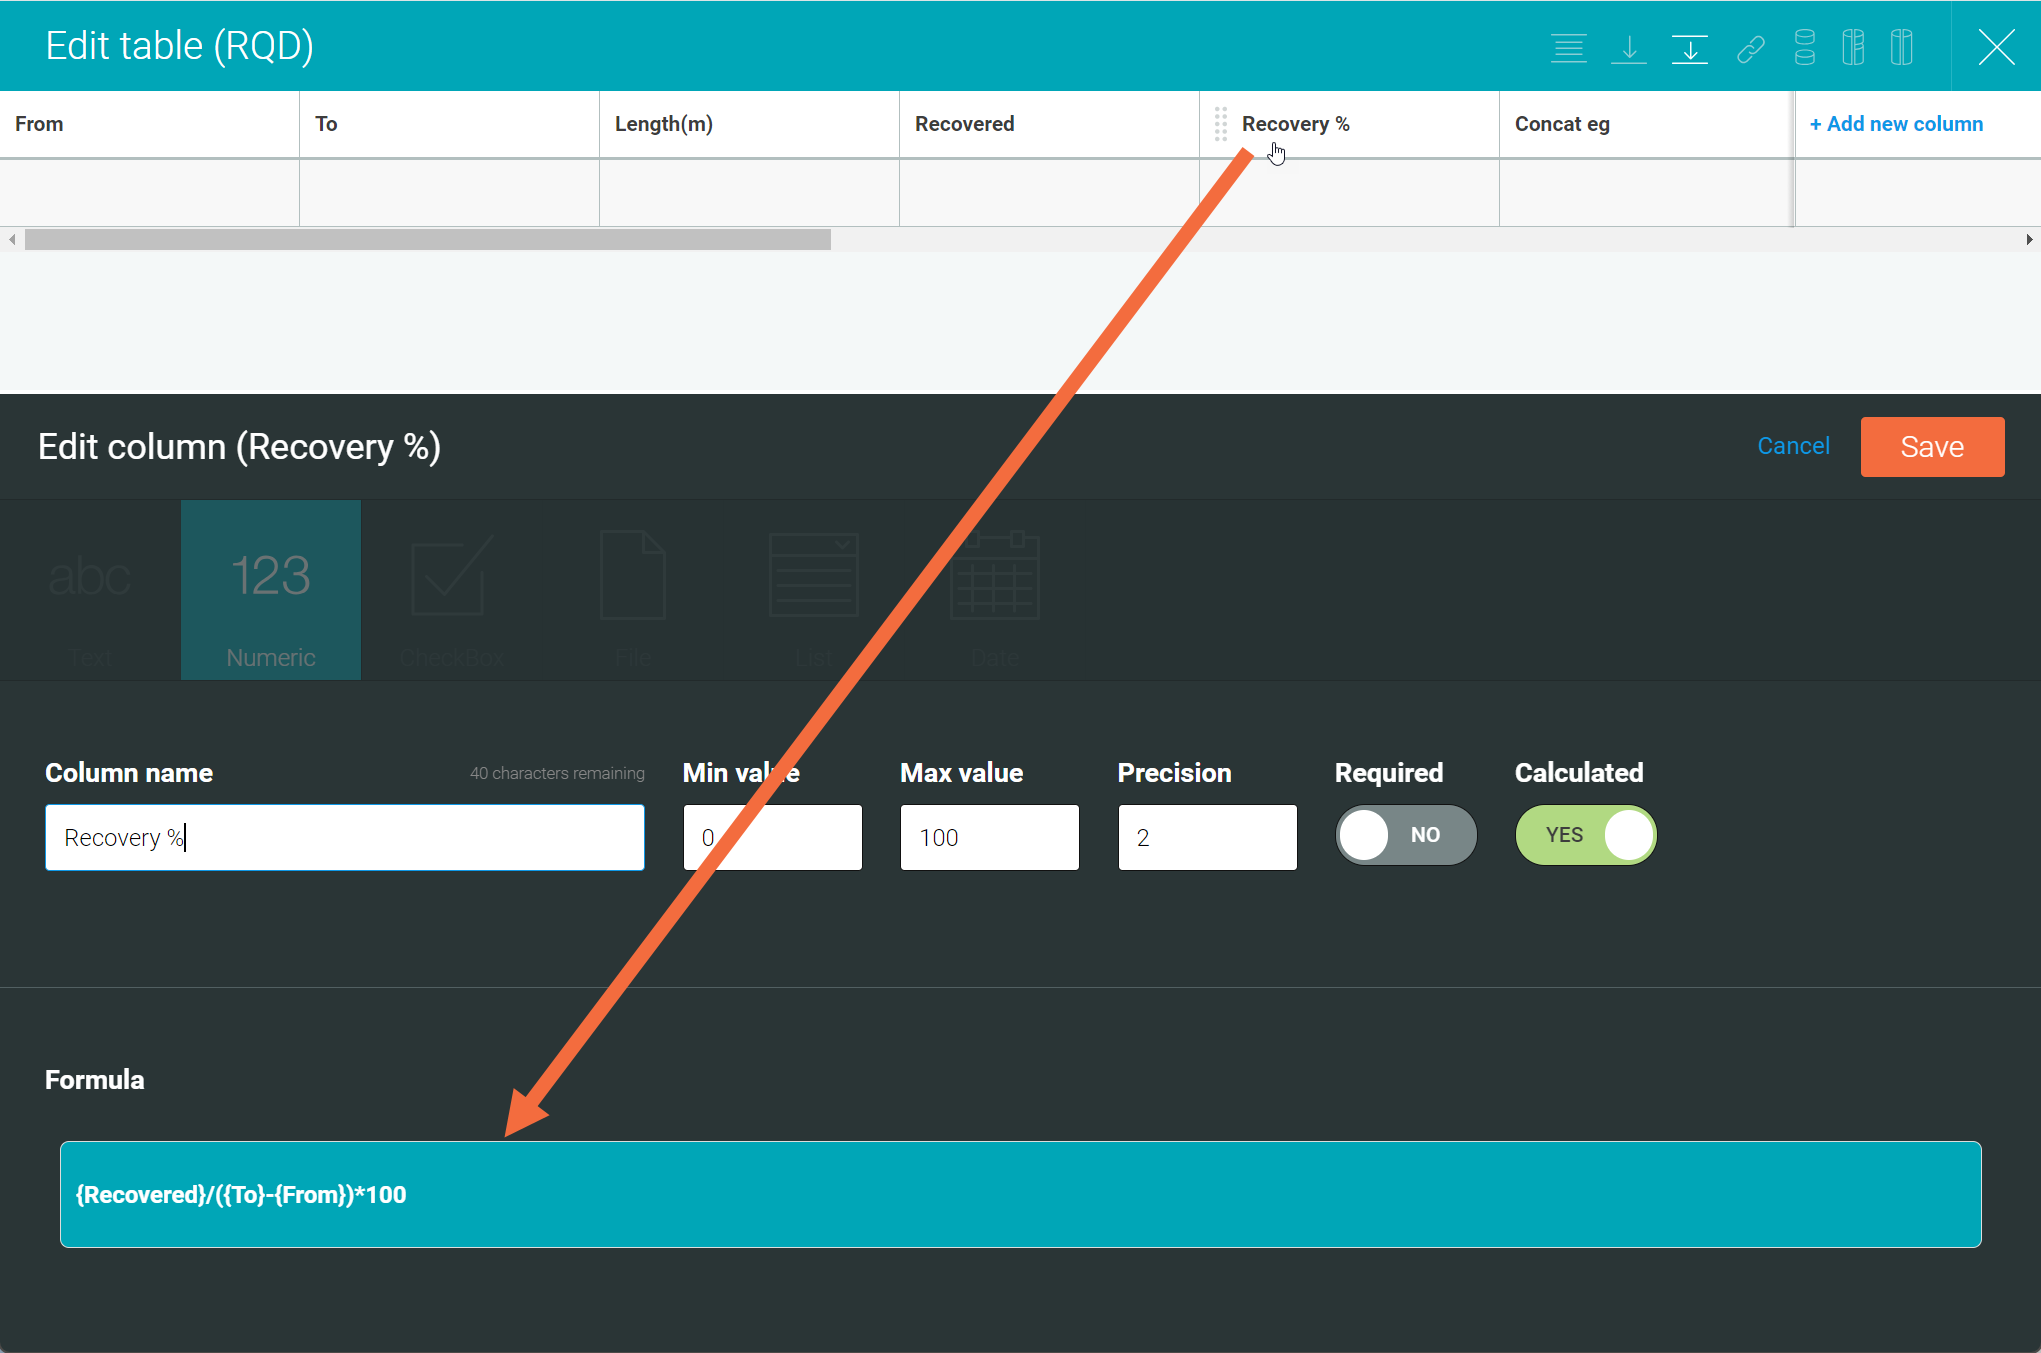
When the return output of the calculation is numeric, such as RQD %, then select the Numeric column type.
When any of the date functions are used in a formula, the column type can vary. See the Date Functions in the catalogue for a detailed breakdown of which column type to choose when using date functions.
You can't change the column type after a formula is added to a column. The column would first need to be deleted and a new one then added.
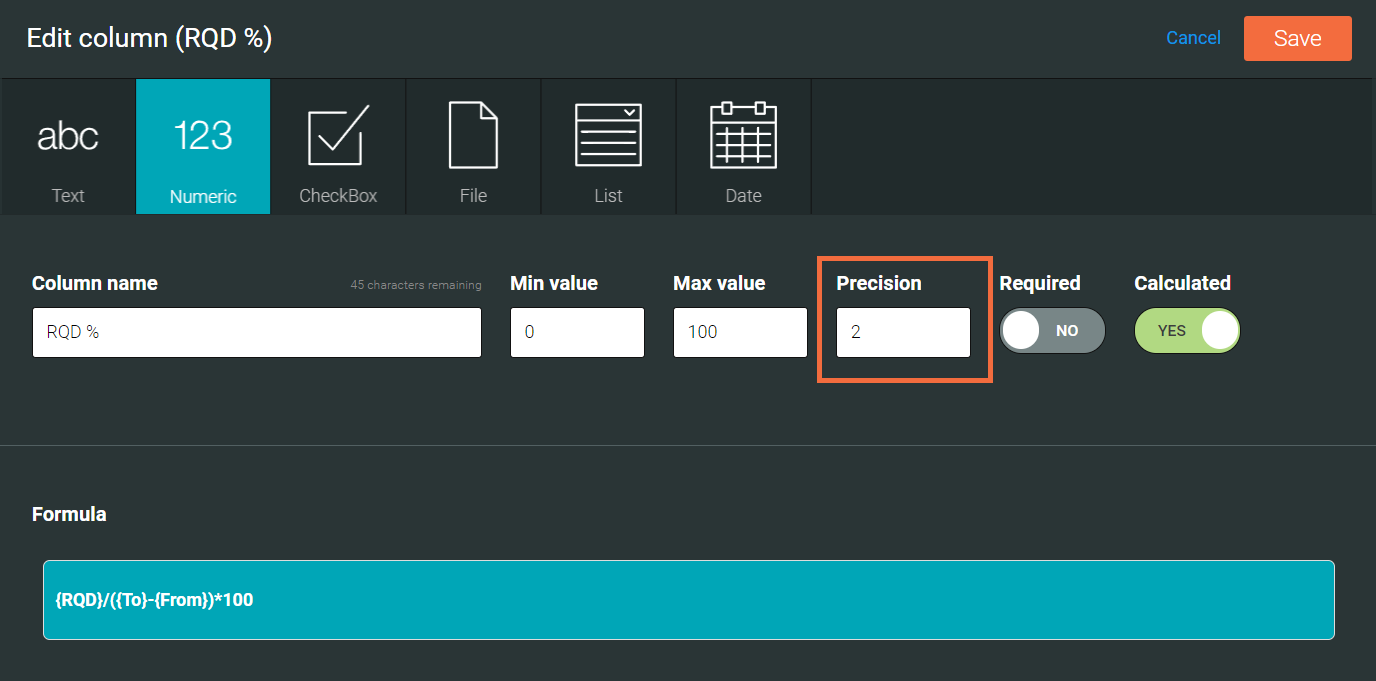
Precision Values for Numeric Columns
For a numeric column type, you can enter a Precision value. If no precision is entered, the result will, by default, be a whole number. Here we have entered 2; the resulting value will be to two decimal places.
Required Setting for Edit Column
When you add a new column, you have the option to make the column required.
- If Required is set to yes, the logger will be alerted that this is a column that requires an input.
- If Required is set to no, it is possible to leave values empty when logging.
Since calculated columns rely on formulas to derive information, it is not necessary to select this option if you are going to add a formula.
Required Setting for Edit Inputs
When editing a formula, you can specify whether each of the inputs is required or not required. To do this, click Edit Inputs, then enable Required for any column that must have a value for each row.
- If Required is set to yes, all rows in the column must have values before the formula will run.
- If Required is set to no, the calculation will use the default value when calculating that row. If no value is provided, that row will not produce a result and will be left blank.
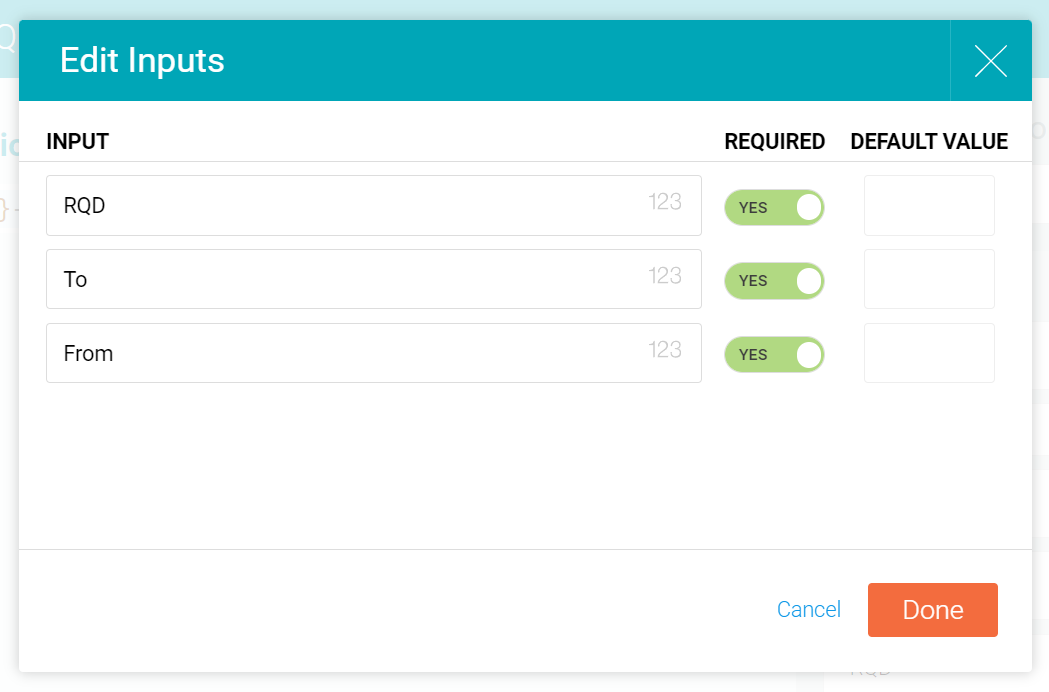
For a detailed example of how this setting can be used in a formula, see the example for calculating True Azimuth in the Formula Gallery.
Entering Names of Inputs and Functions
In the formula editor, you can use the search function in the sidebar to easily find inputs and functions.
When typing in the formula editor, possible inputs are suggested. For example, when the input selected is a list, the value column for that list will display by default. However, if you would like to use another column within the list, such as using the description column, then replace Value with Description in the Formula Expression by typing it directly. Columns within that list are suggested as you type.
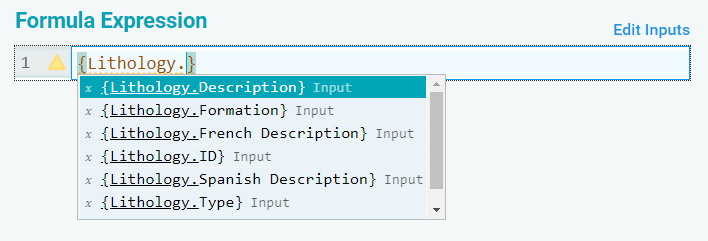
You can also select Edit Inputs in the formula editor. Here the Lithology.Description is selected from the drop down list instead of the default Lithology.Value.

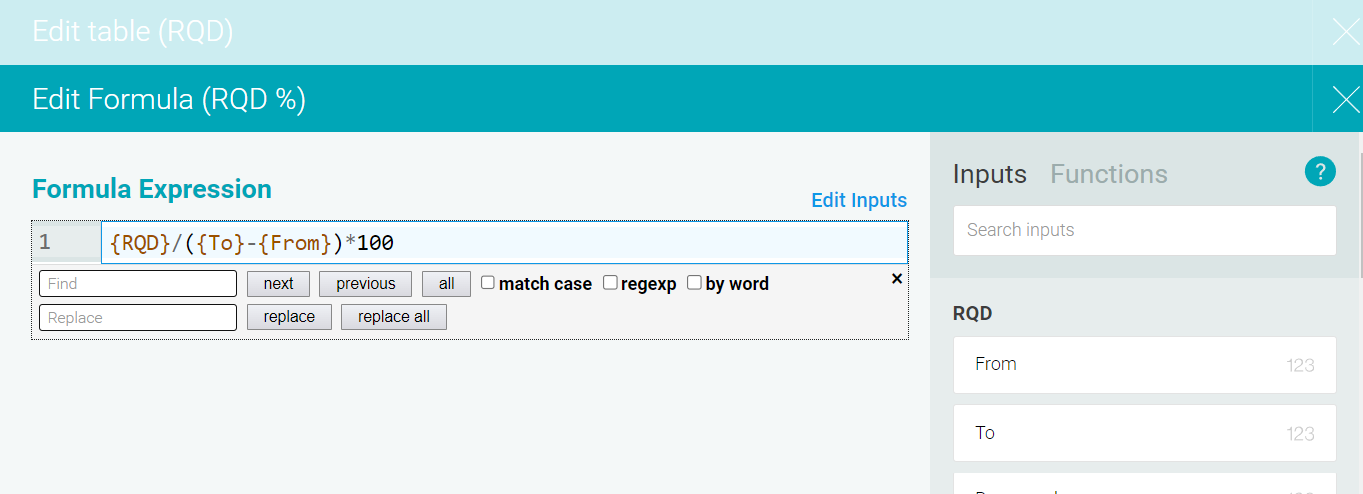
Finding and Replacing in Calculations
To bring up the find and replace window, use the keyboard shortcut Ctrl+F for PCs or Command+F for Macs.
Using Header Fields
When building a calculation, the header fields that are displayed are those that are assigned to the same activities as the table you working in. This is because when you reference a header field you would normally want to use one that is related to that table.
In this example, we have a validation formula in a Survey Table. The Target depth field from the Header is used in the formula so that a warning appears if the depth exceeds the target depth.
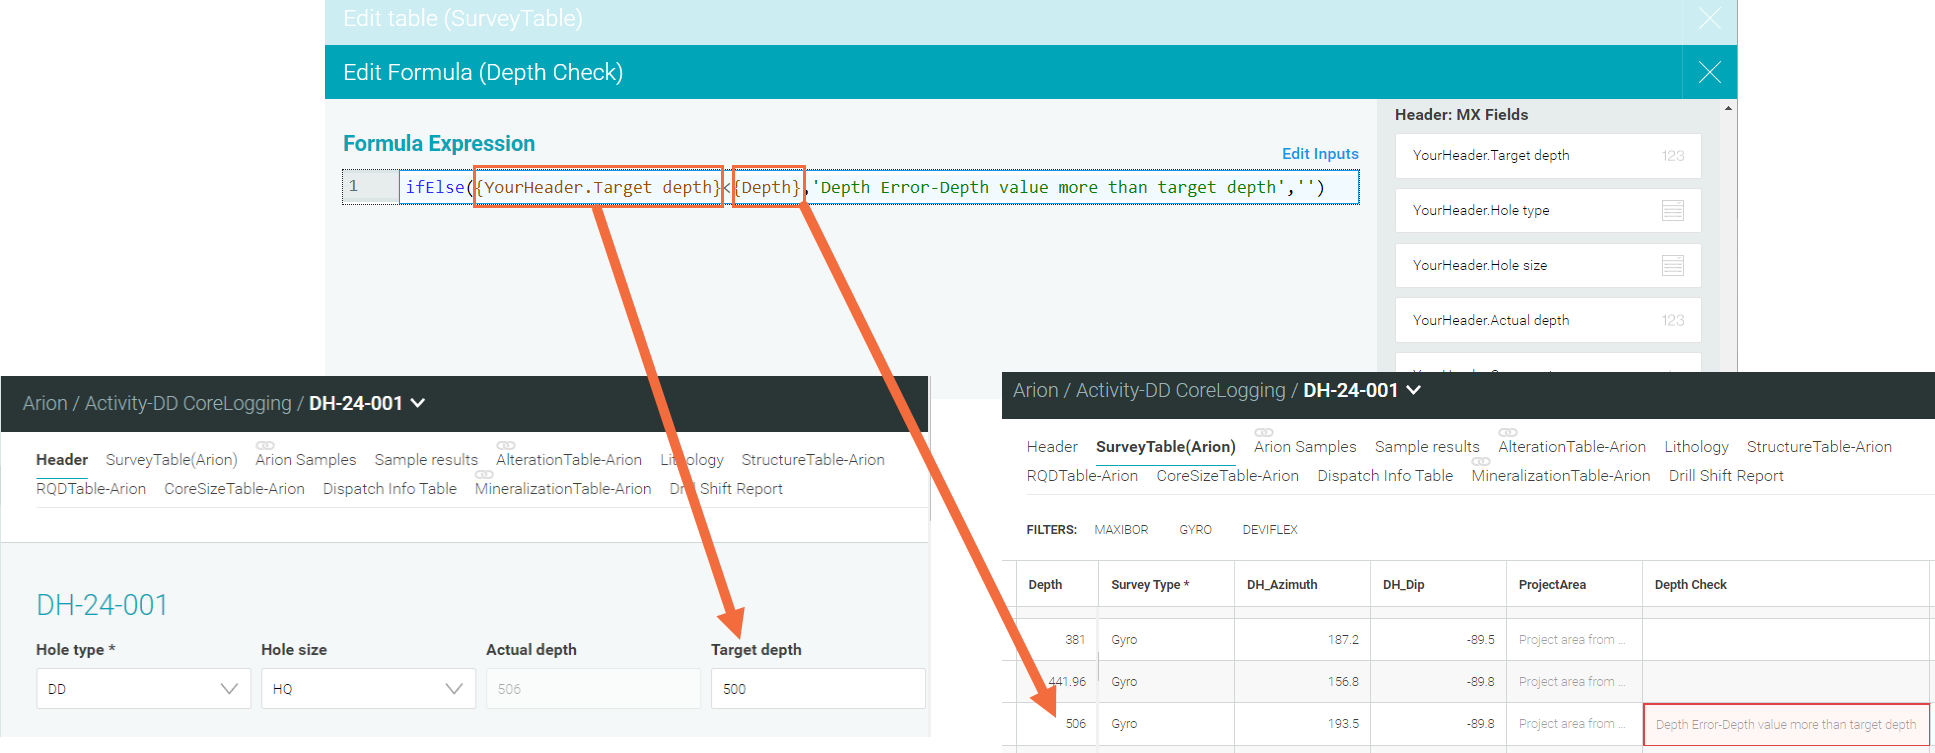
If a header field does not display as a suggested input, it could be because the header isn't part of the same activity as the table you are in.
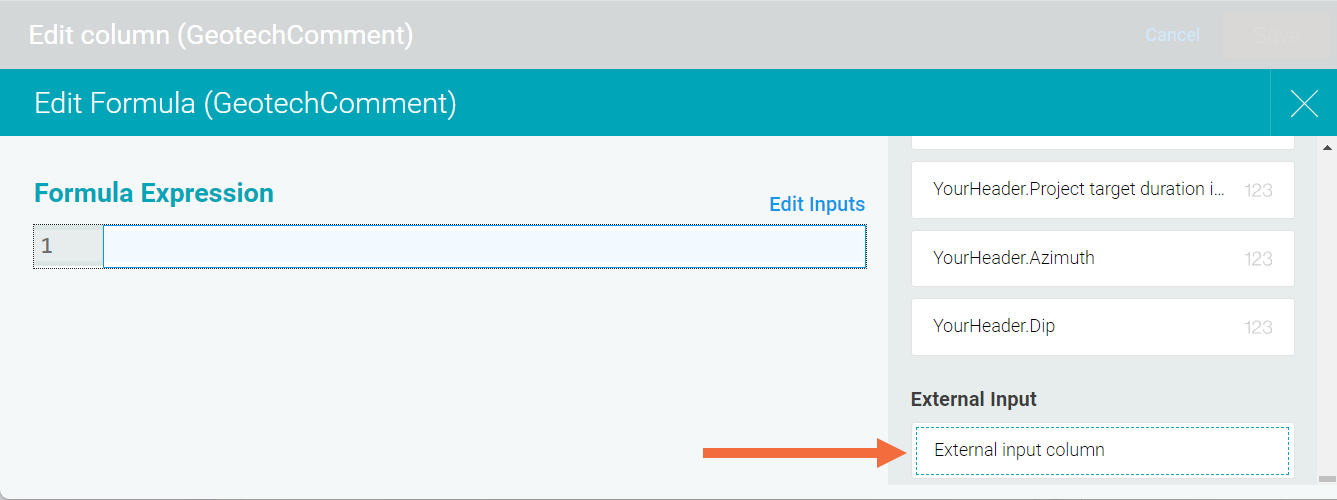
Using External Column Inputs
To reference an external text or numeric column from a table, other than the one you are editing, select External Input Column from the inputs and complete the parameters for that column in the window that appears.
Open the formula editor and select External input column from the side panel.
Complete the Input name field, and select the source Table and Column. Here we have chosen to add the Comment column from the GeotechComment table to the Lithology table.
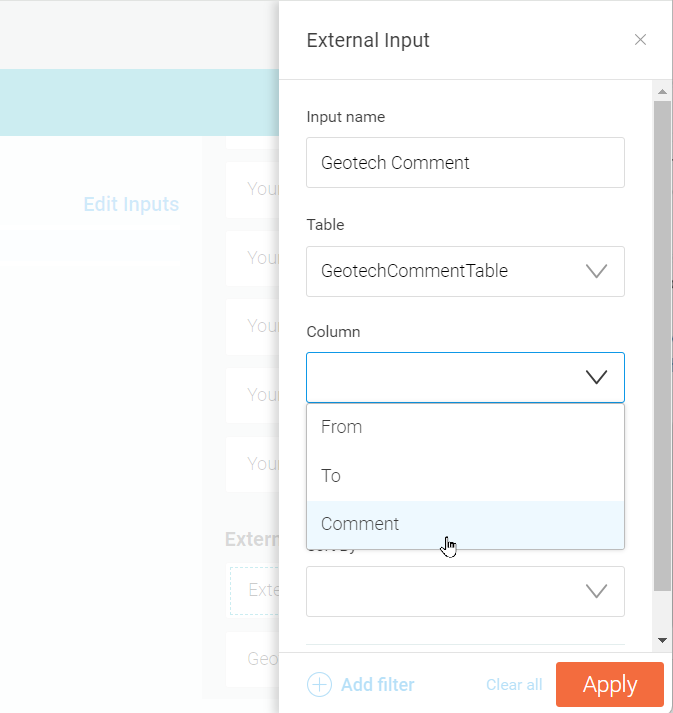
Complete any sorting and filtering parameters to display the correct information from the external source table's row to the corresponding destination table's row.
Here we are displaying the First value in the Geotech Comment table that is sorted by the To column, and is equal to the To column in the Lithology table, so the To columns are used to line up and display the correct corresponding information.
After you have selected Add filter and chosen your column to filter on, you can choose to either enter a simple value directly into the field, or it can be a destination table column. To do this, hover your cursor over the blank area next to the filtering column. An overflow menu will appear from which you can choose to Use destination columns:
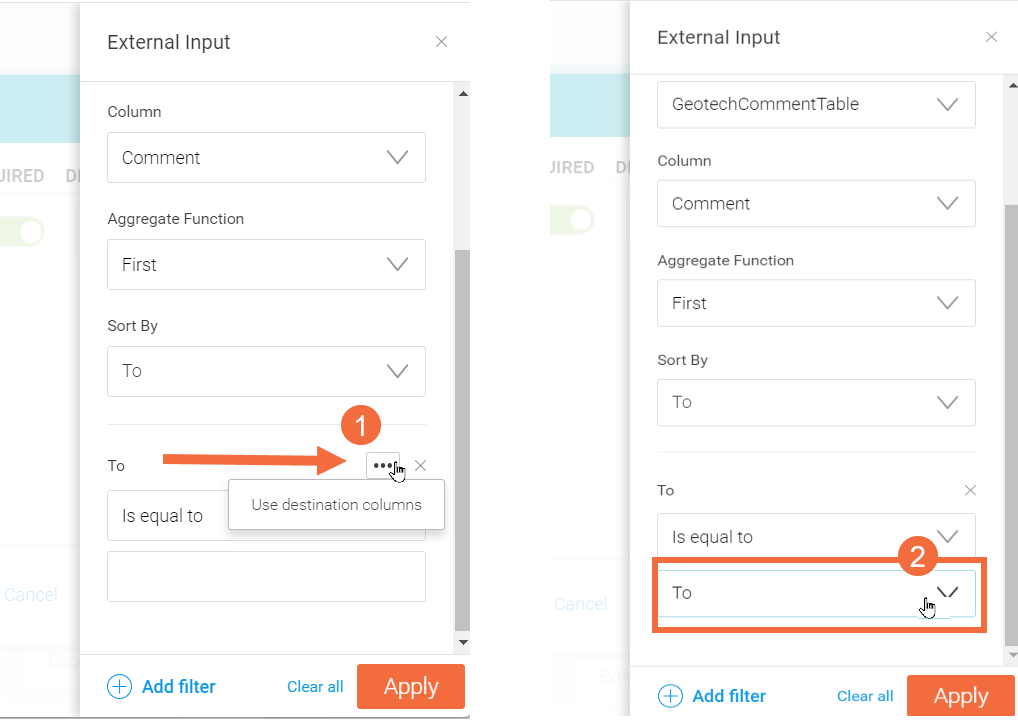
Click Apply to add it to your formula expression.
See Obtain Recovery % From RQD to Samples Table When Intervals are Mismatched in the Formula Gallery for an example of selecting an Aggregate Function, setting Sort By options and defining Filters.
Scrolling and Line Breaks
When you have a long formula, you may need to scroll across your screen to see the complete formula, as is the case here:

To avoid this, you can enter a new line for ease of viewing at logical separation points in the formula expression. However, doing so is not required

Editing an Existing Calculated Column
To edit a calculated column, click on the column name:
You can then edit the calculation by clicking the formula. This opens the formula editor.
Useful Keyboard Shortcuts
| Keys - PC | Keys - Mac | Action |
|---|---|---|
| Ctrl+F | Command+F | Find - brings up the Find and Replace window |
| Ctrl+G | Command+G | Find next |
| Shift+Ctrl+G | Shift+Command+G | Find previous |
| Shift+Ctrl+F | Command+Alt+F | Replace |
| Shift+Ctrl+R | Shift+Command+Alt+F | Replace all |
| Ctrl+A | Command+A | Selects all content of the editor |
| Ctrl+C | Command+C | Copy selection |
| Ctrl+V | Command+V | Paste |
| Ctrl+D | Command+D | Deletes the whole line under the cursor including the new line at the end |
| Ctrl+Z | Command+Z | Undo the last change |
| Ctrl+Y | Command+Y | Redo the last undone change |
| Ctrl+Home | Command+Home | Move the cursor to the start of the formula expression |
| Ctrl+End | Command+End | Move the cursor to the end of the formula expression |
| Ctrl+Backspace | Alt+Backspace | Delete to the left of the group before the cursor |
| Ctrl+Delete | Ctrl+Alt+Backspace | Delete to the start of the group after the cursor |
| Tab | Tab | Insert a tab at the cursor |