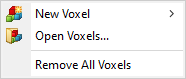
Create a Voxel, Add Multiple Voxels, Remove all Voxels
|
-
Select (highlight) the Voxels node in the Project Explorer, right-click and select the desired option from the popup menu.
|
-
The New Voxel option displays the sub-menu to add the appropriate voxel. Select the voxel type to be created and the dialog for the chosen type of voxel will open.
-
The Open Voxels option displays the Add New Voxel(s)
dialog. Select the voxel to be added and click the Open button. The voxel will be added to your current project.
-
The Remove All Voxels option removes all voxels from your current "Project" but
does not delete
the voxel files from the project directory.
|
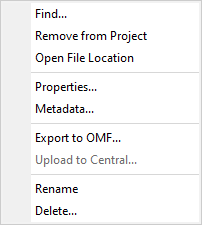
Remove, Delete, Rename, View Metadata, View and Modify Properties and Colour Display of a Voxel
|
-
Under the Voxels node in the Project Explorer, select (highlight) the voxel name, right-click and then select the desired option from the popup
menu.
|
-
The Find option is available when the source file of the selected voxel document is missing: the voxel appears in grey along with a warning icon  . Use this option to open the browse dialog and locate the missing file. See Missing Data Files for more details on the Find functionality. . Use this option to open the browse dialog and locate the missing file. See Missing Data Files for more details on the Find functionality.
-
The Remove from Project option will
remove the voxel from the "Project" but will not delete the voxel from your directory.
-
The Open File Location option will open the Windows File Explorer to the location of the voxel file selected.
-
The Colour Tool option opens the Colour Tool dialog, which enables you to interactively edit the colour display of your voxel and experiment with different colour configurations.
The option is not available for lithology voxels, since the values are categorical, and blending the colours would produce inappropriate results.
-
The Properties option will open the Voxel Properties dialog and display the properties for the currently selected voxel.
-
The Metadata option will display the Metadata Viewer dialog. Click the Edit button on the Metadata Viewer to display the Metadata Editor. Click the OK button to accept your changes and close the dialogs.
-
The Export to OMF option opens the Export Project to OMF dialog; the selected voxel along with any other grids, voxels, and geosurfaces from your current project can then be saved to an OMF file.
-
The Upload to Central option uploads the voxel to a Central project. All the associated files will be uploaded to the Central server as well.
-
The Rename option renames the voxel in the project as well as on the disk. Any auxiliary files (.xml) will be renamed at the same time.
-
The Delete option removes the voxel from the project's workspace and permanently deletes the voxel file and all associated files from their physical location.
|