Stratigraphic Sequences
When you have a series of continuous layers in a geological model, you can model each layer separately, as part of a single stratigraphic sequence or using the offset surface tool. Modelling a stratigraphic sequence works best for sequences uniform in thickness with a consistent stacking order. If a layer varies in thickness, the contact surface may not match the contact points in some places. This will be a consideration when choosing whether to model layers as separate layers, as offset surfaces or as part of a stratigraphic sequence. For information on the offset surface tool, see Offset Surfaces.
Once you have created a stratigraphic sequence, you can refine it by adding and removing layers and by adjusting the surfaces produced.
This topic describes using the stratigraphic sequence tool and is divided into:
Creating a Stratigraphic Sequence
To create a stratigraphic sequence, right-click on the Surface Chronology object and select New Stratigraphy. The New Stratigraphic Sequence window will appear:
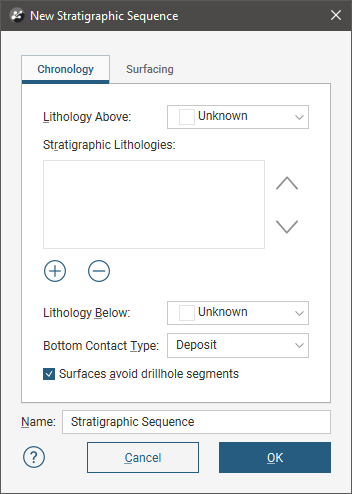
Select the lithologies at the top and bottom of the stratigraphic sequence. To do this, select the Lithology Above and Lithology Below from the lithologies available in the geological model:
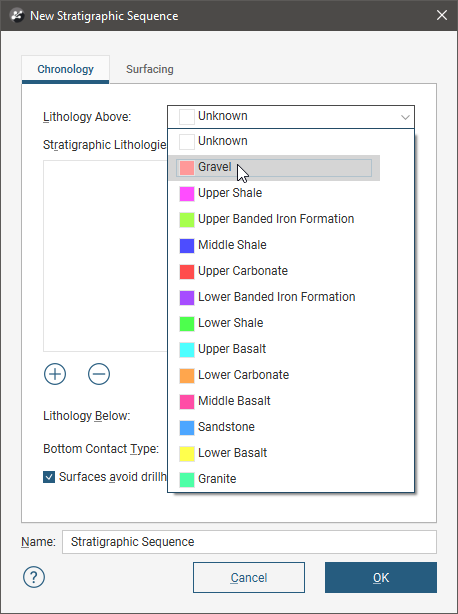
You can add lithologies to the Stratigraphic Lithologies list first, but if you set the Lithology Above and Lithology Below first, those lithologies will be filtered out when you select the Stratigraphic Lithologies.
Next, click the Add button (![]() ) to view available lithologies:
) to view available lithologies:
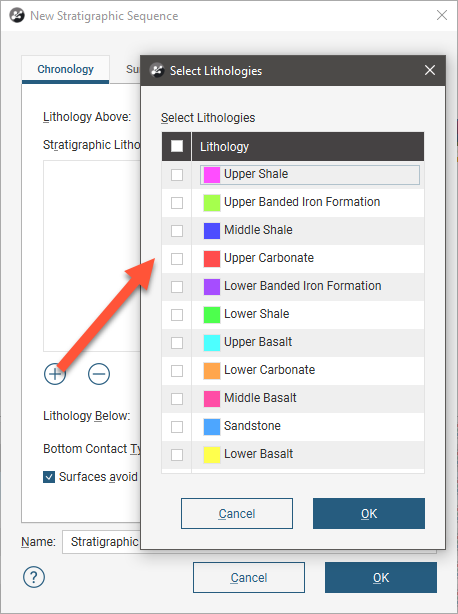
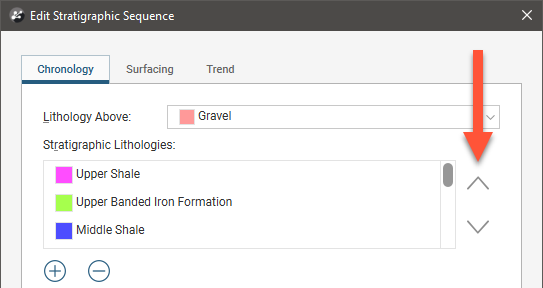
Select the lithologies that you want to use in the stratigraphic sequence, then click OK to add the layers to the Stratigraphic Lithologies list. Make sure they arranged in the correct order, using the arrows alongside the window to rearrange them, if necessary:
In the New Stratigraphic Sequence window, select whether the Bottom Contact Type is an erosion or a deposit.
When the Surfaces avoid drillhole segments option is enabled, the surfaces in the stratigraphic sequence will not cut through intervals of lithologies that are selected for the stratigraphic sequence.
Stratigraphic sequences created in earlier versions of Leapfrog Geo (before 3.0) used only the contact information; intervals were ignored and stratigraphic sequence surfaces could cut through intervals. To upgrade a stratigraphic sequence created in earlier versions, edit the stratigraphic sequence to enable Surfaces avoid drillhole segments.
Next, click on the Surfacing tab to set the surfacing settings for each surface created for the sequence:
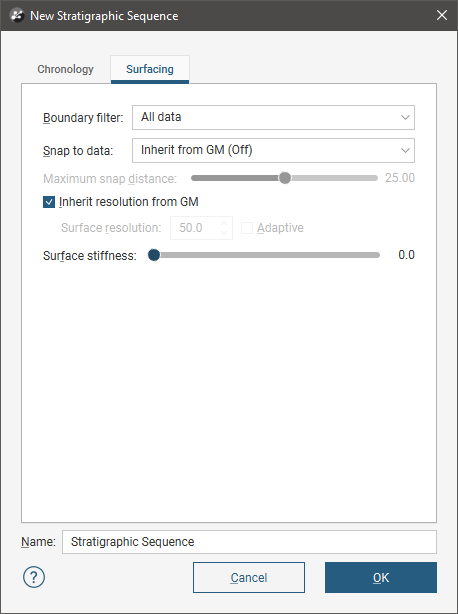
For the Boundary filter and Snap to data options, it is possible to override these settings for the individual contact surfaces that are part of the stratigraphic sequence. To do this, select Custom. Once the stratigraphic sequence has been created, expand it in the project tree and double-click on each surface to change its surfacing options, as described in Contact Honouring and Boundary Filtering for Individual Surfaces below.
Boundary Filtering
When data objects are added to a surface, there are two ways to handle the data that lies outside the surface’s boundary:
- Filter the data. The surface is only influenced by the data that falls inside the surface’s boundary.
- Leave the data unfiltered. The surface is influenced by the data both inside and outside the surface’s boundary.
The Boundary filter setting determines how data used to define the surface is filtered:
- Off. Data is not filtered.
- All data. All data is filtered.
- Drilling only. Only drillhole data and data objects derived from drillhole data are filtered.
- Custom. Only the data objects specified in the Inputs tab are filtered.
All contact surfaces that make up a stratigraphic sequence will inherit the Boundary filter setting from the stratigraphy unless Boundary filter is set to Custom.
Snapping to Data
There is a Snap to data setting for a geological model as a whole that is set in the Geological Model > General tab (see Editing a Geological Model). Snap to data can also be set on a surface-by-surface basis by double-clicking on the surface in the project tree and then clicking on the Surfacing tab.
For a stratigraphic sequence, the options are:
- Inherit from GM. The setting for the geological model as a whole is used. This is the default setting.
- Off. Surfaces do not snap to the data used to create them.
- All data. Surfaces snap to all data within the Maximum snap distance, which includes drillhole data and any data added to the surfaces.
- Drilling only. Surfaces snap to drillhole data and data objects derived from drillhole data within the Maximum snap distance but not to other data used to modify the surfaces.
- Custom. Surfaces snap to the data objects indicated in the Inputs tab for each surface.
Take care in enabling snapping and in selecting what data the surface will snap to, as the more data you include, e.g. by setting a large Maximum snap distance or selecting All data for Snap to data, the greater the possibility that errors in the data or assumptions inherent in interpretations (e.g. polylines) will cause distortions in the meshes. If you do enable snapping, it is best to snap only to drilling data. See Honouring Surface Contacts for more information on these settings.
All contact surfaces that make up a stratigraphic sequence will inherit the Snap to data setting from the stratigraphy unless Snap to data is set to Custom.
Surface Stiffness
The Surface Stiffness controls the smallest bend a surface will make, where a higher value will result in a smoother surface that bends less. The default value is 0, which is no stiffening.
Click OK to create the stratigraphy, which will be added to the project tree as part of the Surface Chronology object.
Editing the Stratigraphic Sequence
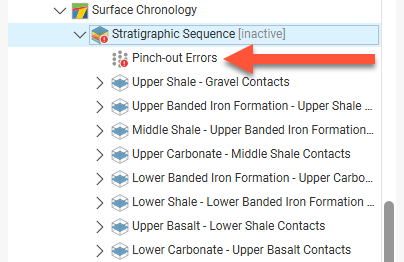
The objects that make up the stratigraphic sequence include the generated contact surfaces and any points that result in pinch-out errors:
Correcting Pinch-Out Errors
Add the pinch-out errors object (![]() ) to the scene to view the points that are causing errors. To find out more about the errors, right-click on the sequence and select List Errors.
) to the scene to view the points that are causing errors. To find out more about the errors, right-click on the sequence and select List Errors.
In the Stratigraphic Errors window, information is provided about the different errors that occur in the stratigraphic sequence, with pinch-out errors and other errors listed separately:
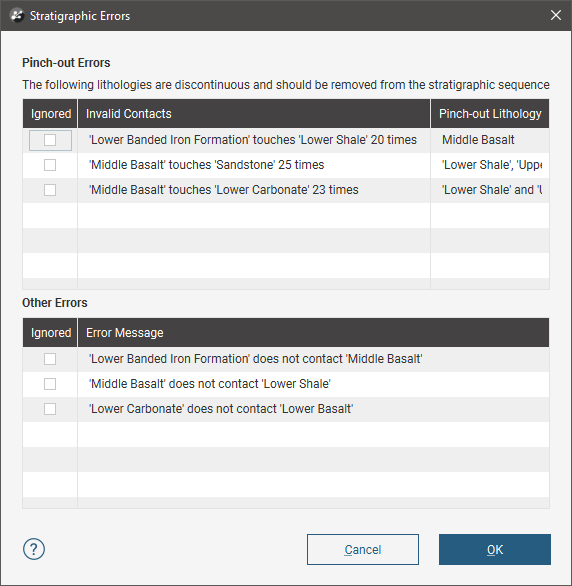
Use this information, together with the pinch-out error points, to either remove lithologies from the sequence or adjust surfaces using any of the tools available for individual surfaces, as described in Editing Individual Surfaces below.
Remove lithologies from the sequence by double-clicking on the sequence in the project tree, then reorganising the lithologies in the Chronology tab.
You can also ignore an error by ticking the Ignored box in the Stratigraphic Errors window.
Surfacing Options
To change a stratigraphic sequence’s surfacing options, double-click on the sequence in the project tree and click on the Surfacing tab. See Boundary Filtering and Snapping to Data above for more information on the settings in this tab. Note that boundary filtering and snap settings can also be set for the individual surfaces that make up the stratigraphic sequence, which is described in Contact Honouring and Boundary Filtering for Individual Surfaces below.
Applying a Trend
To apply a global trend to a stratigraphic sequence either right-click on it in the project tree and select Adjust Surface or double-click on the stratigraphic sequence and then click on the Trend tab. You can then apply a trend to the surface as described in Global Trends.
Editing Individual Surfaces
Individual surfaces that make up a stratigraphic sequence can be modified by:
- Contact Honouring and Boundary Filtering for Individual Surfaces
- Adding Data to Individual Surfaces
- Editing Surface Contacts
Contact Honouring and Boundary Filtering for Individual Surfaces
There are general boundary filtering and snap settings for the stratigraphic sequence as a whole, but it is possible to override these settings for the individual surfaces that are part of the stratigraphic sequence. To do this, first double-click on the stratigraphic sequence itself, then click on the Surfacing tab.
- To change boundary filtering for an individual surface, Boundary filter must be set to Custom for the stratigraphic sequence.
- To change the snap setting for an individual surface, Snap to data must be set to Custom for the stratigraphic sequence.
Next, double-click on an individual surface in the project tree. The window that appears shows all the data objects used to create the surface:
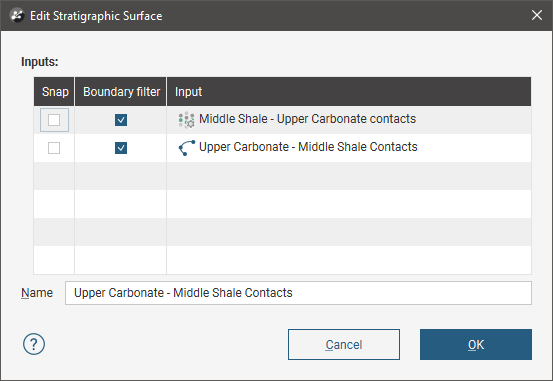
See Boundary Filtering and Snapping to Data for more information.
Adding Data to Individual Surfaces
You can also refine the individual surfaces in a stratigraphic sequence in several ways:
- Add other data. Right-click on the surface to see the options available, which will depend on how the surface was created. See Adding Data to Surfaces for more information.
- Edit the surface with a polyline. Right-click on the surface in the project tree and select either Edit > With Polyline. See Editing Surfaces With Polylines for more information.
It is not possible to add structural data or polylines with orientation information to individual surfaces in a stratigraphic sequence. If you edit a surface with a polyline, your options for editing the polyline will be limited.
Editing Surface Contacts
You can edit the contacts used to generate the surface by expanding the contact surface in the project tree and double-clicking on the points object (![]() ). See Extracting Contact Points from Drillhole Data for more information on the settings in the Edit Contacts window.
). See Extracting Contact Points from Drillhole Data for more information on the settings in the Edit Contacts window.
Got a question? Visit the Seequent forums or Seequent support