
User Management
This topic describes how to manage a subscription’s users in the Imago Admin Portal. It is divided into:
- The Users List
- Adding New Users
- Assigning Users to Workspaces
- Assigning Users to Profiles
- Editing a User’s Details
- Deleting Users
The Users List
Open the list of users by clicking on Users in the sidebar. This shows the users who have been added to the subscription, along with whether they are signing in using a Seequent ID or an Imago ID (A), what their Role is (B) and whether or not they are active (C):

Only an Imago admin can add and manage users. If you are not an admin, there will be no Users option in the Imago Admin Portal’s sidebar.
If you have an Imago Enterprise licence, there will be an additional tab, Groups. See the User Groups (Enterprise Licence Only) topic for more information.
Adding New Users
A user can be an admin or a standard user:
- An Admin can set up and manage users, workspaces, data definitions and capture profiles.
- A standard User can only access the workspaces and capture profiles they have permissions for.
Your Imago subscription can have more than one admin, but it is recommended that you limit the number of admins as they have access to all aspects of your subscription.
To add more or more new users, open the Users list and click Add Users. In the window that appears, enter the email addresses for the users you wish to add to your Imago subscription (A). If you want the user to be an admin, enable the Admin option (B).
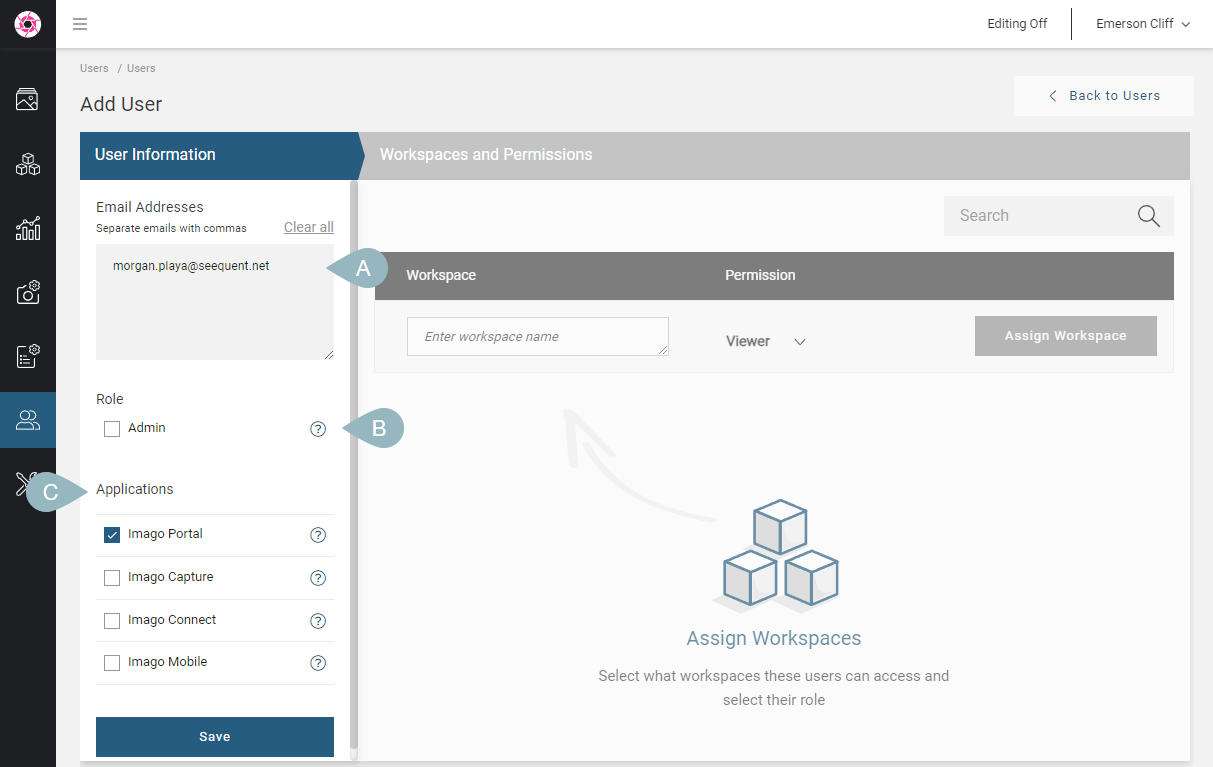
Next edit the list of Applications (C) the new users have access to:
- Imago Portal. This allows a user to view imagery in the portal.
- Imago Capture/Mobile. These allow a user to capture images in Imago Capture X/Imago Mobile.
- Imago Connect. This allows user to sign in to the Imago Connect application for setting up batch operations, including scripting interoperability and import/export.
When you click Save, the new users will be added to your subscription. They will appear in Users list as pending until they sign in.
Assigning Users to Workspaces
Once you have set up new users, you need to assign them to a workspace before they can work in Imago. You can do this in the Users list of the Imago Admin Portal by selecting a workspace, then setting their permissions for that workspace. The different workspace permissions are:
- Owner. An Owner can edit all datasets in a workspace, can set up new datasets for the workspace, can assign other users to the workspace and create, edit and delete content in the workspace.
- Editor. An Editor can create, edit and delete content in the workspace.
- Viewer. A Viewer can only view content in the workspace; they cannot create, delete or edit content.
You can also assign users to a workspace via the workspace itself. Which method you choose depends on your workflow:
- If you are adding multiple new users to your subscription, assign them to a workspace from the Users list as part of adding those users.
- If you are adding a new workspace, define that workspace then click on Users at the bottom of the new workspace’s window to select from the users in the subscription.
If you have an Enterprise account, you can also add users to workspaces using user groups. See the User Groups (Enterprise Licence Only) topic for more information.
Assigning Users to Profiles
If new users are going to be capturing images using Capture X or Capture Mobile, they must also be given permissions for capture profiles. See Assigning Users to Profiles in the Capture Profiles topic.
Editing a User’s Details
Click on a user in the Users list to edit their information. You can:
- Change their role
- Change which Imago applications they have access to
- Change the workspaces they have permissions for
A user’s name, sign in email and password are managed using their Seequent ID.
Deleting Users
To delete a user from your Imago subscription, select the Users list from the sidebar, then click on the user. In the Edit User window, click on the Delete button. You will be asked to confirm your choice.
Got a question? Visit the Seequent forums or Seequent support
© 2025 Seequent, The Bentley Subsurface Company