
The Project Tree
The series of folders in the project tree are used to organise objects such as data sets, maps and images into categories. These folders also provide tools that let you import information into the project and generate models. Right-click on each folder to view the actions you can perform using that folder.
This topic provides an introduction to working with the project tree. It is divided into:
- Importing Data
- Data Object Options
- Object Status Indicators
- Viewing Object Properties
- Restricted Objects
- Using Project Notes
- Project Tree Keyboard Shortcuts
Separate topics describes object processing, how to manage large numbers of data objects in Leapfrog Works and how to find more information about objects. These topics are:
Importing Data
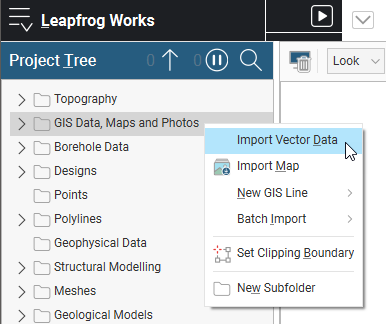
Leapfrog Works has tools for importing, creating and working with many different types of data, and these tools are available by right-clicking on the different folders in the project tree.
Leapfrog Works is unit-less and adopts the units used in the data you import. For example, if your imported data is in metres, the units displayed will be metres, and figures such as resolution, measured distances and slicer thickness will be in metres. It is important, therefore, to be consistent in the units used in the data you import. If you are importing data that uses different coordinate systems, you will need to pre-process the data so that it is using the same coordinate system.
You can record the coordinate system used in a project in order to communicate this to the wider team. See Recording a Coordinate System in the Managing Leapfrog Works Projects topic.
See the Data Types topic for information on the different types of data that can be imported into Leapfrog Works projects.
Data Object Options
You can right-click on data objects within the top-level folders to view more information on that object or carry out actions specific to that object. For example, right-clicking on a table of imported drilling data reveals a menu showing possible actions:
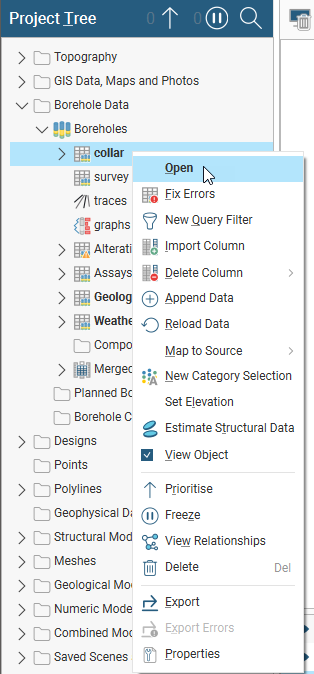
When a bold option appears in the right-click menu, as Open does in the menu above, that option can also be selected by double-clicking on the object.
You can select more than one object in the project tree by holding down the Shift key or the Ctrl key while clicking. This is useful for viewing or deleting multiple objects at once.
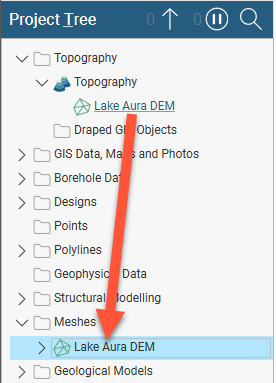
The way folders and objects are organised in the project tree lets you reveal or hide information about an object to focus on objects you are currently working with. This is also useful when you are exploring a project and want to determine how something was put together. The arrows next to objects in the project tree let you reveal or hide an object’s details to focus on objects you are currently working with. Here, the Topographies folder is expanded to show a Topography object that is made up of a mesh:
Also note that:
- The mesh itself is stored in the Meshes folder, but is hyperlinked to from wherever it is used in the project.
- Folders that have no arrow have no detail stored.
Expanding a data table (![]() ) shows the columns in that table contains, including category data columns (
) shows the columns in that table contains, including category data columns (![]() ), numeric data columns (
), numeric data columns (![]() ) and query filters (
) and query filters (![]() ), among others:
), among others:
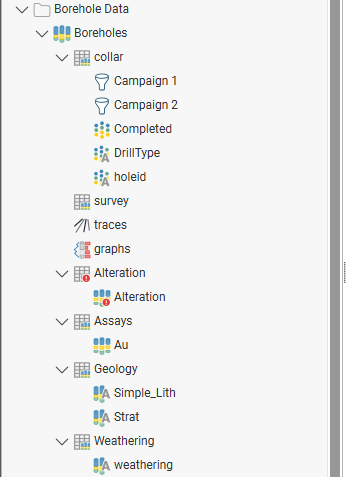
Some tables are marked as having errors (![]() ), which are discussed in Identifying and Correcting Data Errors in Leapfrog Works.
), which are discussed in Identifying and Correcting Data Errors in Leapfrog Works.
Expanding a geological model reveals information about how it was built. Here, a geological model has been expanded to show the basic objects that make up a model:

The five objects underneath the geological model “GM” represent the five basic parts of a geological model:
- The Boundary object defines the outer limits of the geological model.
- The Fault System object defines faults and their interactions in the geological model.
- The Lithologies object defines the lithologies in the model.
- The Surface Chronology object defines the structure of the model’s contact surfaces.
- The Output Volumes folder contains the generated units (outputs) that make up the geological model.
Here, boundary objects for a geological model have been expanded to show how they were created:
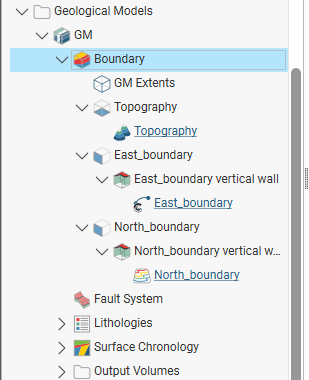
The Topography object is included as the model’s upper boundary. The “East_boundary” object was created using a polyline from the Polylines folder and the “North_boundary” object was created using a GIS data object in the GIS Data, Maps and Photos folder. Clicking on the hyperlinks will locate the object from which the extent was created.
Object Status Indicators
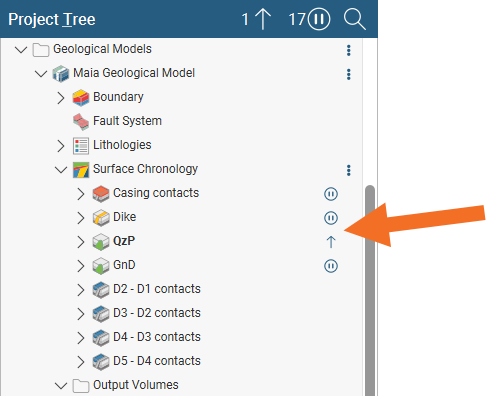
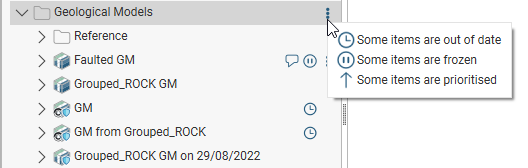
Some objects in a project may be marked with different status indicators. For example, here three surfaces are marked as frozen (![]() ) and one is marked as priority (
) and one is marked as priority (![]() ):
):
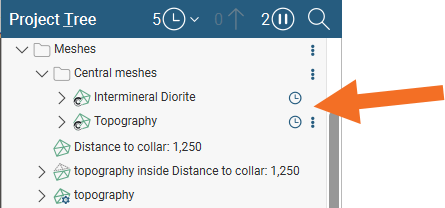
In cases where objects have been imported to the project via a service such as Seequent Central, an object will be marked as out-of-date (![]() ) when a newer version is available, which is the case for both the Intermineral Diorite and Topography meshes here:
) when a newer version is available, which is the case for both the Intermineral Diorite and Topography meshes here:
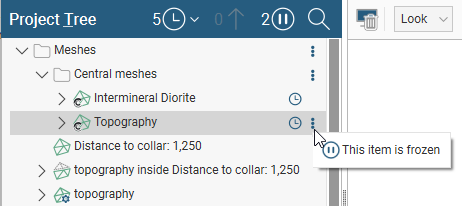
When an object has more than one status indicator, as is the case for the Topography mesh shown above, the highest priority status will be display, along with an overflow indicator (![]() ). Hold your mouse cursor over the indicator to view more information:
). Hold your mouse cursor over the indicator to view more information:
Project tree folders that contain objects that have status indicators will also have an overflow indicator. Again, hold the mouse cursor over the indicator to view more information:
Frozen objects and priority processing are described in the Object Processing topic. The Leapfrog Works integration with Seequent Central is described in the Seequent Central topic.
Viewing Object Properties
You can view the properties of most objects imported into or created in Leapfrog Works. To do this, right-click on the object in the project tree and select Properties.
The information available in the Properties window depends on the type of object. Tabs may include:
- A General tab that summarises information about the object. The amount of information in the General tab will vary according to the type of object. For example, for table objects, the General tab shows the table’s data structure.
- A Processing tab that shows the current status of the processing (queued to process, processing, finished).
- A History tab that records information about who created and modified an object and when.
- An Errors tab that displays errors that have occurred while processing the object. See the Object Processing topic.
Some types of interpolants include a Statistics tab in the Properties window.
- For RBF interpolants, see RBF Interpolant Statistics.
- For multi-domained RBF interpolants, see Sub-Interpolant Statistics.
For many data tables, you can view a table of statistics for multiple attributes. This is not part of the Properties window, but is instead opened by righting-click on a table and selecting Statistics. See the Statistics topic for more information.
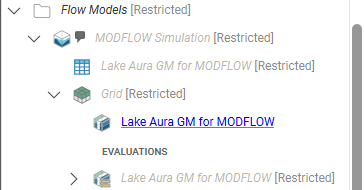
Restricted Objects
The project tree may also contain restricted objects. Restricted objects were created using features not available in Leapfrog Works. Restricted objects cannot be viewed, used as the basis for another object or exported. You can, however, delete a restricted object.
Other objects may be restricted because they are dependent on a restricted object. When a restricted object is dependent on an unrestricted object that reprocesses, the changes to the restricted object will not be processed.
If when you open a project you get a message saying that the project contains restricted objects, this is because one or more objects were creating using Leapfrog Works features available in an extension you did not sign in with. Click Show restricted objects to view the affected objects.
If an object you expect to be able to modify is marked as Restricted, check your permissions to ensure that you selected the required extension when you signed in. Do this by clicking on the user ID menu, then on Manage Permissions.
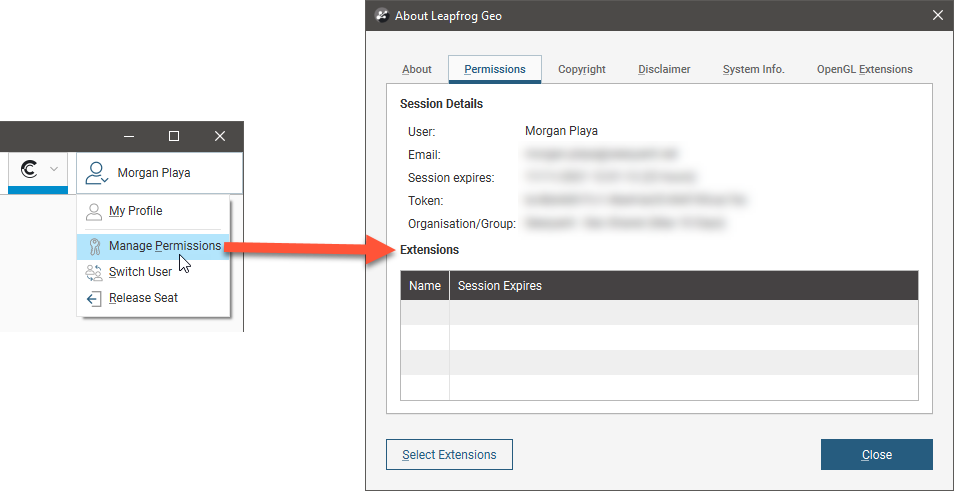
If the extension you expect to see is not listed, click on Select Extensions.
Using Project Notes
You can add information about the project as a whole using the Notes object (![]() ), which is the last object in the project tree. Double-click on the Notes object to open it and add information.
), which is the last object in the project tree. Double-click on the Notes object to open it and add information.
You can also record comments on individual objects in the project. See Commenting on Objects in the Managing Data Objects in a Project topic for more information.
Project Tree Keyboard Shortcuts
Keyboard shortcuts for navigating in the project tree are as follows:
| Key(s) | Action |
|---|---|
| Up and down arrows | Navigate up and down the tree |
| Right arrow | Expand folder/object or go down one level |
| Left arrow | Close folder/object or go up one level |
| Ctrl+shift+left arrow | Close all folders/objects |
| Shift+right arrow | Expand the selected folder/object and any objects in it |
| Shift+left arrow | Close the selected folder/object and any objects in it |
| Ctrl+A and Ctrl+/ | Selects all folders and objects |
| Ctrl+F | Search for objects |
| Enter | The equivalent of double-clicking on an object |
| Ctrl-X | Cut an object or subfolder. Use with Ctrl-V to move objects and subfolders. |
| Ctrl-V | Paste an object or subfolder |
Some actions are not available until data has been imported into the project.