
Collaborating with the Team
This guide discusses using comments and scenes for collaborating with others in your team. It is divided into:
- An Introduction to Comments and Scenes
- Viewing a Project’s Scenes
- Viewing a Scene in 3D
- Commenting and Replying
- Using Annotations
- Using @ Mentions
- Making Scenes
- Sharing Scenes
An Introduction to Comments and Scenes
Comments and scenes are great ways of collaborating with your team. With comments and scenes, you’re not limited to just telling them about what you’re working on, but you can also show them and invite them to take part in the conversation.

At first glance, comments and scenes appear to be similar because they both have thumbnails that are linked to specific views of a project. However, comments and scenes are used in different ways.
- Scenes are for coming back to specific views of a project in the Central Portal. Adding a scene is like making a bookmark to a part of the project history. You can make scenes for yourself to help you get back to a specific view of the data you want to work with. You can also make scenes to share with others; for example, you might set up a series of scenes to help those new to the project to become familiar with it.
- Comments are for an ongoing conversation between team members actively working on the project data. Adding a comment starts a conversation about a specific aspect of the project. Comments and replies to them are threaded to make following the conversation easier, and you can make @ mentions in comments to bring others into the conversation. You can also make measurements in the scene and add annotations that will be saved as part of a comment.
Another key difference between comments and scenes is that comments are visible in Leapfrog, whereas scenes are not. Here you can see that Emerson has asked Brooklyn to look at something specific in the model:
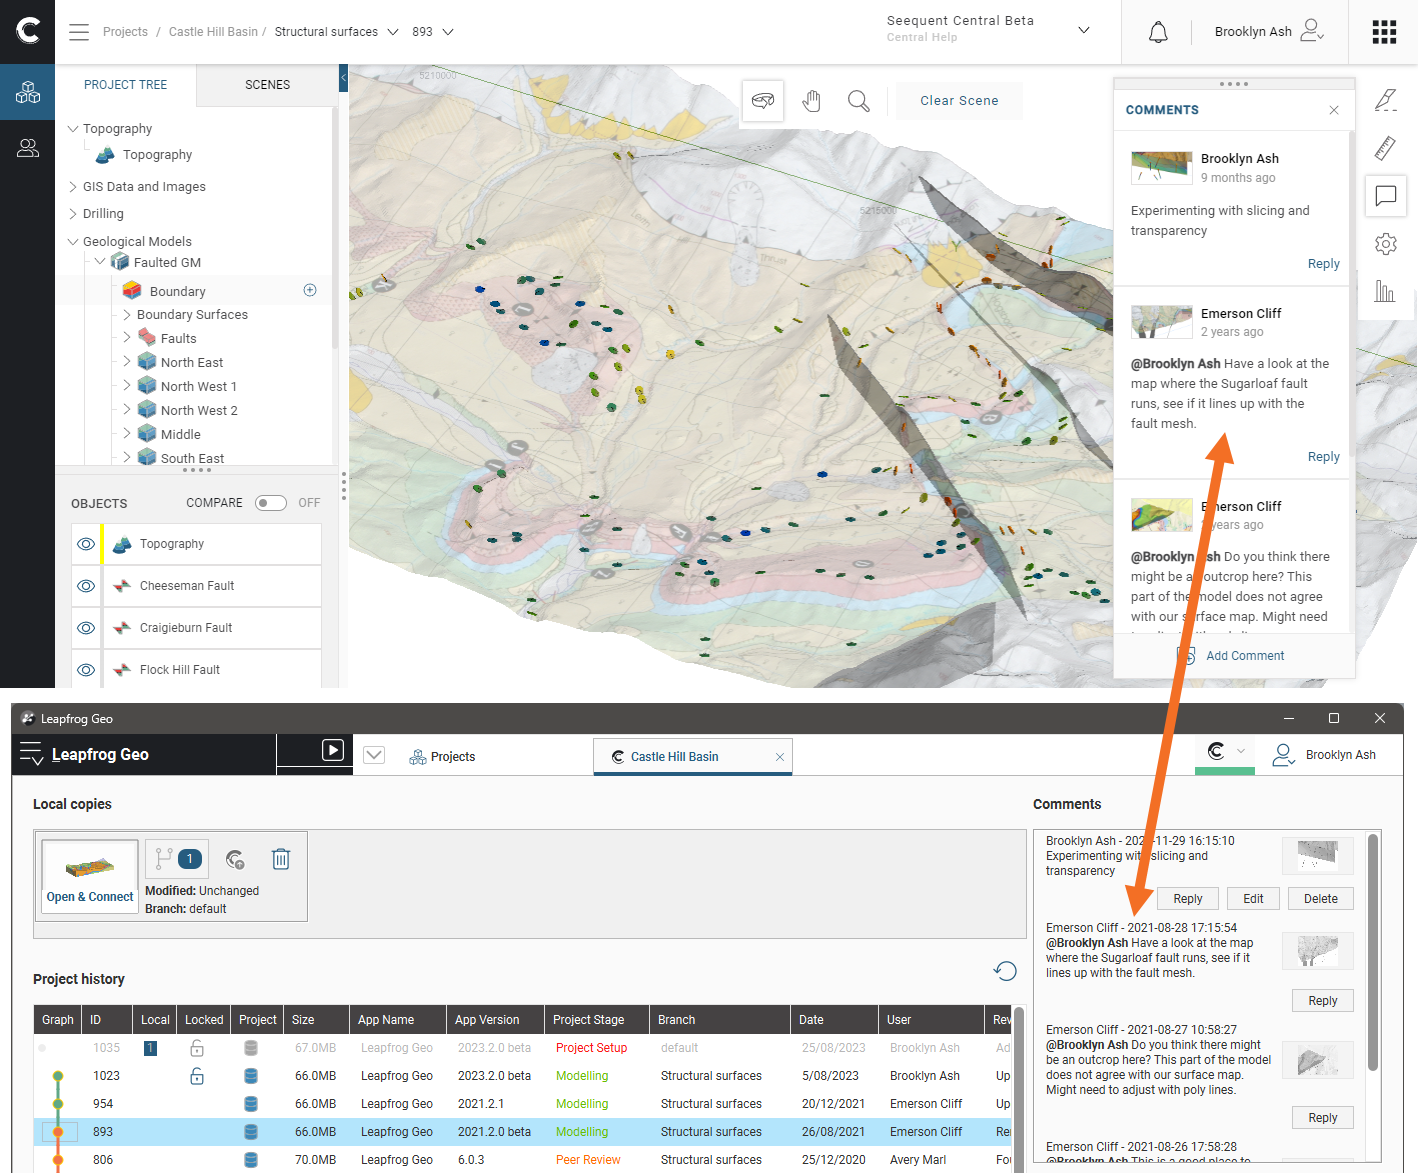
Brooklyn can reply from inside of Leapfrog, and Emerson can respond from the Central Portal.

Viewing a Project’s Scenes
A project’s pinned scenes are shown in the project’s Overview tab. Clicking on a pinned scene will open it in 3D in the latest revision.
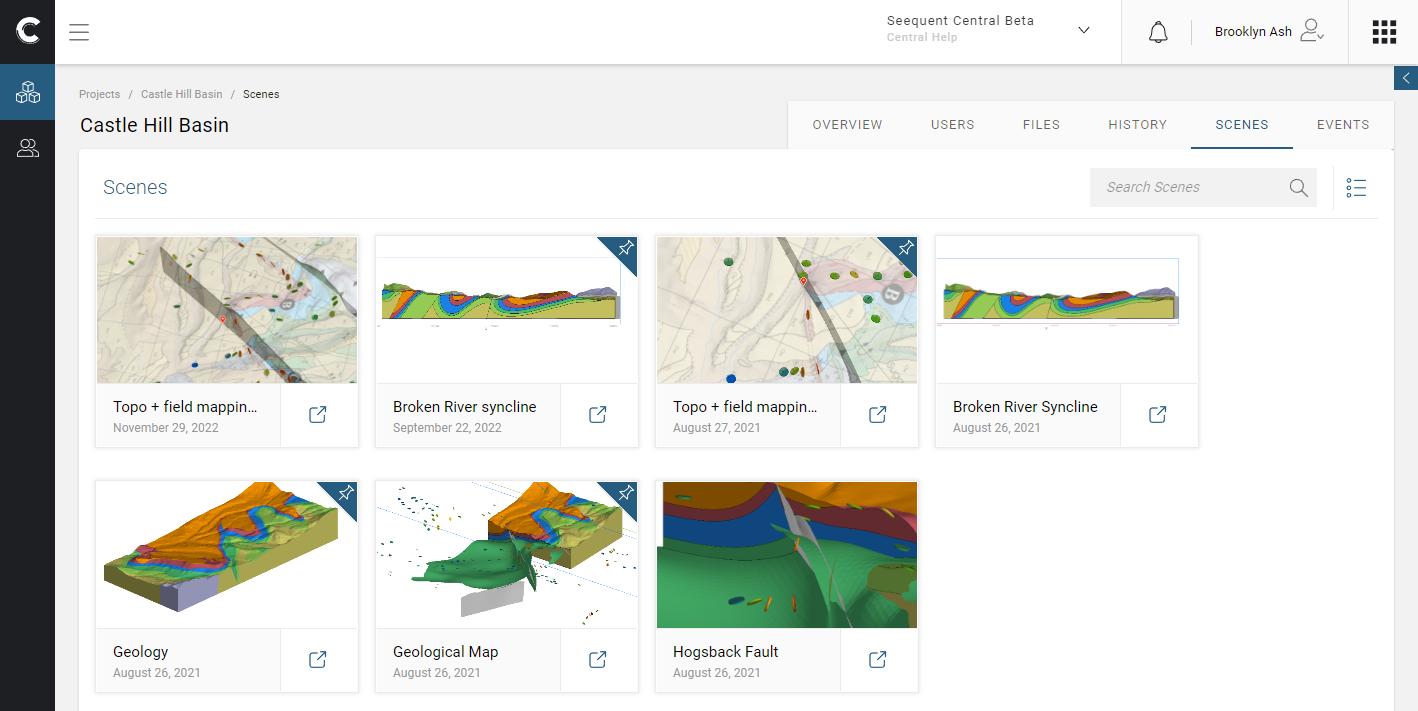
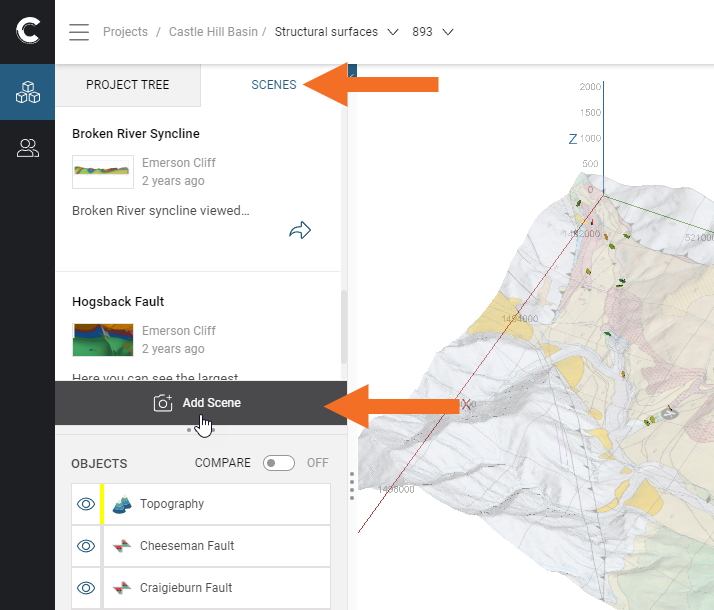
There may be other scenes in the project. To see all of a project’s scenes, pinned and unpinned, click on the Scenes tab or on the All Scenes link:

This shows all the scenes that have been made for the project:
Click on a scene to open the Scene Properties panel:
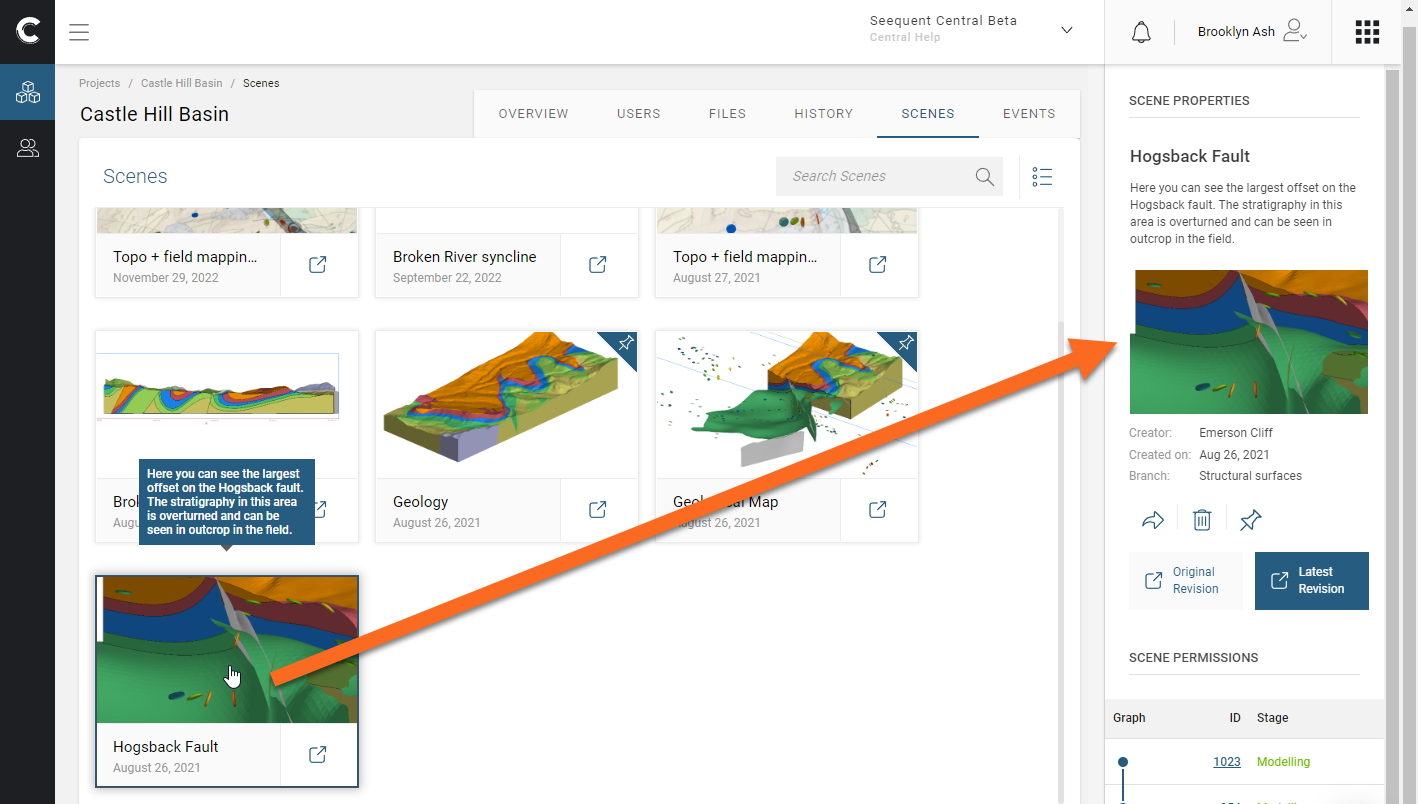
In this panel you can:
- Open the scene to view it in 3D in either the revision in which it was made or in the project’s latest revision. Anyone who has access to the project can open the scene in 3D.
- Edit the scene’s description. Simply click in the text to start editing. You must be either an Owner or an Editor of the project.
- Pin or unpin the scene. You must be either an Owner or an Editor of the project.
- Delete the scene. You must be either an Owner or an Editor of the project.
- Manage how the scene is shared with others. You must be either an Owner or an Editor of the project.
Viewing a Scene in 3D
See Visualising Data in the Central Portal for information about the Central Portal’s tools for viewing data in 3D.
Depending on how you open a scene, the data in the scene is displayed in the latest revision or in the revision it was created in. You can move between revisions using the breadcrumbs above the Project Tree/Scenes panel:
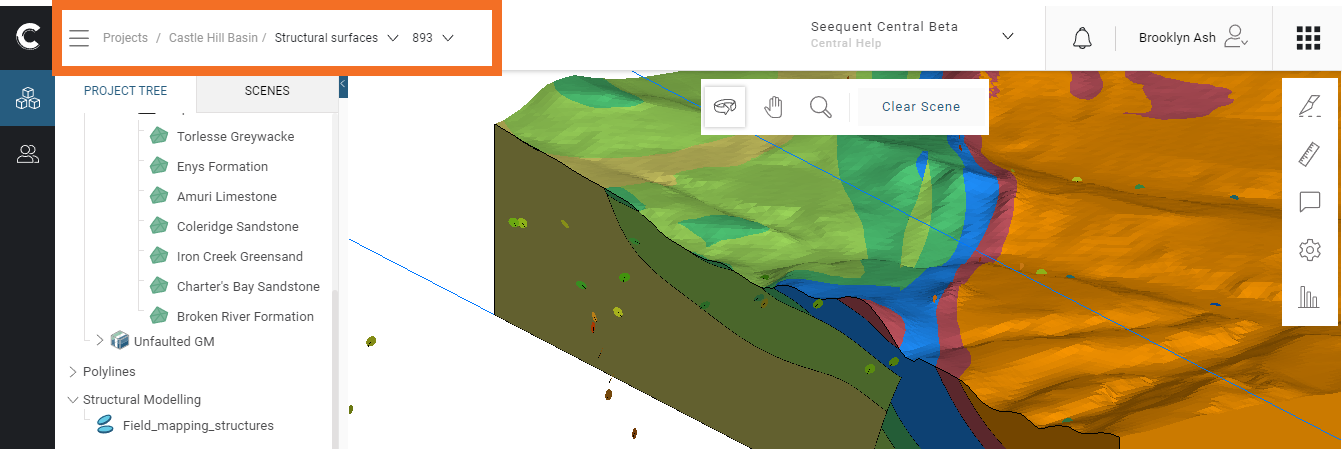
See Navigating Between Branches in the 3D View in the Branching in Central Projects guide for information on navigating between branches and revisions.
Commenting and Replying
In the Central Portal, you can comment on projects by opening a revision in the 3D view.
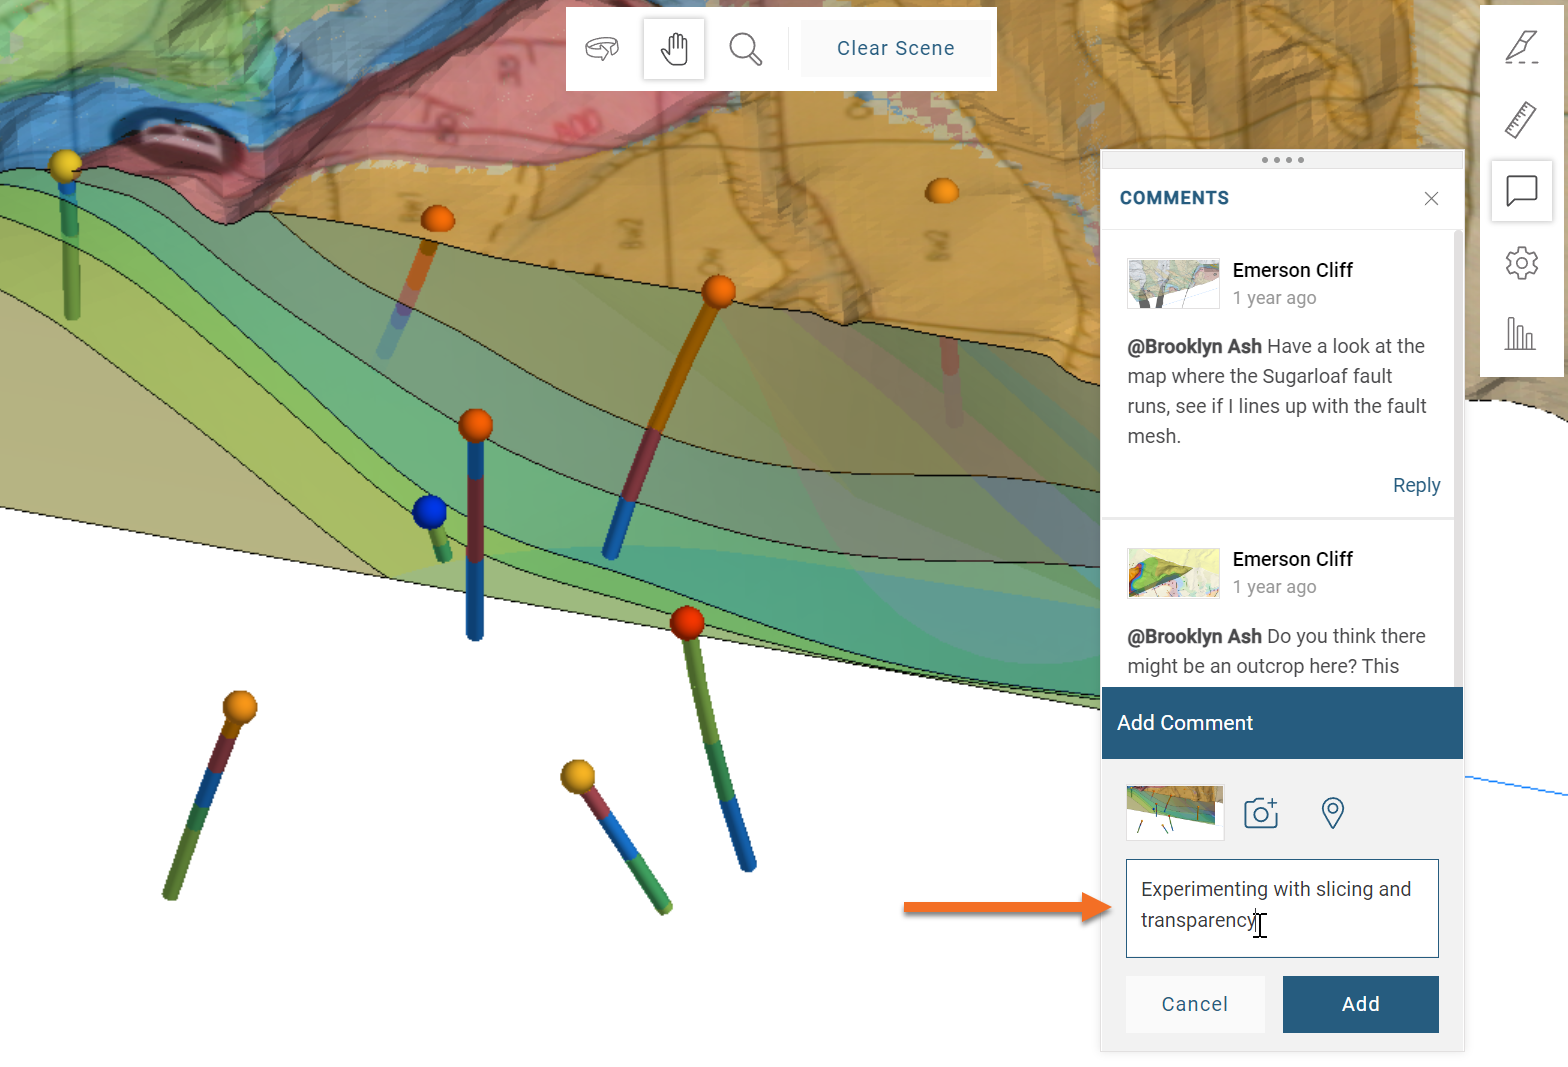
To make a comment, click the Comments button (![]() ) to open the Comments panel. Then click the Add Comment button.
) to open the Comments panel. Then click the Add Comment button.

Enter your comment and when you are finished, click Add.
You can also:
- Add a geotag to the comment. Click the geotag button (
 ), then click in the scene to set the geotag’s location.
 - Enter a URL to create a clickable hyperlink. Hyperlinks will open in a separate tab.
- Make a measurement in the scene that will be saved along with the comment.
- Add an annotation to the scene that will be saved along with the comment.
If you make adjustments to the scene, you can refresh it by clicking the snapshot button (![]() ).
).
You can edit any comments and replies you have made by clicking on them, then clicking the overflow menu (![]() ).
).

Using Annotations
When adding comments to a project, you can make annotations in the scene and save them as part of a comment. An annotation is made up of a line and text, which you can customise to suit what you want to highlight.
Annotations are only saved once they are included in a comment.
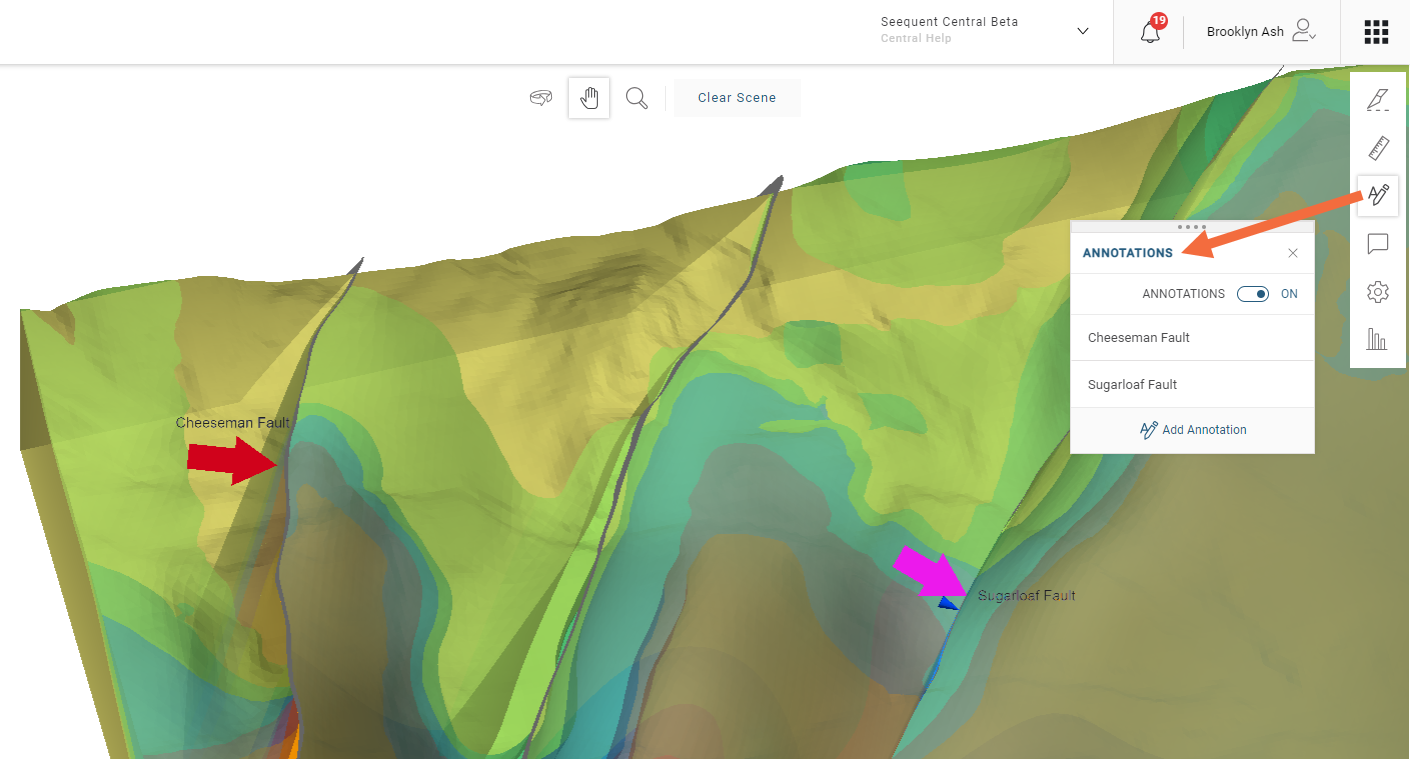
To make an annotation, click the Annotations button (![]() ) to open the Annotations panel. Then click the Add Annotation button.
) to open the Annotations panel. Then click the Add Annotation button.
A set of controls will appear so that you can drawn the annotation in the scene and customise its appearance. The Drawn Annotation button will be automatically selected when you first click Add so you can then click on an object and draw a line:

Next, customise the line’s appearance and add text, if you wish. You can redraw the line by clicking on the Drawn Annotation and redrawing in the scene.
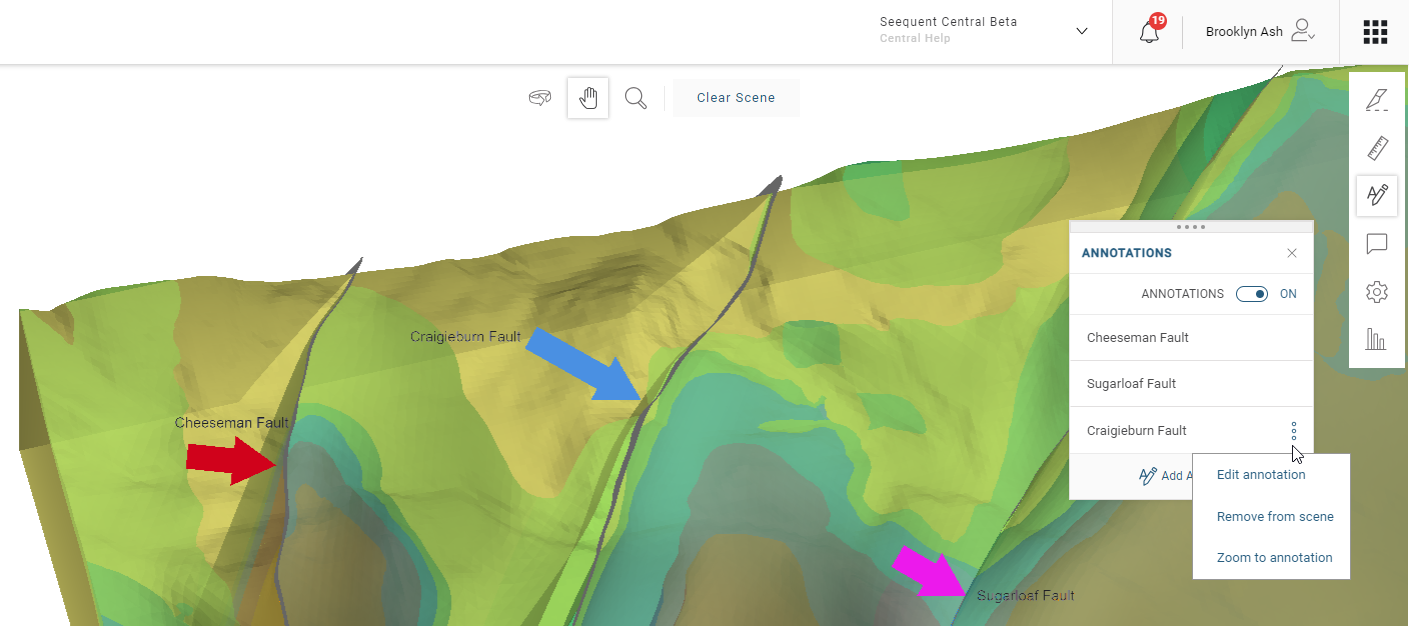
When you have finished, click the Add button. The annotation will be added to the Annotations panel. Click on the overflow menu for an annotation to edit it, zoom into it, or remove it from the scene.
When you add a comment and save it, all annotations visible in the scene will be saved along with it.
Scenes cannot be displayed while annotations are displayed. If you wish to work with scenes, make sure you have saved the annotations you wish to keep by including them in a comment.
Using @ Mentions
When you add comments to a project or reply to comments, you can use @mentions to bring others into the conversation. They will receive notifications of the conversation.
Simply type @, then start typing the name of the person you wish to mention. Central will suggest matches from those who also have access to the project you’re working in. Here, typing @m lists three possibilities:
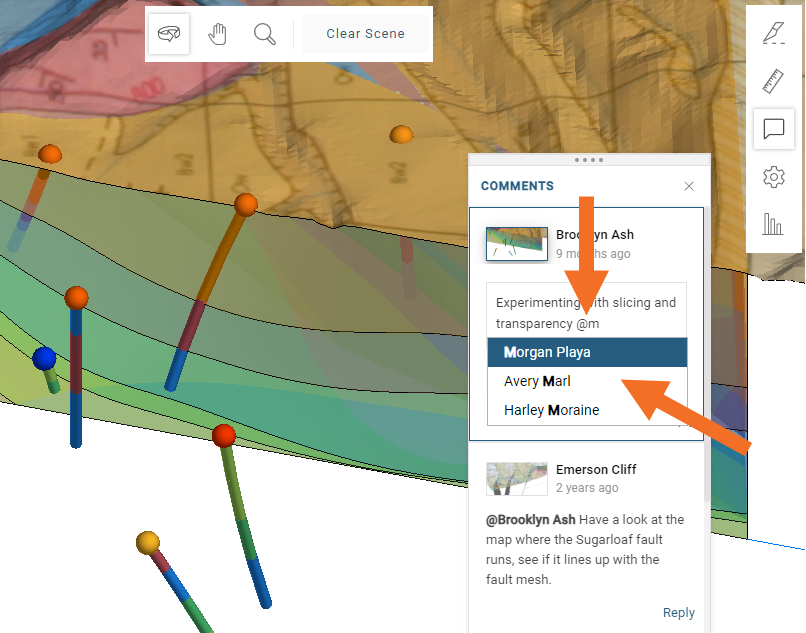
You can use the arrow keys to scroll up and down the list of suggested users, then press the Enter key to select.
Mentioned users will receive a notification with a link they can click on to view the comment and the scene.
To learn more about notifications, see the Receiving and Configuring Central Notifications guide.
Making Scenes
You can create a new scene in a project if you are an Owner or Editor of the project. There is a difference, however, in how scenes can be shared that relates to whether scenes are Public or Private:
- Private scenes can only be viewed by other collaborators on the project, e.g. those who are Owners, Editors or Viewers of the project.
- Public scenes can be shared by sending a link to the scene; people do not need to have access to the Central project itself to view the scene.
By default, scenes are created set to Private. Only a project’s Owners can change a scene’s Private/Public setting, but any Viewer, Editor or Owner of a project can share both types of scenes.
To create a scene, first set up the scene, adding and styling objects, and zooming to the view you wish to save. Click on the Scenes panel, then on the Add Scene button:
Enter a name and description for the scene and add a geotag, if you wish.
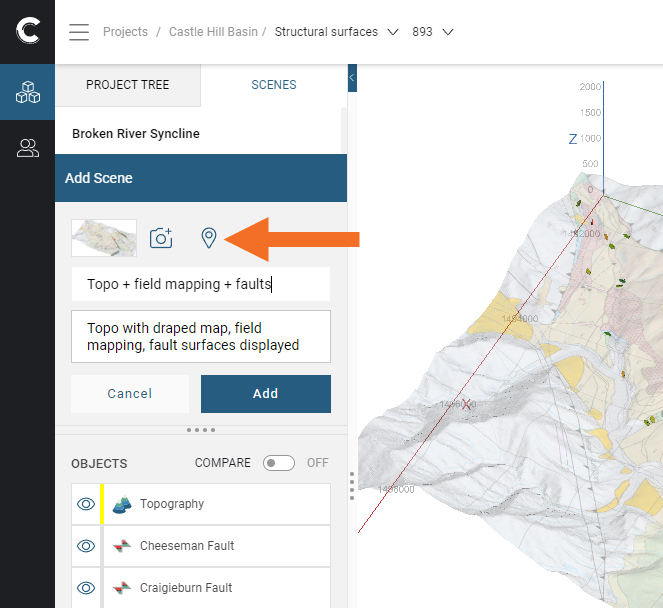
You can also enter a URL as part of the description to create a clickable hyperlink. Hyperlinks will open in a separate tab.
If you make adjustments to the scene, you can refresh it by clicking the snapshot button (![]() ):
):

Click Add to save the scene, which will be added to the Scenes panel.
To edit the scene, move your cursor over it and click the overflow menu (![]() ). Then click Edit:
). Then click Edit:

There are also options for pinning/unpinning the scene and deleting it.
Scenes can be Private or Public, which determines who can view them:
- Private scenes can only be viewed by other collaborators on the project, e.g. those who are Owners, Editors or Viewers of the project.
- Public scenes can be shared by sending a link to the scene; people do not need to have access to the Central project itself to view the scene.
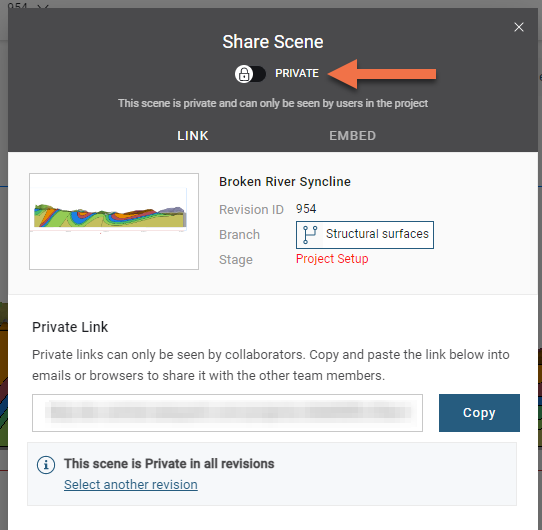
If you are an Owner of the project, you can change the Private/Public setting using the switch at the top of the Share Scene window:
If the Private/Public switch is disabled, your Admin has disabled the ability to make scenes public. Only those who have access to the project will be able to view scenes.
Sharing Scenes
Sharing scenes with others on your team is an effective way of communicating your work. You can share scenes privately, which might be useful within your project team when discussing decisions and insights, or publicly, which might be more suitable for sharing with stakeholders outside of your immediate team.
- Private scenes can only be viewed by other collaborators on the project, e.g. those who are Owners, Editors or Viewers of the project.
- Public scenes can be shared by sending a link to the scene; people do not need to have access to the Central project itself to view the scene.
By default, scenes are created set to Private. Only a project’s Owners can change a scene’s Private/Public setting, but any Viewer, Editor or Owner of a project can share both types of scenes.
The only way to share a private scene is via a link to the scene in the Central Portal. Anyone clicking on the link will need to have to have access to that project in order to view the scene.
There are three methods for sharing public scenes:
- Using the Public Link, which does not require that those viewing the scene have access to the Central Portal
- Using the Private Link, which can only be used by collaborators
- Embedding the scene into your website
Project Viewers, Editors and Owners can share public scenes using each method.
To share a scene, click on its share button (![]() ) in the Scenes panel. In the window that appears, click the Copy button to copy the URL, which you can paste into your document, email or other communication. In this example, the scene being shared is a private scene, so only a private link is available:
) in the Scenes panel. In the window that appears, click the Copy button to copy the URL, which you can paste into your document, email or other communication. In this example, the scene being shared is a private scene, so only a private link is available:
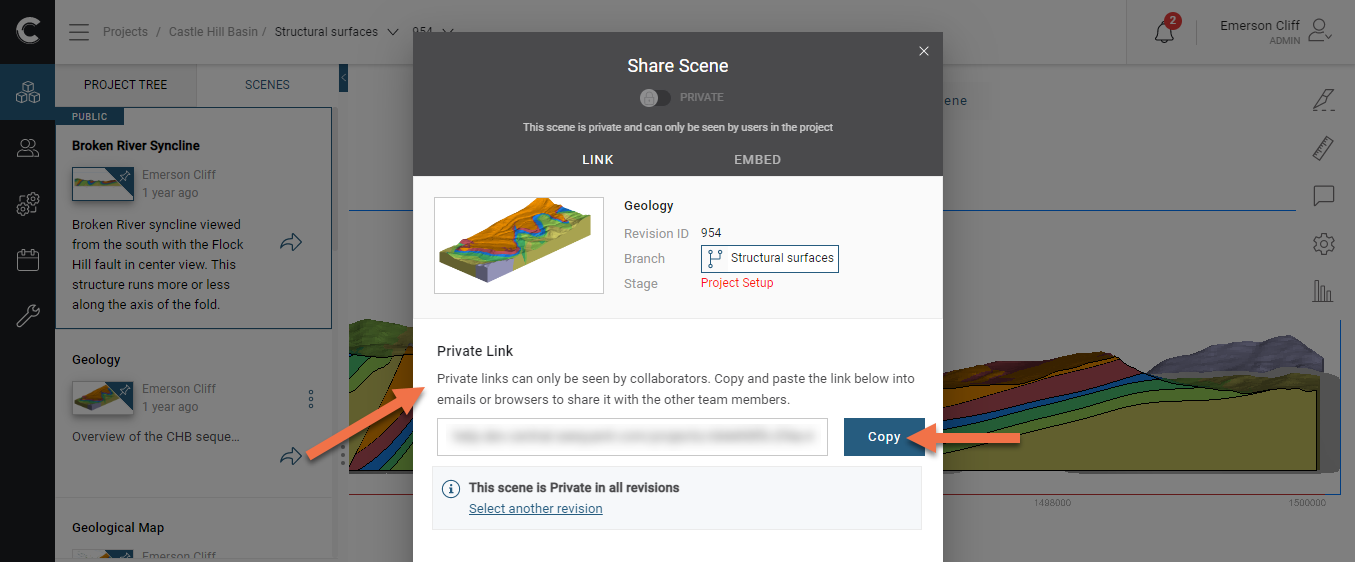
In this example, the scene being shared is a public scene and so there is a Public Link and a Private Link:

There is also the option for embedding the scene into your website. To do this, click on the Embed option in the Share Scene window, then click the Copy button to copy the HTML code to the clipboard:

You can then paste the code into your website content management system's HTML page editor.