
Tables
Tables are a fundamental part of MX Deposit. Tables are where the majority of data collection takes place and help to provide a logical separation of your data. Tables can be made up of columns that can be text, numbers, checkboxes, files and, if you have a Seequent Imago account, Imago core imagery.
This topic describes how to define and edit tables in MX Deposit. It is divided into:
- Viewing the Tables Library
- MX Tables, Special Tables and Child Tables
- Creating a Table
- Applying Table Rules
- Configuring Columns
- Editing Existing Columns
- Deleting a Table
Viewing the Tables Library
To view the tables in your MX Deposit account, open the Admin panel and click on Tables under Logging. There are different table types: MX tables, indicated by the orange flag (A); special tables, indicated by the orange labels (B); and child tables, indicated by being indented beneath their parent tables (C):
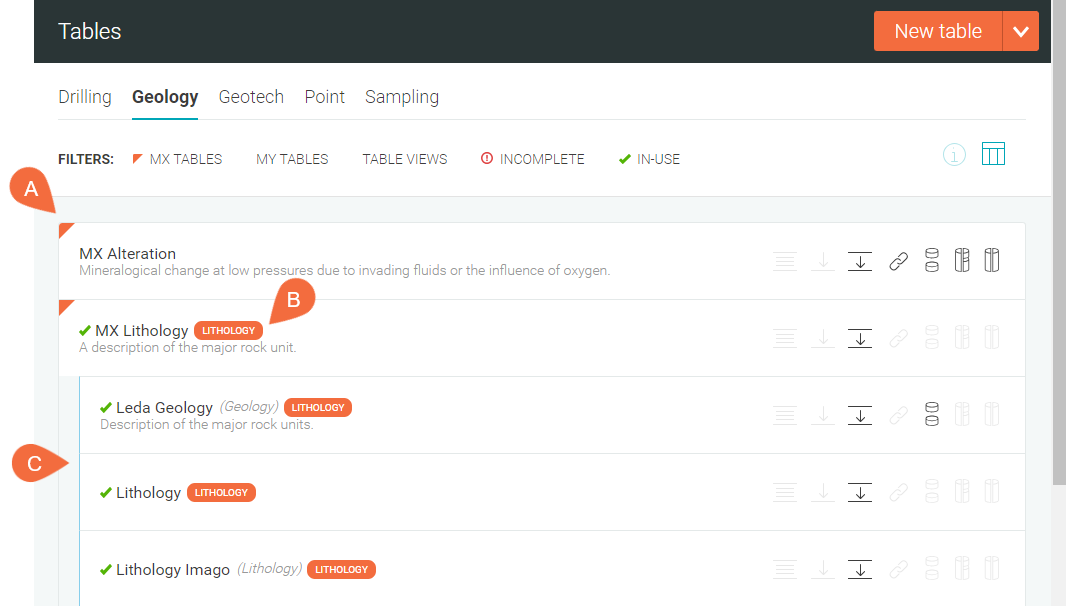
Each of these table types is discussed in MX Tables, Special Tables and Child Tables below.
Another table type is a table view. A table view combines two or more tables and allows you to choose the columns you will display. This is described in a separate topic, Table Views.
You can organize your tables into categories. To create a new category, click on the drop down arrow next to New table and select New category. In the window that appears, give the category a name, then click Save.
MX Tables, Special Tables and Child Tables
An important consideration in managing your MX Deposit library is to understand the different types of tables.
MX tables come with your MX Deposit account and are a useful starting point for setting up the tables in your account. Think of them as master tables and edit them to represent your organisation as a whole rather than customising them for specific activities. The best way to create tables for specific activities is to create child tables off of the MX tables. A child table inherits all the configuration from its parent table. At the point of creation, the child table is split off from the parent, but you can still see in the Tables collection what table it is descended from.
Special tables are survey, lithology or samples tables. These are indicated in the Tables collection by orange labels. Each of these special table types have validation rules that other tables do not. You cannot create new special tables, but you can create child tables from the special tables.
Child tables are created based on existing tables, often from special tables. Creating child tables is an effective way of preserving the original table, which you may which to use as the basis for future child tables used in other activities and projects.
Creating a Table
There are two ways to create a new table:
- Create the table as a child table. Do this by right-clicking on a table and selecting Create child table.
- Create a new table. Do this by clicking on the New table button.
In both cases, the table builder will open.
If you decide at this step that in fact you wish to create a child table, you can do so in the table builder’s first step.
For the first step, give your table a name and a label. Note that:
- The Table name must be unique to avoid conflicts with other tables.
- The Table label is what is displayed for loggers. You can re-use the same table label across multiple tables.
Requiring that the Table name field be unique helps in keeping your MX Deposit library organised over time; having the Table label field helps in keeping naming consistent for loggers.
Choose what Category you want the table to belong to and provide a Table description to help you to know at a quick glance what this table is for.
Applying Table Rules
In the next step, the rules applied determine what kind of table this is.
- Data. This is a blank slate with no rules applied to it.
- Depth. This is a single “depth at” table such as a downhole survey or structural type data table.
- Interval. This is a “from to” table.
When you first move on to this step, no options are pre-selected. Click on an option to select it; it will then be outlined in blue.
Once you have set the table type, enable validation rules, if you wish. The validation rules available depend on your table type choice. For example, here selecting a Depth table makes the Duplicates validation option selectable:
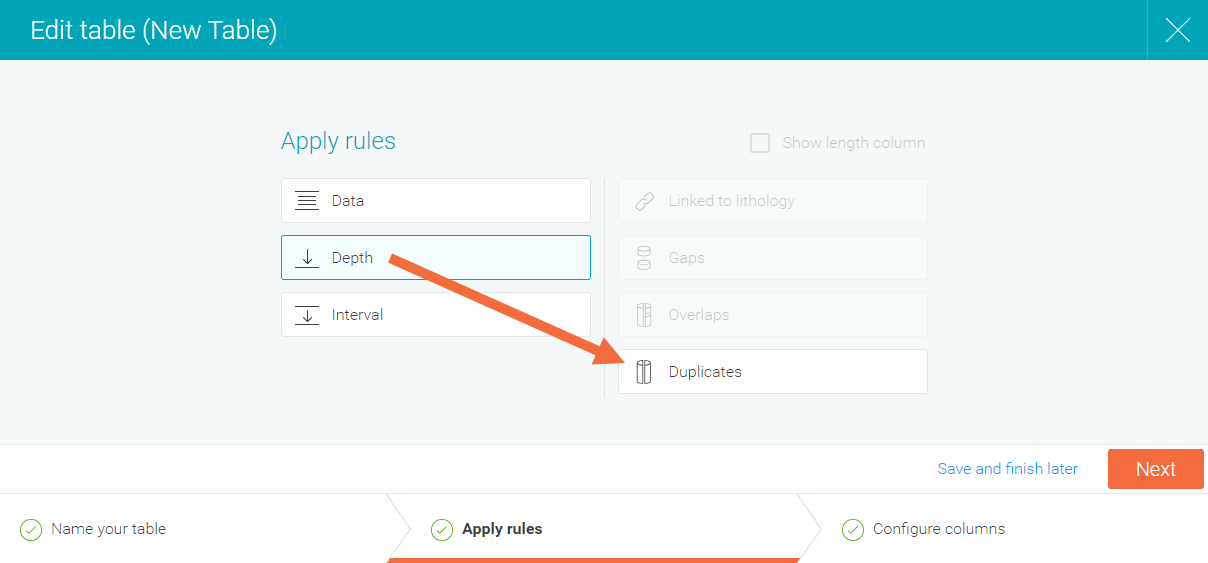
Click a validation rule to enable it; it will then be highlighted in blue. These rules are:
- Linked to lithology. When enabled, loggers will be warned if the intervals entered do not match the lithology intervals.
- Gaps. When disabled, loggers will be warned if they enter intervals that result in gaps. When enabled, gaps are allowed.
- Overlaps. When disabled, loggers will be warned if they enter intervals that overlap with other intervals. When enabled, overlaps are allowed.
- Duplicates. When disabled, loggers will be warned if they enter a duplicate interval. When enabled, duplicate intervals are allowed.
Enabling Show length column for an interval table will add a length column in the next configuration step.
Configuring Columns
The type of table you choose in the previous step will determine what sort of default columns your table will have. To add more columns to your table, click the Add new column button. A window will appear prompting you to select the data type for the column.
The column options are:
- Text. The user will enter text. You can specify the Character length to allow for shorter or longer descriptions.
- Numeric. The user will enter a numeric value. You can specify a Min value and a Max value to constrain the numeric value that can be entered. Precision is for specifying how many decimals places you want to have displayed; the full value will be saved as the Precision setting only affects what is displayed. This column type also has the calculated field option.
- CheckBox. The user will tick or not tick a box. Make sure the column name describes what ticked and unticked means.
- List. When you select this type of column, you will be prompted to select from the lists in your MX Deposit account. Simply choose one and it will become a picklist within the table.
- Date. This brings up the option to insert a date.
- Imago File. This option will appear when you have an Imago integration enabled. See Adding Imago Columns to Tables for more information.
Text and numeric columns can be calculated columns. See the Calculated Columns topic.
Once you have added all your columns, click Publish or Save and finish later.
Editing Existing Columns
To edit a column in a table, open the table from the Tables library.
Deleting a Table
You can delete a table from the library only if it is not used elsewhere in MX Deposit. If this is the case, a Delete option will be available in the Actions menu in the Properties panel or from the overflow menu. You will be asked to confirm your choice.