An Overview of Leapfrog Geo
This topic provides an overview of the different parts of the Leapfrog Geo main window. For more detailed information on using the controls in the different parts of the main window, see the following topics, which describe different aspects of using Leapfrog Geo:
- The Project Tree
- The 3D Scene
- Visualising Data
- Working With Data Tables
- Correcting Data Errors in Leapfrog Geo
- Evaluations
- Query Filters
- Drawing in the Scene
- Organising Your Workspace
For more information on basic concepts that are important to getting the most out of Leapfrog Geo, see the Concepts section.
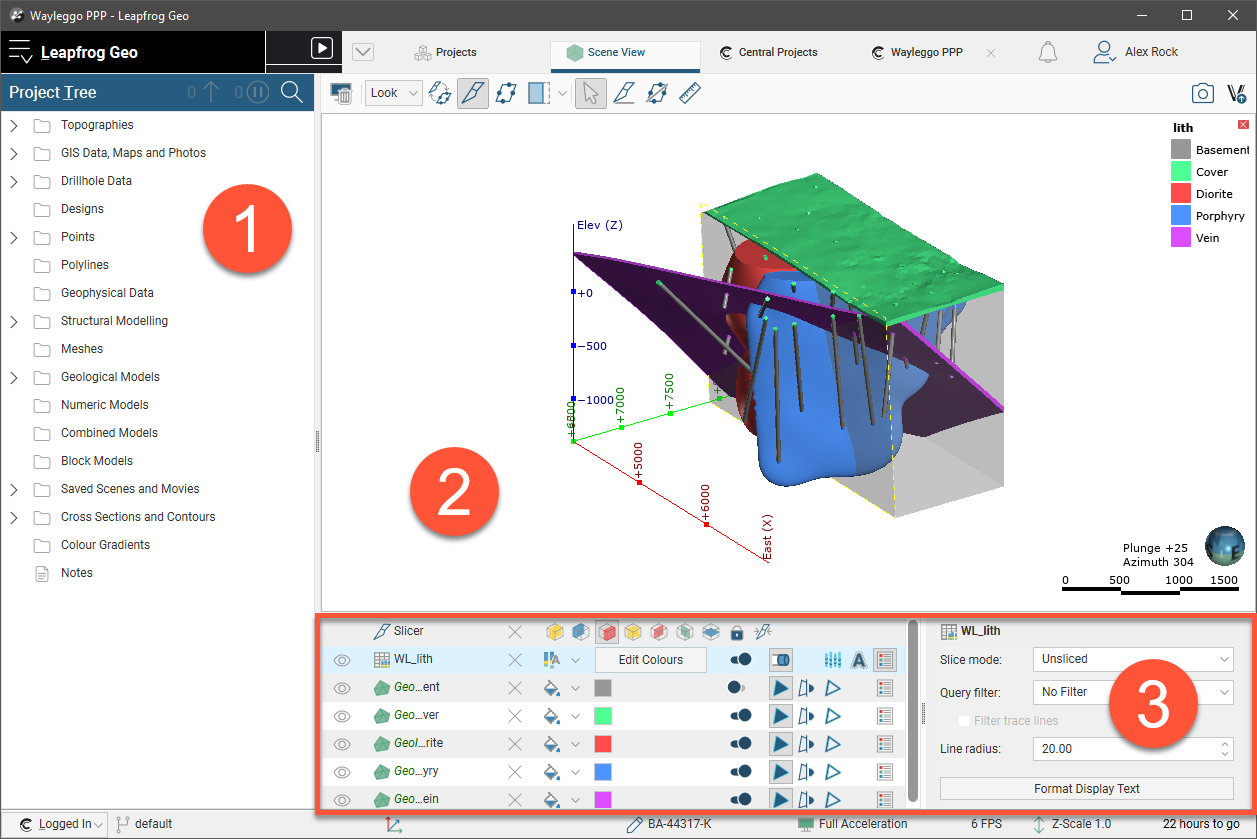
The Leapfrog Geo main window is divided into three main parts:

The Project Tree  contains all the data in the project and tools for working with that data. When you want to change how this data is used in the project, work with the objects in the project tree. See The Project Tree. The Scene View tab
  displays a 3D representation of selected objects from the project tree. Changing how you view objects in the scene window does not change those objects in the project tree. See The 3D Scene. Tools for changing the appearance of data in the scene window are available in the shape list and the shape properties panel
  . Changing the appearance of these objects does not change those objects in the project tree.
You can add objects to the scene window by dragging them from the project tree. You can temporarily hide them in the scene or remove them altogether using the controls in the shape list.
Leapfrog Geo is unit-less and adopts the units used in the data you import. For example, if your imported data is in metres, the units displayed will be metres, and figures such as resolution, measured distances and slicer thickness will be in metres. It is important, therefore, to be consistent in the units used in the data you import. If you are importing data that uses different coordinate systems, you will need to pre-process the data so that it is using the same coordinate system.
When you open a Leapfrog Geo project, the project is displayed in the state it was in when it was closed.
Keyboard Shortcuts in the Main Window
Use the Tab and Shift+Tab keys to move between the different parts of the main window in the following order:
- Project tree
- Scene toolbar
- Scene window
- Shape list
- Shape properties panel
| Key(s) | Action |
|---|---|
| F8 | Maximise scene, minimise project tree and shape list. Press F8 again to restore. |
| Ctrl+1 | Activate the Select tool ( |
| Ctrl+2 | Activate the Draw slicer line tool ( |
| Ctrl+3 | Activate the Draw plane line tool ( |
| Ctrl+4 | Activate the Ruler tool ( |
| Ctrl+\ | Split the scene view |
| F10 or Alt L | Open the Leapfrog Geo menu |
| F11 | Open the Seequent ID menu |
| F1 | Open Leapfrog Geo help |
| Ctrl+Q | Quit Leapfrog Geo |
Got a question? Visit the Seequent forums or Seequent support