Brief Guide to the Imago Portal

This guide is an introduction to viewing core and chip tray images in the Imago Portal using the Imago demo site. It is intended as a brief overview for those who are new to Imago. It is divided into:

Opening the Imago Demo Site

Click here to view the Imago demo site.

The demo site has been set up to automatically sign you in and display a drillhole (AADD0141) from a dataset called Drilling Core that is part of the Firefly Resource Development workspace:

If the demo dataset opens and the light table is empty, tick the box for the AADD0141 collection in the Drilling Core list:

The Imago Portal works in two modes, Editing Off and Editing On:

Editing Off is for viewing images without making changes to the images or the collections and datasets they belong to. With Editing On, one useful tool is the ability to annotate images.

Editing On requires a higher level of permissions and might not be available to you in your own Imago subscription. The demo dataset is configured so that you can experiment later with the options available with Editing On.

The different parts of the Imago Portal imagery window are:

The Active Imagery panel

This panel shows the collections that are currently selected in the workspace browser, along with the image types, features and attributes available for those collections. In this case, only one collection is displayed, the AADD0141 drillhole.

  The light table

This is where the imagery selected in the Active Imagery panel is displayed.

The Workspace browser

Data in Imago is organised into workspaces, which contain datasets. Datasets, in turn, contain collections of imagery. In this case, Drilling Core imagery is displayed.

  Viewing options

Imagery can be viewed on the light table (), in a gallery () or on a map ().

Together, the Active Imagery panel and the Workspace browser are referred to as the Datasets Browser. The datasets browser can be hidden, which is useful if you are working on a small screen. To do this, click the Datasets Browser button ():

Click the button again to restore the datasets browser.

The other buttons beneath the Datasets Browser button are not discussed in this guide.

How Images are Organised in Imago

In an Imago subscription, workspaces contain datasets that store collections of images. Collections are organised into different imagery types that contain one or more image types.

If you are an Imago Admin setting up your subscription, see The Imago Data Hierarchy for a more detailed discussion of how data is organised in Imago.

In the demo dataset, the workspace browser (A) shows the contents of the Firefly Resource Development workspace (B). This workspace contains five datasets (C), called Drilling Chips, Drilling Core, Drilling Geophysics, Drilling Spectral and XRF and Reference Samples. The items listed under each dataset in the workspace browser are the imagery types the dataset has been set up to support. For example, the Reference Samples dataset (D) supports imagery types called Hand Samples, Polished and Reference.

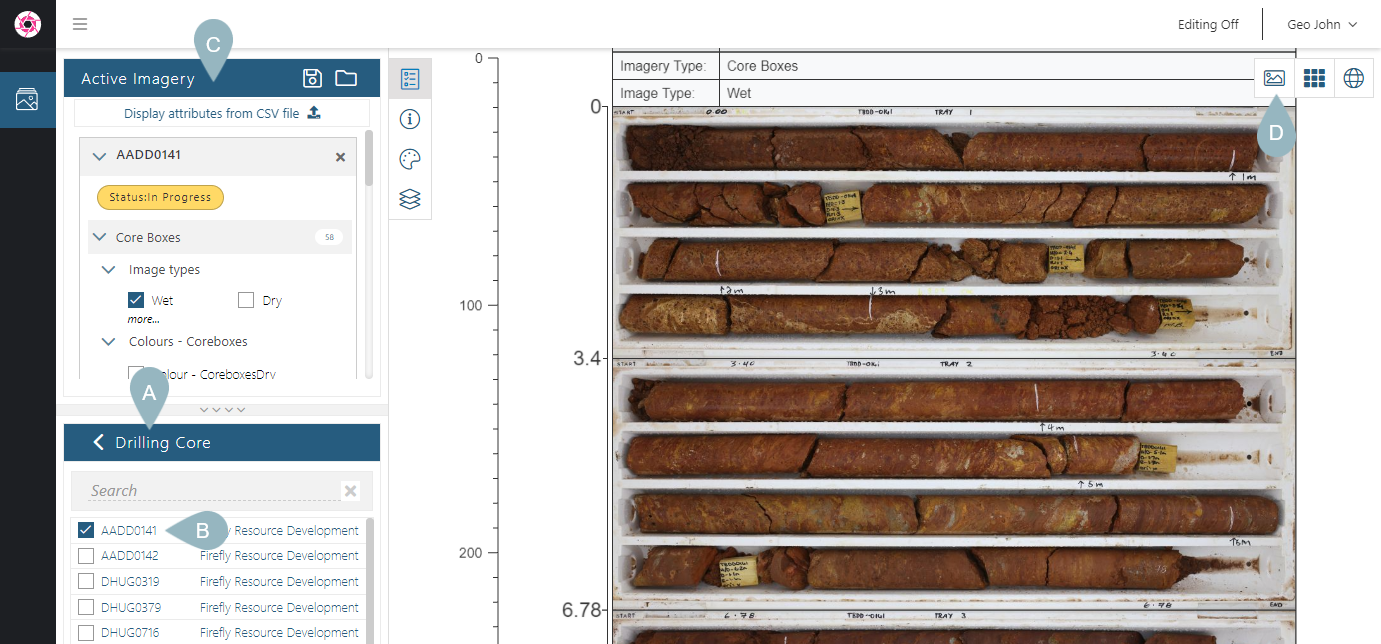
Clicking on the Drilling Core dataset shows the collections it contains (A), which in this case are individual drillholes, e.g. AADD0141 (B). Selecting one of the drillholes displays its information in the Active Imagery panel (C) and displays images on the light table (D):

Light Table, Gallery and Map Views

The right-hand side of the window has three options for displaying and working with images:

The Light Table () is the default view used when you open the Imago Portal. This is where you can display and edit images.

The Gallery () is for viewing entire collections and information about them in one go. Images can displayed in a grid or in a list. Viewing whole collections in the gallery is useful for identifying specific images or a depth range. When working with Editing On, using the gallery is useful for replacing, archiving or deleting images and for editing the names of multiple images.

The Map () is for viewing imagery that has been assigned coordinates. For example, sample images such as soil or outcrops collecting using Imago Mobile can be viewed on a map.

In the light table view, you can:

  • Zoom in and out using your mouse’s scroll wheel
  • Move images on the light table by clicking and dragging
  • Add more imagery to the light table by selecting from those available in the Active Imagery panel

The Datasets Browser

Together, the Active Imagery panel and the Workspace browser are referred to as the Datasets Browser. You can resize each panel to control what information you are displaying by dragging the resize control between the panels:

Clicking on the resize control will collapse one panel to display more information in the other panel.

The Imago demo site opens with a workspace and dataset selected showing a collection of drillholes. Clicking on the back arrow next to the current dataset name browses outward to show all the datasets in the current workspace. The demo site contains four datasets to help you explore the Imago Portal:

  • Blackfly Exploration
  • Firefly Resource Development
  • Grasshopper Mine Production
  • Sandbox

If you have an Imago Enterprise licence, you can create multiple workspaces and group them into workspace folders. That is the case for the Imago demo site, and by clicking on the Browse Workspaces title bar, you can view only the datasets in the selected workspace:

The Active Imagery Panel

When collections are being displayed, information about them is shown in the Active Imagery panel. For example, here the panel shows that imagery from two collections is being displayed. All information about collection AADD0142 is hidden, whereas for collection AADD0141 we can see the image types available for the Core Boxes imagery type.

When you have multiple collections active, they will be organised in the panel so that you can move between each collection and see what information is available about it:

Here the wet Core Boxes images for just one collection are displayed on the light table. In the Active Imagery panel, we can see the collection we are viewing (A), the type of imagery (B) and the image types (C). A yellow box around an image on the table (D) indicates that it is selected, which is important when working with Editing On.

Downhole imagery is also available for the collection, and we can display that alongside the Core Boxes imagery:

Here the wet core boxes imagery is displayed along with a feature (A). These features can be edited by switching to Editing On (B), and you can then see the different feature types displayed on the core boxes imagery (C).