
Project Explorer
The Project Explorer, found below the Oasis montaj menus, is the window into the data files contained within the currently open project.
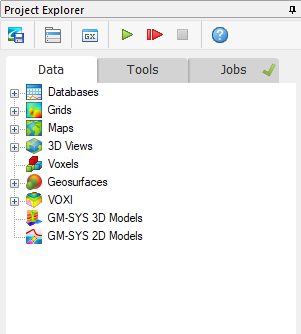
The data files that you have created or opened in this project will be visible in the Project Explorer and grouped by data type (e.g., databases, grids, maps, 3D views, voxels, geosurfaces):
You can open existing data files, create new files, and remove files from within the Project Explorer. You can also view the properties of most data files and access their metadata.
The Project Explorer window:
-
can be docked to the left side or to the right side of the project's workspace.
-
can be floating inside or outside the project's workspace.
-
can be "pinned" = open, or "unpinned" = displayed as a tab at the docking location.
-
cannot be closed.
Project Explorer Toolbar
In your Oasis montaj project, you are able to access quick commands and functions within the Project Explorer. The toolbar provides access to some commonly used tools, such as:
|
|
Save Project Use this command to save the changes made to the project. |
|
|
Use this command to load/unload a menu to/from the menu bar. |
|
|
Use this command to run a GX from the \gx directory. |
|
|
Use this command to run a script with multiple parameters. You can also access the script for editing. |
|
|
Record Script Use this command to record a script to a new script file. If the script file (*.gs) already exists, you will be prompted to overwrite or append to it. |
|
|
Stop Recording Use this command to end recording the script. |
Project Explorer Tabs
Data
The Data tab includes all the datasets opened or created in the current project.
Various tools to keep track of your project are available including the data description tool that enables you to add descriptive text to the data items listed in the Project Explorer. Enhanced metadata capabilities provide access to the properties of all data items displayed in the Project Explorer.
You can perform group actions like opening, removing, and creating multiple datasets by right-clicking the main folder items in the Project Explorer. Datasets can be removed from the project or even permanently deleted from the system along with all auxiliary files. (The action will also remove the dataset layer from any unpacked 2D or 3D documents in the current workspace.) You can also launch the Colour Tool from one or more selected grid and/or voxel items to modify the colour distribution for all of them at once.
Individual datasets can be renamed; this will also rename any auxiliary files at the same time. To access these features, mouse over the desired item(s) in the respective folder, and use the right-context menu options.
What options are available?
Click on the links below to see the tools available for some of the commonly used data types:


Tools
The Tools tab allows you to keep track of any Geostats/Geochemistry tools that may be used in your project, including the Histogram, Scatter Plot, Probability Plot, and the Triplot tools. You can show/hide the tools as needed, so that you can keep your project as streamlined as possible.
The Geostats/Geochemistry tools are available with a Geochemistry subscription of Oasis montaj.
Jobs
You can elect to run slow, computationally intensive or bulk/repetitive processes (like gridding multiple channels) asynchronously (i.e., in the background) so that you can continue to work on other processing and interpretive steps. The progress will be monitored, and when the process completes, the results of each of these processes are integrated back into the current workspace.
The Jobs tab contains a history list of all the jobs that were launched for the current project (listed sequentially from newest to oldest), their status and progress:
- Jobs that completed successfully: completion and success are indicated by a check mark icon
.
- Jobs that are still processing: progress is indicated by a spinner icon
.
- Jobs that failed: failure is indicated by an exclamation mark icon. Click on
to learn more about the captured/reported error.
- Jobs that have been canceled: an active job can be canceled by clicking the “Stop” icon next to the progress icon; cancellation is indicated by a cross-mark icon
.
For gridding jobs, the entries contain the database name appended to one of the following prefixes:
-
"Gridding" – the job was created from running the Grid Data tool
-
"Grid Multi” – the job was created from running Grid Multiple Channels
The Jobs tab header includes:
A visual indicator for the progress of a running job (e.g., a spinning wheel for a job in progress) or the status of a completed job (e.g., a check mark for a successfully completed operation).
A numeric indicator that shows the number of jobs being processed in the background; the number updates in real time as jobs are completed and added, and resets to no value once all the jobs have finished processing.
Each job entry has the information presented under a node in the tree. Newly added jobs are appended to the list in a collapsed state.
Clicking on the +/- icon expands /collapses the desired node:
The output files are listed under the job entry.
For gridding jobs, hovering over an entry produces a tooltip advising of the gridding method used followed by the full path and name of the input (database) file.
Hovering over a child node under a job entry will produce a tooltip containing the full path and name of the output file.
Double-clicking on a job entry or clicking the play button
located next to the job's status icon triggers a rerun of the job:
The parameters used at the time the job was created are retained when the GX is relaunched. You also have the option to adjust these parameters before starting the process again.
Re-running a job will add a new entry to the top of the list.
Any generated grids are loaded into the Project Explorer Data tab under Grids; however, they are not opened automatically into the current workspace (irrespective of the current advanced settings or the display setting in Grid Multiple Channels).
Closing the project (or the Oasis montaj instance) while the background process is in progress will display a confirmation prompt. If you choose to close the project and keep the OMS script window open, the process will execute to completion.
When you re-open the project:
- In the Jobs tab:
There will be no job status indicator for the job that completed after closing the project. Expanding the job node will show the output files.
The files generated before the project was closed will display a visual indicator for their status, for example, a check mark for a successfully generated grid.
- In the Data tab:
- The grids generated before the project was closed will be loaded to the Grids list.
Got a question? Visit the Seequent forums or Seequent support
© 2024 Seequent, The Bentley Subsurface Company
Privacy | Terms of Use